


Just uploaded the Mig gear doors to thingiverse however it takes 24 hours before it gets published.
-
-
the flaps are far too flimsy for my liking at this point. that could also be another reason why the plane is rolling one way or the other and requiring trim. So I am going to see if I can stiffen them or maybe make them out of a different material. I only have brakes wired to work at the moment but plan to tie them together...Originally posted by Quickstop View PostCheck me out on youtube at https://www.youtube.com/user/gooniac33
I am an RC addict and innovator that loves to share my knowledge with those that need help. Ask me anything via PM if you need help! Check out my Website here https://www.gooniac33.me/Comment
-
Posting for Tengarng as he's on vacation with limited internet access:Originally posted by Hawker_Hurricane View Post
"Hello Hawker_Hurricane,
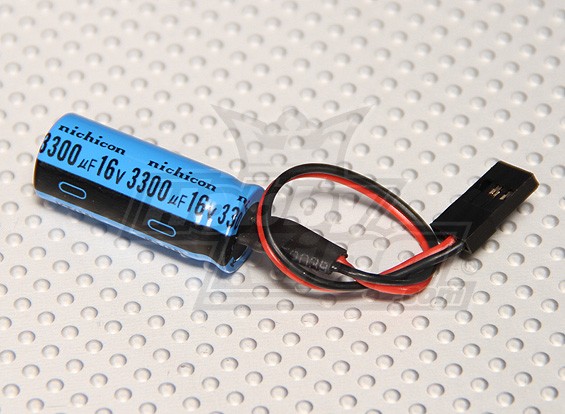
The idea is to have both ESC's operating at the same time in case the main bec of the esc overheats the external bec which is sourced by a 2s lipo pack which can be lightweight and small in capacity is used due to low voltage drop and therefore smaller heat dissipation which means less likely hood of failure.
You don't have to cut the red wire of the esc, which gives power to the integrated BEC, just leave everything as is
same time put the capacitor on a spare port of your RX, you can also use a Y harness to any other port that is already occupied as the capacitor has no real function to it except to stabilize the output voltages of the BEC's going against each other in case of significant voltage differences.
you can buy the capacitor here:
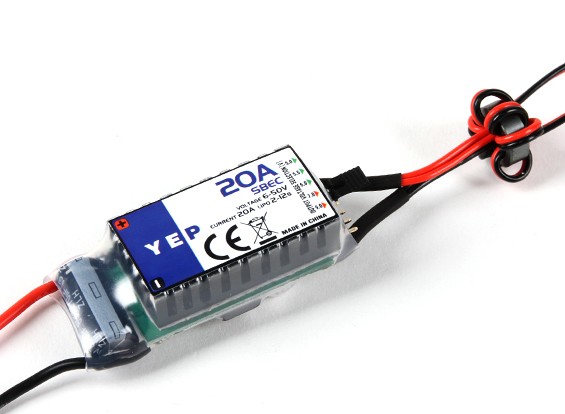
If you plan on using an aftermarket ESC, make sure to match the internal BEC and the external BEC to the same voltage output.
if you plan on using the stock ESC with 5.5V output then i recommend you get the external BEC from hobbyking
because it has a 5.5V select output which brings the voltage gap between both BEC's closer
You will be fine nevertheless with a cap on the spare port to balance any potential differences."
He also wanted to let you know that of you have any questions, you can call him; PM me for his number.Comment
-
RanGee, thank you very much!! This evening I packed my MIG into the truck for the EDF event I'm going to tomorrow, and bent the original foam skid in half just putting the jet into the truck~!! So I am printing the skid now, 1.5 hours from now I will have a plastic skid.Originally posted by RanGee View Post
Hopefully I'll have a few comments after flying tomorrow. My jet turned out fine, there was a significant amount of fiddling to get the controls adjusted, especially the inner gear doors, but everything is set. The flaps on mine won't close all the way, they're slightly warped, I guess this seems to be a thing. And one flap servo is slightly jumpy. But its really not a big deal and I think this jet is fan-tastic!.Marc flies FW & FL: AL37, MiG-29, T45,F4, A4, A10, F104 70 and 90, P38, Dauntless SBD, Corsair, B17, B24, B26 & P61, Lipp.P19, ME262, Komets, Vampire, SeaVixen, FMS Tigercat, FOX Glider & Radian XL.
Rabid Models foamies, including my 8' B17 & 9' B36... and my Mud Ducks! www.rabidmodels.comComment
-
You bet!Originally posted by themudduck View Post
I'm doing elevator servo covers now, will upload to thingiverse later tonight.
Comment
-
Thank you Rangee (tengarang) I hope everything is ok with tengarang, he has not been very active, but appreciate you letting me know hes on vacation. Strange why his avtar says banned.Originally posted by RanGee View Post
I hope that is not the case as he has been providing a lot of value in his posts to the HS community. I enjoy reading his posts and watching his videos.
the components tengarang suggested has been ordered, and will message you if I need to reach himComment
-
Two migs, two maidens today, three flights each. Both flew well and needed a bit of right trim and about 3mm up elevator. CG good with battery almost full forward. Lands best with full flaps and speedbrakes out.Comment
-
Congrats! Welcome to the Squawk G
Comment
-
-
-
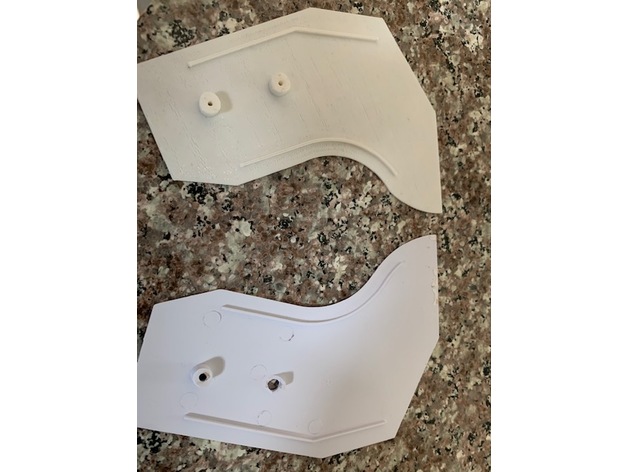
Elevator servo covers:
Main landing gear doors:
Both published now and ready to be downloaded
Comment
-
RanGee, that's cool, thanks! I printed and installed the tail skid, it fit perfectly and it's exactly what this plane needed. I flew three flights today. With the Admiral 5000 stuffed as far forward as possible, it still checked out tail heavy (a bit more than 1/4" further back than the manual's recommendation) but flew perfectly. When I flight-tested the balance (by flying inverted) it was not tail heavy. We're going to need to move the battery strap. It's not possible to secure the battery even with the strap all the way forward.
I found it somewhat difficult to land, because it floats like no one's business all the way down the runway in ground effect. I discovered that it lands well on the grass at the end of the runway! You definitely need to slow this one down on final - and I need to do more flight testing to see how slow it will fly! I was landing with half flaps with the speed brakes deployed.
I did need some up trim after takeoff. I found the elevator response to be normal but the aileron response was fairly soft - I have my controls set up with the control rods on the next-to-the-last hole so I think I may move the aileron control rods to the outer hole. And - its not extremely fast but flies really well. Stable and easy. I really liked it.Marc flies FW & FL: AL37, MiG-29, T45,F4, A4, A10, F104 70 and 90, P38, Dauntless SBD, Corsair, B17, B24, B26 & P61, Lipp.P19, ME262, Komets, Vampire, SeaVixen, FMS Tigercat, FOX Glider & Radian XL.
Rabid Models foamies, including my 8' B17 & 9' B36... and my Mud Ducks! www.rabidmodels.comComment
-
Some rivet detail...
Tolga
Instagram: @_t01ga_
YouTube: t01gaComment
-
Cool! I did some work on mine too...
Comment
-
That is literally awesome!!!Originally posted by Evan D View PostTolga
Instagram: @_t01ga_
YouTube: t01gaComment
-
Pitots on... they are a pain.
Comment
-
-
Thanks buddy. I am looking forward to your afterburner.Originally posted by RanGee View PostTolga
Instagram: @_t01ga_
YouTube: t01gaComment
-
Had a great day today at the field! Thank you Borntoolate for the awesome pictures!Comment
-
I was asked about the paint I used. Pictures worth a dozen words. This is my first time using this paint and I’m not sure I’d use it again. I bought it all at Wally. The one I went to didn’t have primer so I used the granite. Took about a can and a half. Then I did the chrome. It turned out perfect, looks like aluminum. Then the Apple Red... notes... the foam on this is soft and dents easy, it’s not a FreeWing. The original paint peels off really easy. I’ve complained about FreeWing paint before but won’t again after this.
The paint is fair, it covers well and dries reasonably quick to the touch, about a half hour. I let it dry a day in my attic workshop between each color and the clear coat... says 48 hours but I gave it 24.
Wally has a no name paint that would probably be better and Model Master is definitely better (though expensive)...
Use very low tac tape.Comment


Comment