


Synergy 516 Review
Intro Video
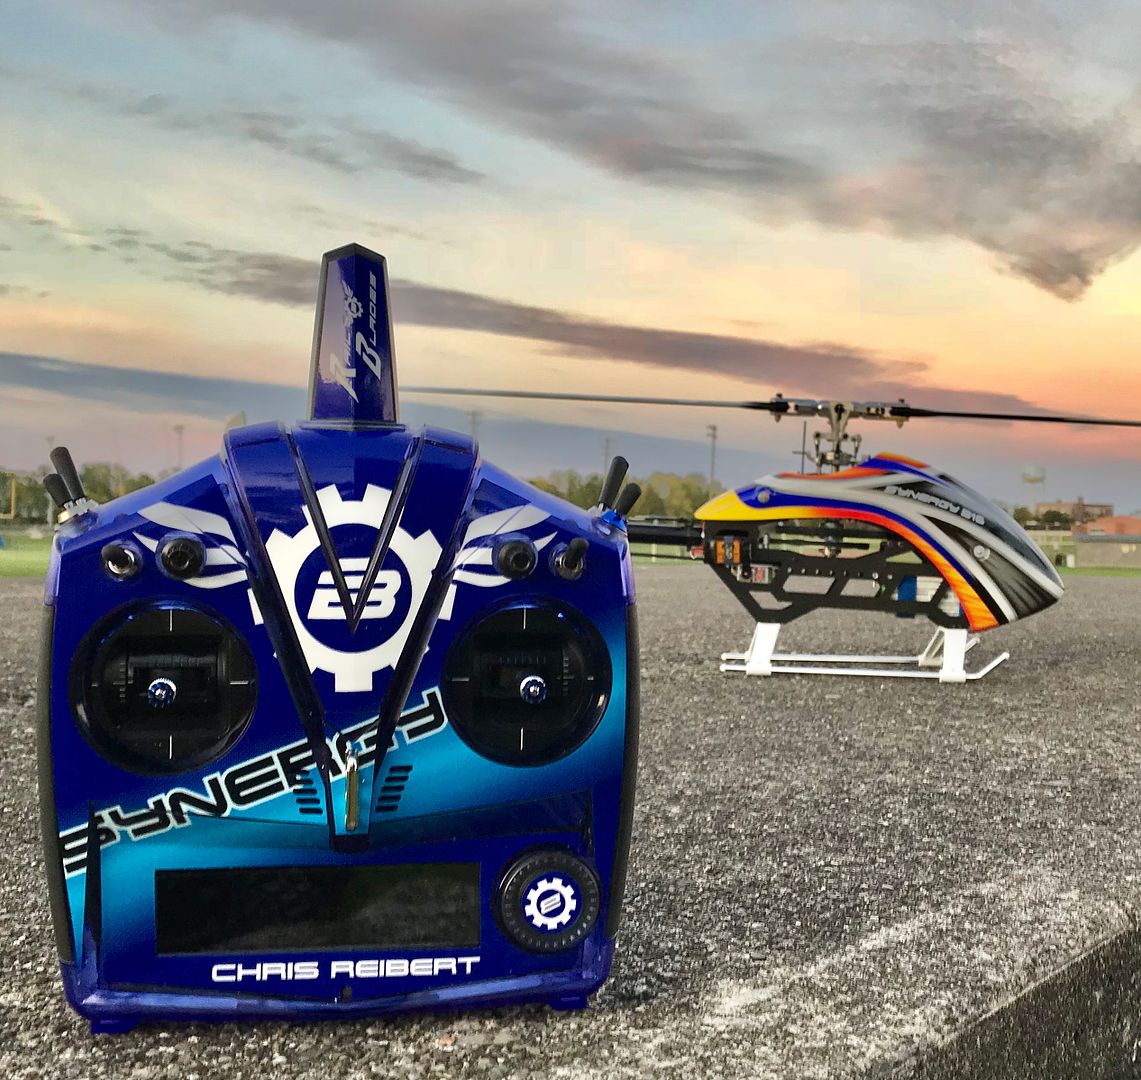
My Synergy 516 Specs:
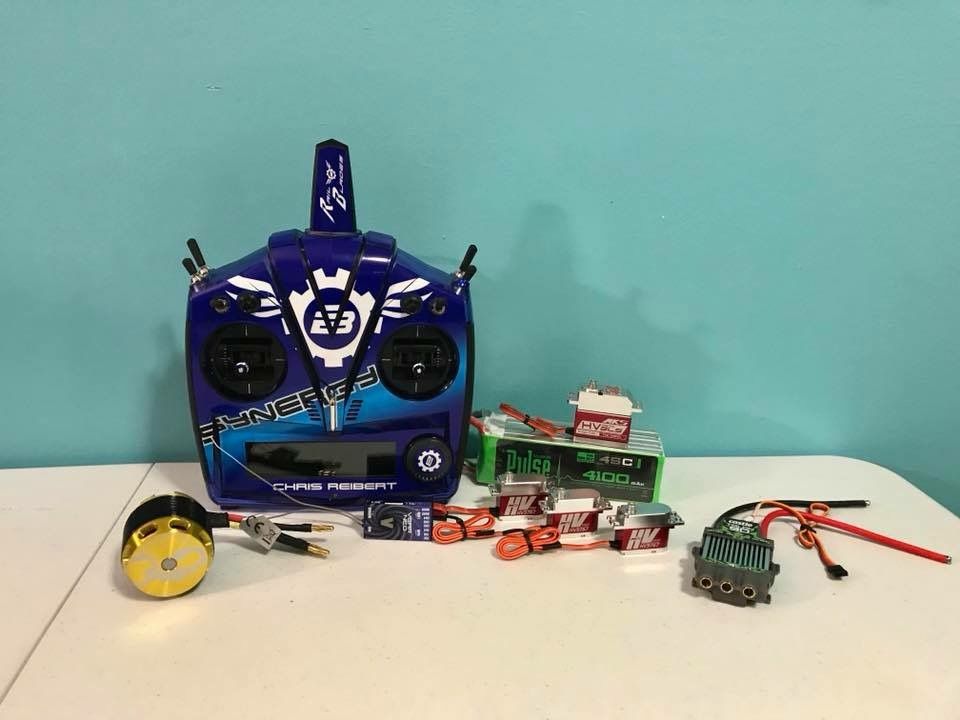
Motor: Scorpion 4020-1350KV
ESC: Castle Talon 90
BEC/RX Pack: Internal BEC
Servos: MKS HV9767 / MKS BLS980
FBL System: Mikado VBar NEO
Gov: Castle Gov
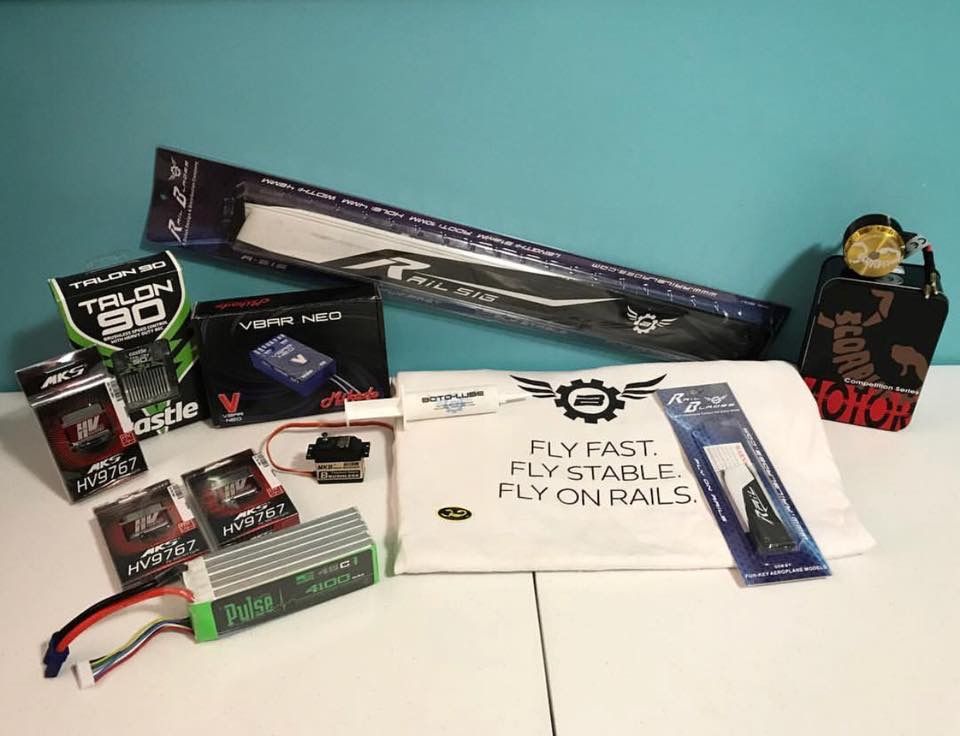
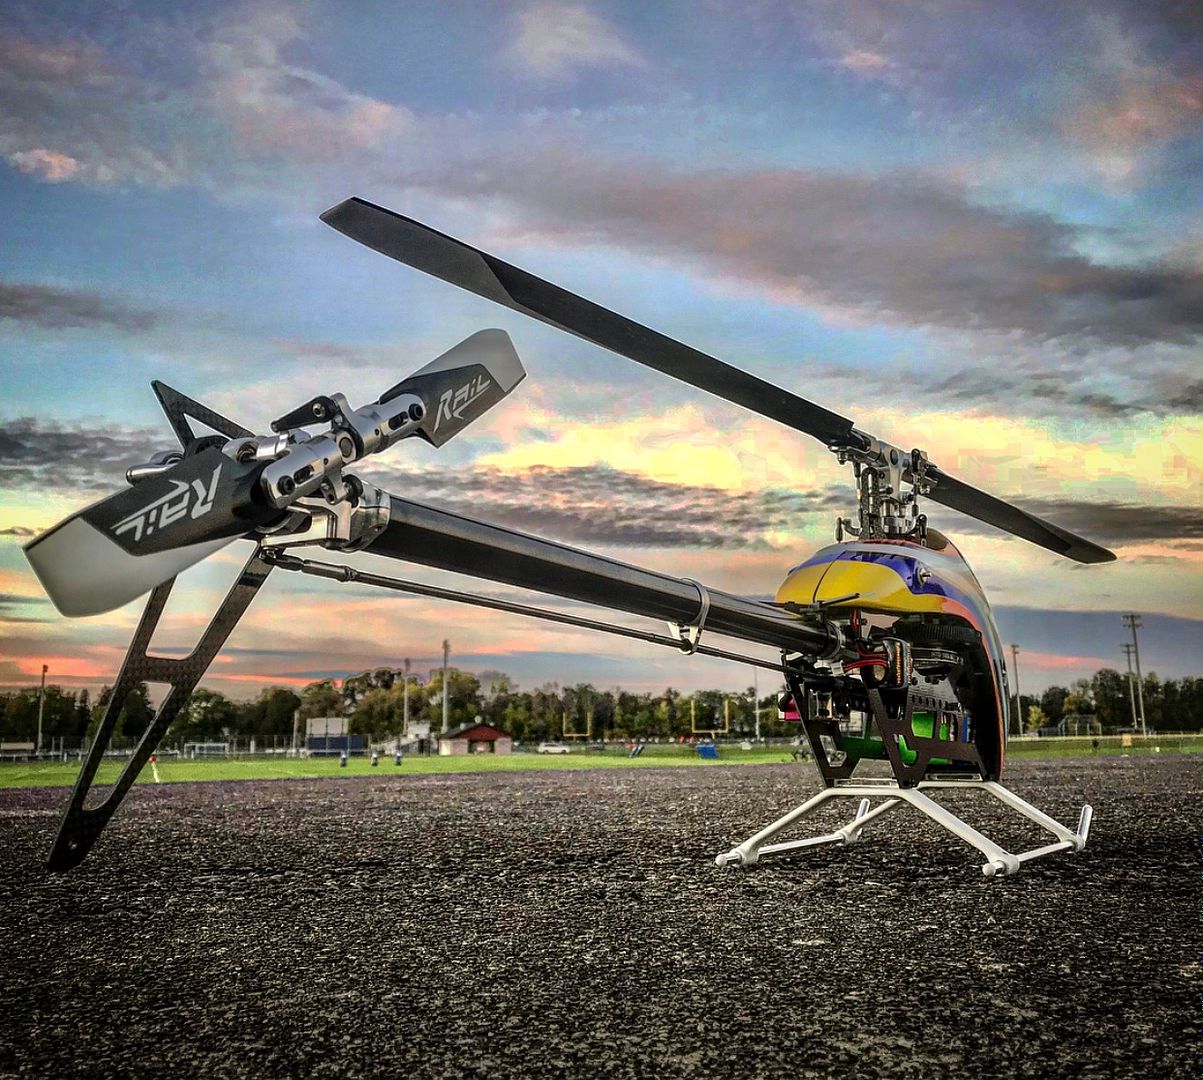
Rotor Blades: Rail 516mm
Tail Blades: Rail 80.6mm
Batteries: Pulse 6s 4100mAh
Gearing: 18T
Headspeeds: 2300, 2500, 2700
If you are in the helicopter hobby and hear the name Synergy or Botos you automatically think homegrown USA. Matt Botos owner and designer at Synergy Helicopters doesn't let anything hit the market until he has put countless hours into testing. His Synergy models are simple, sleek and cater to any pilot out there. Matt has had a very successful line of helicopters from 550-800 class machines. Even if you are just starting out in the hobby and want something reliable that won’t break the bank Synergy has a model for you.
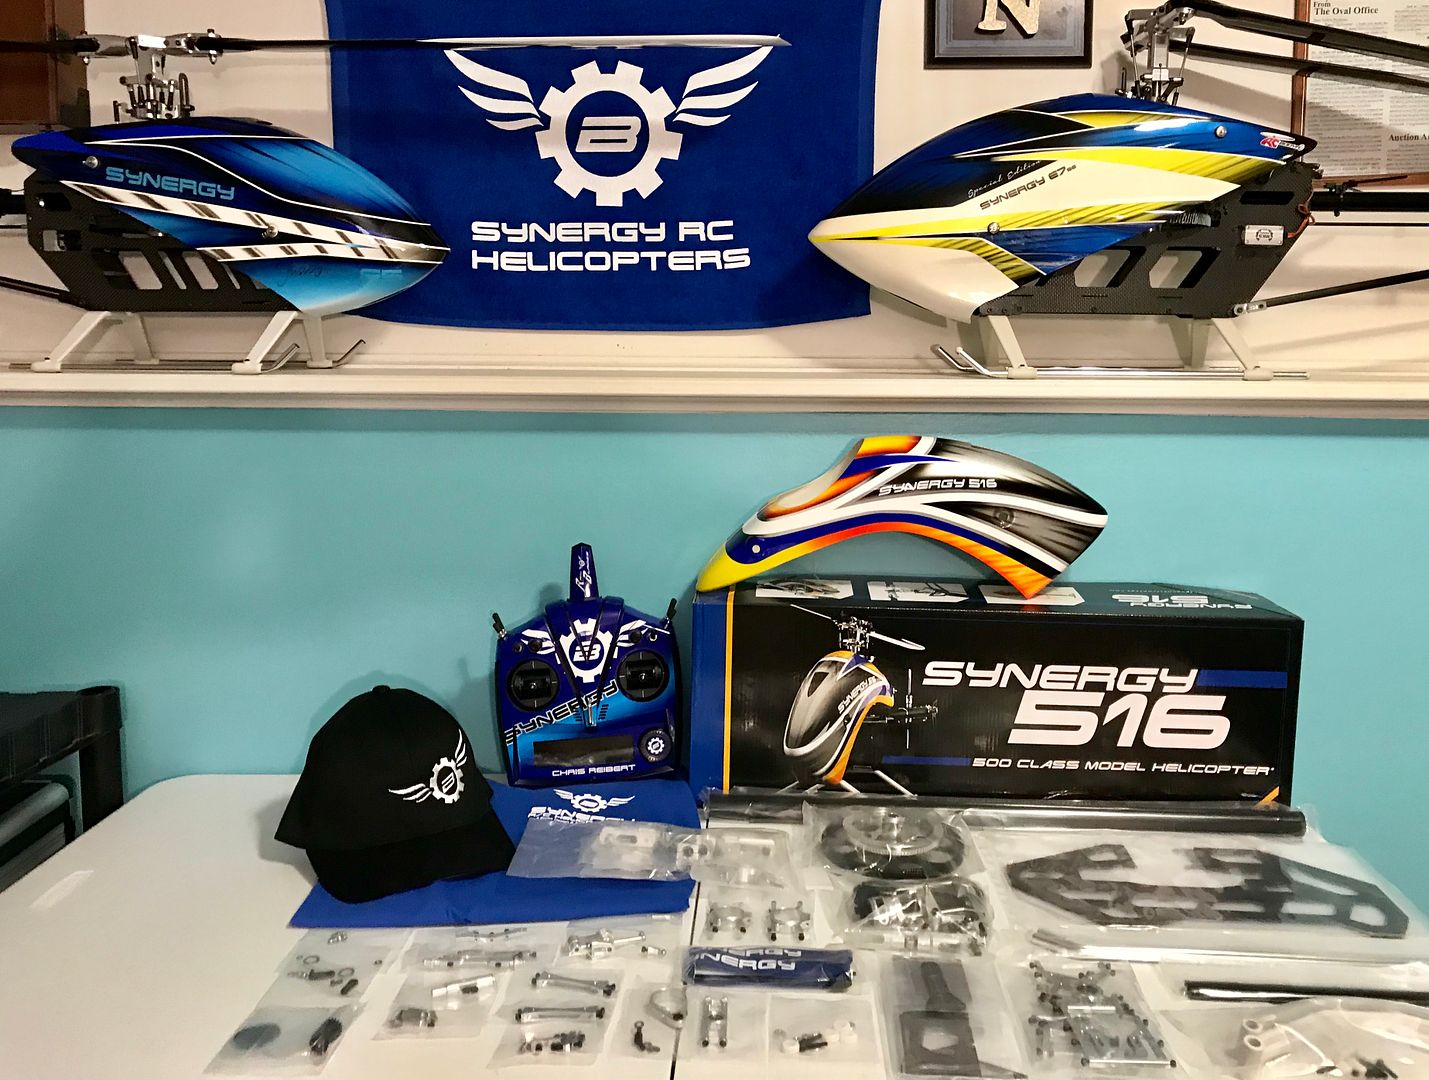
OPENING THE BOX
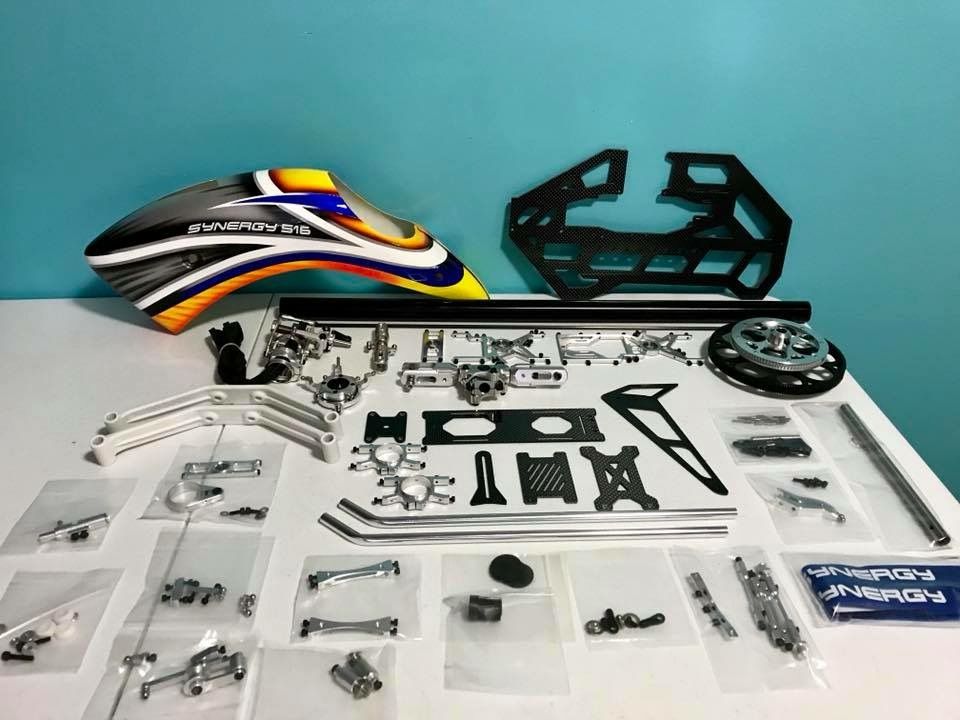
When you open the box you will find the 2mm carbon fiber frame halves on top of the big box. On the side of the boxes you will find the skids, boom, and battery rails. Inside the big box is the beautiful new style Synergy 516 canopy with custom paint job design by Rob Cherry himself. The small box contains all the other assemblies to complete the model. The 516 comes as an airframe only so you will need to buy the rotor blades and blade holder separately. With all the parts laid out it was time to start the build. The manual is in digital form and can be downloaded from Matt’s website. It is a very high detailed colored manual with diagrams and descriptions easily understood by even the newest of heli builders.
Unboxing Video
THE BUILD
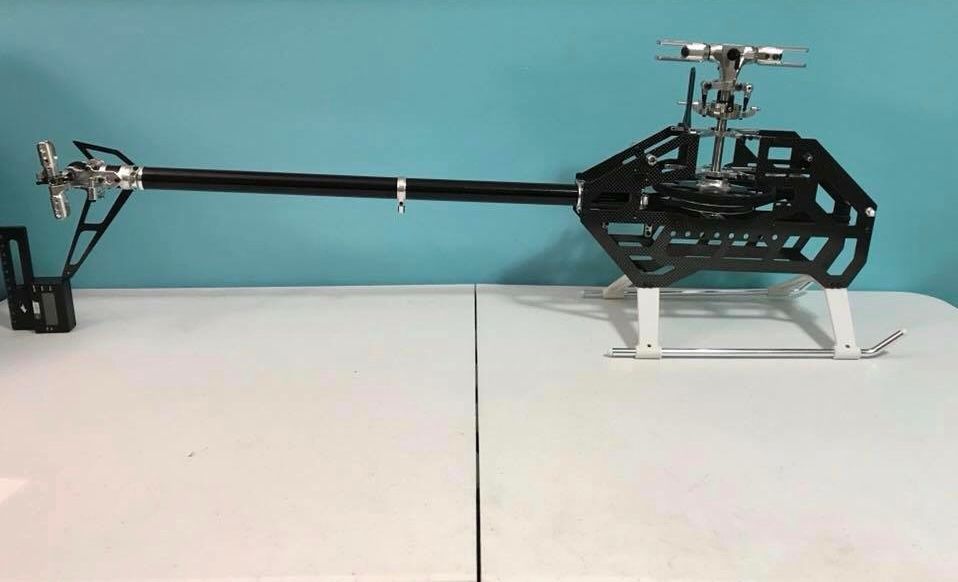
The build begins by assembling the 516’s main frame. The frame is made up of 2mm carbon fiber single stack side frame which sandwich main bearing blocks, frame stand offs, battery tray, electronic trays and boom clamps. The 516 integrates the motor mount into the top bearing block. The 516 has has a belt tensionor assembly that installs into the left side of the frame. Pay close attention to the build manual as the left and right frame halves are different. The 516 also has a sliding locking battery tray system which is great for quick pack changes. The frame has number of holes in the side for multiple battery locking positions so the pilot can use their favorite size packs to maintain perfect CG. After verifying the frame was straight on my marble table using the mainshaft I applied loctite to all the frame screws and installed the canopy pins and keychain mounts. The 516 uses a skid and pipe landing skid design similar to what’s found on the 766 just sized down for the 516. Before inserting the mainshaft, main gear assembly and belt I completely removed all screws in the gear assembly and used red loctite and lube everywhere required. I’ve been using Botos Lube on all my helis for the past few years. The delrin main gear is cut in a helical design for quiet and efficient power performance.

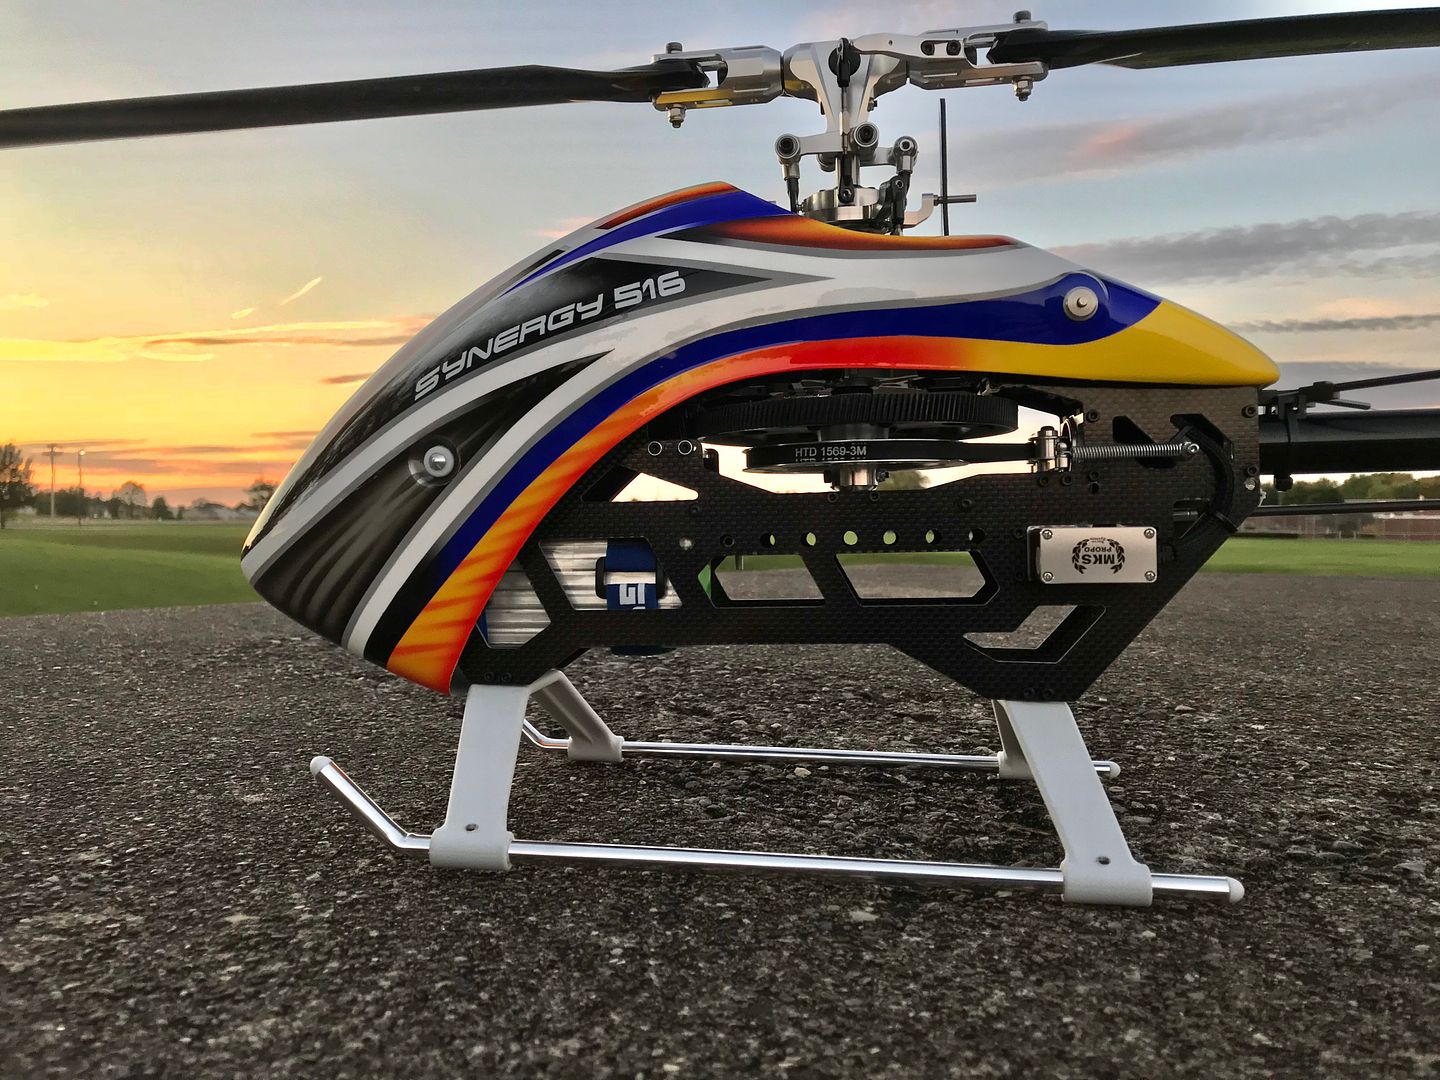
With the main shaft, gear assembly and belt in place I fished the belt down the boom and lightly locked the boom into the blocks. The 24mm boom is off the 766 and is cut down to work with the 516. Because of its robust size there is no need for boom supports giving the 516 a slick clean look. After disassembling the tail case I reassembled per the manual using loctite and lube where required. Make sure you do the 90 degree twist on the tail belt in the proper counter clockwise direction. The tail case is very well designed and has a built in tail belt guide tensionor. Make sure the tensionor guide is not tight and can move freely. The tail case has a lip around the inside so be sure to seat the tail case all the way onto the boom.
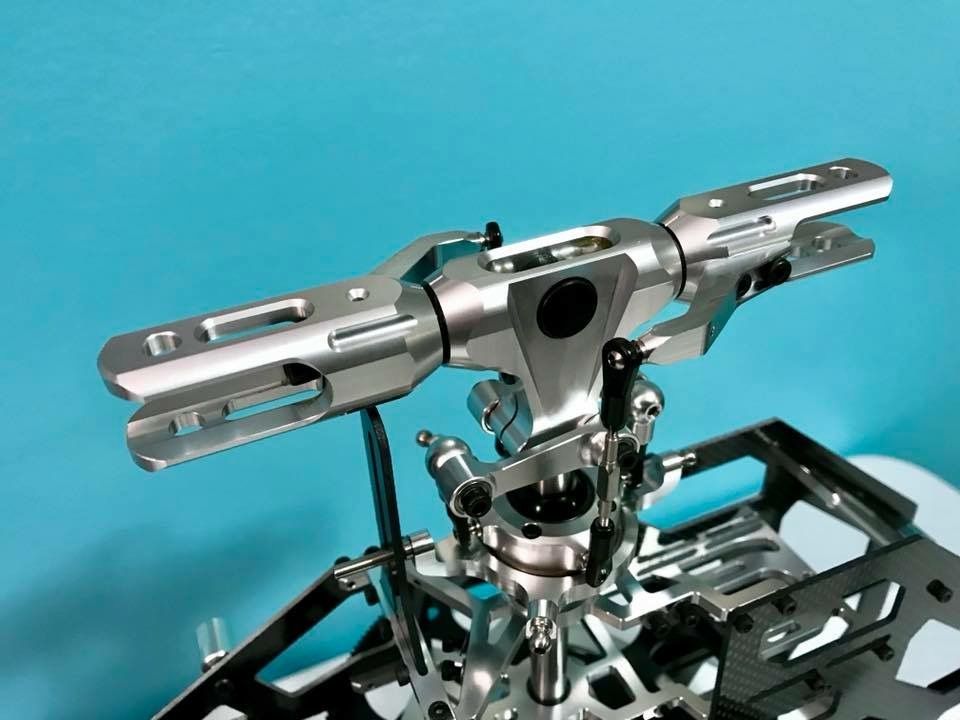
Next I moved onto the flybarless rotor head assembly. The 516 uses a standard flybarless rotor head design as seen on their other models. The extra wide head block is designed to give the 516 quick cyclic response and high stability capable of 2800+ high head speeds. It looks amazing and incorporates the pivot design inside the head block. Matt has put notches in the center of the blade grips and head to give you a visual zero pitch mark when doing setup. Once I had the swash and head loctite assembled and lubricated I installed them onto the main shaft.
I assembled the five links per the manual and popped them all onto the swash balls. The links are a turn buckle design making field adjustments fast and easy. Lastly I assembled the tail push rod and slid it into the guide. After checking everything over the airframe assembly was complete. With all my builds I have the electronics all soldered up and servos centered in the FBL system before I begin my builds. This makes the next step of the build go much quicker. With that said let’s move onto the electronics.
ELECTROINCS INSTALLATION
For my 516 build I chose to use the MKS HV9767 high voltage servos on cyclic and a MKS HBL980 for tail control. After installing the servos I routed my wires up towards the back of the frame and secured them using servo wire loom and small black zip ties. I installed the Scorpion 4020-1350kv and stock 18T pinion onto the motor mount and secured it into place leaving a little pinion backlash. You don’t want it so tight to stress the motor but if it’s too loose it could slip and strip the helical main gear. I mounted the Castle Talon 90 up on the front electronics tray. This location is perfect on the 516 as the wires from the motor can can run under the ESC tray and plug directly into the ESC with jumper wires. I mounted the NEO flybarless unit on the rear electronics tray with the wires facing front and used the top gyro to secure my bundle of excess servo wires. For a 500 class model the 516 is very spacious when mounting the models electronics and wires. With the electronics installed I bolted on the RAIL 516mm mains and 80.6mm tails before entering NEO setup. Setup with the Mikado Vbar Control radio and NEO flybarless system was extremely fast and EASY. When you are setting up a new “Other 500” model in the NEO wizard it automatically puts basic presets in the NEO leaving the builder just a few quick setup steps before getting your model into the air! On all my helis I leave the stock NEO settings except for increasing all my head rates to 120. I also leave the head and tail optimizer on for the first few flights. With the 516 built and setup she was ready for the honorary driveway test hover. I highly recommend if you are new to helis to always do your first hover over some sort of smooth surface. This way is something is setup backwards or wrong it won’t tip over in the grass and eat itself up.
Build Video
IN THE AIR
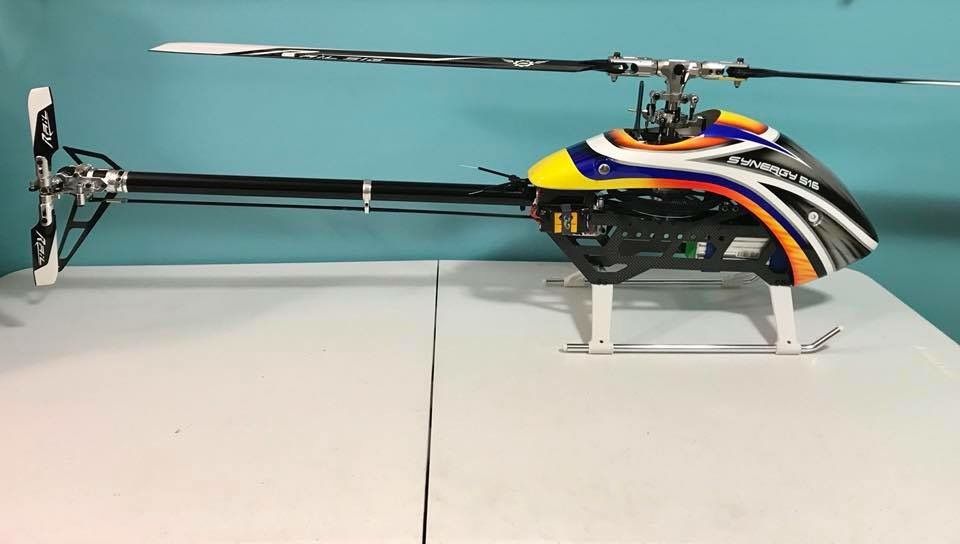
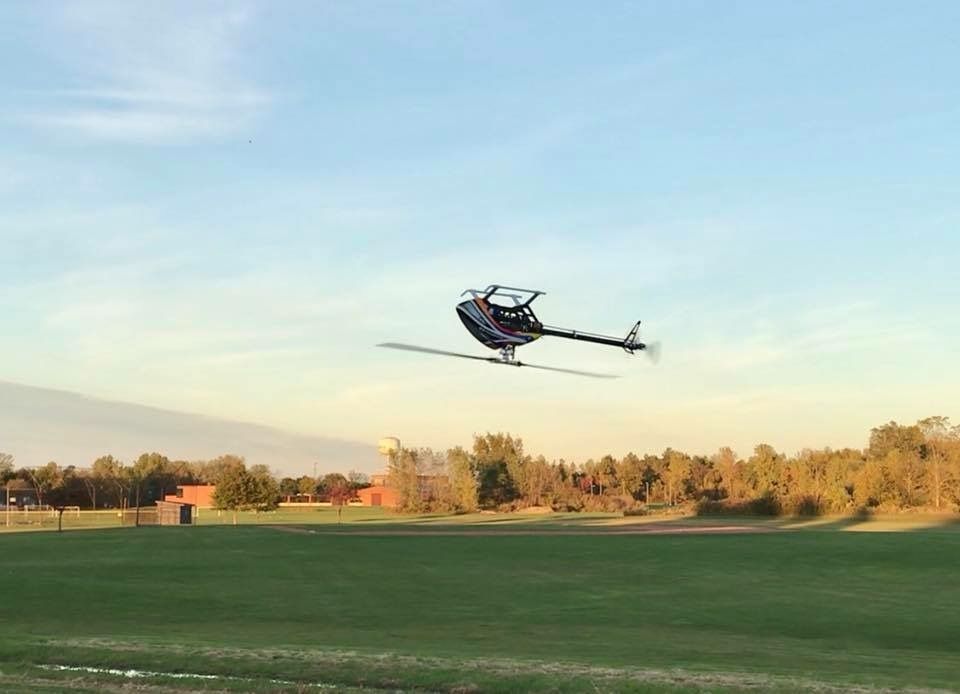
Flipping out of throttle hold the little 516 hopped right up into its first hover. Blade tracking was spot on and the heli just sat there waiting on my inputs. Fighting the sunset I rang up my Dad to see if he could meet me at the local school yard for a quick maiden flight before dusk. Knowing she hovered perfect 20mins prior in my driveway I spooled the 516 up in bank 1 and went right it a soft 3D routine. The 516 tracked perfectly through the corners with crisp collective and cyclic response. Flips and rolls were smooth and stable with no noticeable wobbles at all head speeds. The bright multicolored canopy was extremely easy to see in all orientations.
Maiden Flight
Running the stock pinion I have my Castle Talon 90 running head speeds at 2300, 2500, 2700rpm. I fly my 516 with Pulse Ultra 4100 mAh 45C to keep the weight down for harder 3D flight. If you want to just have fun and sport fly you can sacrifice weight performance but gain minutes of flight time by using 4500mAh packs. My recommendation is lean towards the 4400 packs if you plan on flying aggressively. You could even get more flight time if you optimize your power system to run at lower head speeds.
For sport flying the 516 really flies well at 2300 with zero bobble and really extends your flight time by minutes. I tend to fly in Bank 2 at 2500 because it gives me a decent time and still gives me plenty of performance to fly 3D. If I want to really show off the 516's abilities I can crank her up to 2700 in Bank 3 for extreme fast forward flying and hard 3D. Some guys are even going as high as 2800rpm.
The battery easily fit on the included slide out locking battery tray. If you only have one battery tray swapping out flight packs is as easy as un-strapping the Velcro strap and throwing another pack on. I highly recommend buying a few extra battery trays and straps though. It makes swapping batteries between flights a breeze.
THE LAST WORD
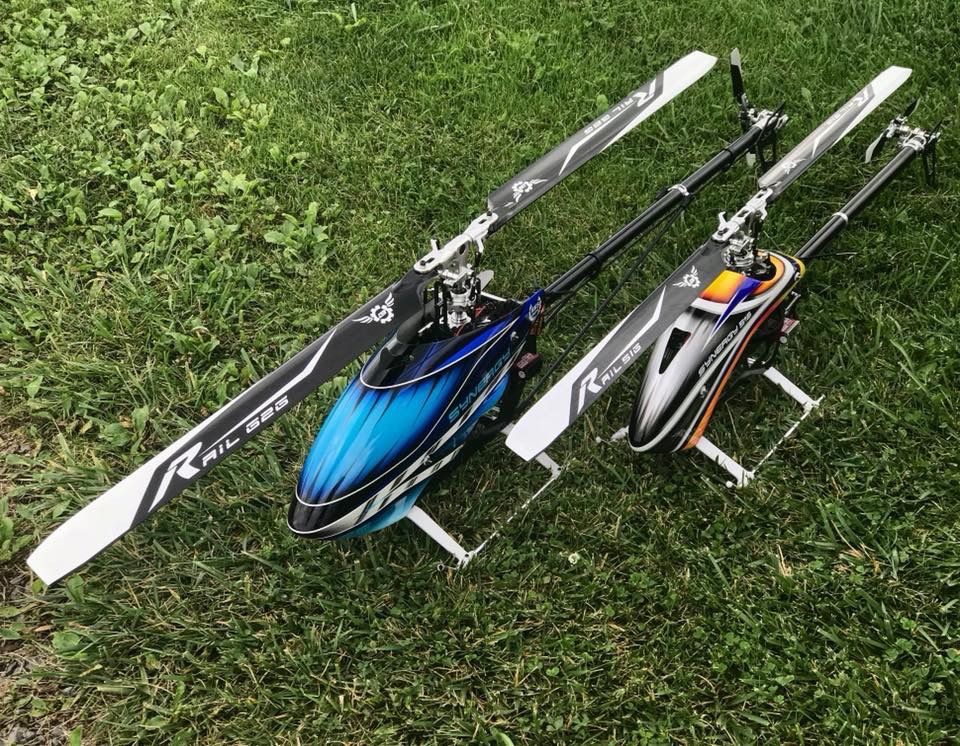
I still to this day a firm believer that a mid size helicopter with 500-550mm main blades is the best choice for a beginner to step into up to a “bigger size” helicopter (just my personal opinion). The 516 will definitely become a great companion next to my trusty Synergy E5. For $520 this helicopter kit comes as upgraded as it gets with a full metal head, metal tail and fiber carbon parts. Even though it's a small 500 Matt still gave it all the great things it's bigger Synergy models have. Overall the new Synergy 516 is an extremely fun and 3D helicopter. It has very good power to weight ratio and also a lighter disc loading than most mid class models on the market. This makes it very agile but also capable of handling a variety of different pack sizes. The 516 proves it has the stability of larger helicopters, while maintaining portability and economical operation of a smaller helicopter. The kit was well packaged, the manual was very well thought out and easy to follow.
The 516 is everything I expected it would be for a Synergy model helicopter. This helicopter can satisfy all the needs for a model in the midsize class. From the ability to fly smooth for 6 minutes or to fly hard and fast in the same model is nice. Amazing performance and a stunning appearance will certainly keep it at the top of its class for a long time!


For more pictures and video you can see them on my helicopter Facebook page "3D and Scale R/C Helicopters".
See you guys at the field
-Chris
Intro Video

My Synergy 516 Specs:
Motor: Scorpion 4020-1350KV
ESC: Castle Talon 90
BEC/RX Pack: Internal BEC
Servos: MKS HV9767 / MKS BLS980
FBL System: Mikado VBar NEO
Gov: Castle Gov
Rotor Blades: Rail 516mm
Tail Blades: Rail 80.6mm
Batteries: Pulse 6s 4100mAh
Gearing: 18T
Headspeeds: 2300, 2500, 2700
If you are in the helicopter hobby and hear the name Synergy or Botos you automatically think homegrown USA. Matt Botos owner and designer at Synergy Helicopters doesn't let anything hit the market until he has put countless hours into testing. His Synergy models are simple, sleek and cater to any pilot out there. Matt has had a very successful line of helicopters from 550-800 class machines. Even if you are just starting out in the hobby and want something reliable that won’t break the bank Synergy has a model for you.
OPENING THE BOX
When you open the box you will find the 2mm carbon fiber frame halves on top of the big box. On the side of the boxes you will find the skids, boom, and battery rails. Inside the big box is the beautiful new style Synergy 516 canopy with custom paint job design by Rob Cherry himself. The small box contains all the other assemblies to complete the model. The 516 comes as an airframe only so you will need to buy the rotor blades and blade holder separately. With all the parts laid out it was time to start the build. The manual is in digital form and can be downloaded from Matt’s website. It is a very high detailed colored manual with diagrams and descriptions easily understood by even the newest of heli builders.
Unboxing Video
THE BUILD
The build begins by assembling the 516’s main frame. The frame is made up of 2mm carbon fiber single stack side frame which sandwich main bearing blocks, frame stand offs, battery tray, electronic trays and boom clamps. The 516 integrates the motor mount into the top bearing block. The 516 has has a belt tensionor assembly that installs into the left side of the frame. Pay close attention to the build manual as the left and right frame halves are different. The 516 also has a sliding locking battery tray system which is great for quick pack changes. The frame has number of holes in the side for multiple battery locking positions so the pilot can use their favorite size packs to maintain perfect CG. After verifying the frame was straight on my marble table using the mainshaft I applied loctite to all the frame screws and installed the canopy pins and keychain mounts. The 516 uses a skid and pipe landing skid design similar to what’s found on the 766 just sized down for the 516. Before inserting the mainshaft, main gear assembly and belt I completely removed all screws in the gear assembly and used red loctite and lube everywhere required. I’ve been using Botos Lube on all my helis for the past few years. The delrin main gear is cut in a helical design for quiet and efficient power performance.
With the main shaft, gear assembly and belt in place I fished the belt down the boom and lightly locked the boom into the blocks. The 24mm boom is off the 766 and is cut down to work with the 516. Because of its robust size there is no need for boom supports giving the 516 a slick clean look. After disassembling the tail case I reassembled per the manual using loctite and lube where required. Make sure you do the 90 degree twist on the tail belt in the proper counter clockwise direction. The tail case is very well designed and has a built in tail belt guide tensionor. Make sure the tensionor guide is not tight and can move freely. The tail case has a lip around the inside so be sure to seat the tail case all the way onto the boom.
Next I moved onto the flybarless rotor head assembly. The 516 uses a standard flybarless rotor head design as seen on their other models. The extra wide head block is designed to give the 516 quick cyclic response and high stability capable of 2800+ high head speeds. It looks amazing and incorporates the pivot design inside the head block. Matt has put notches in the center of the blade grips and head to give you a visual zero pitch mark when doing setup. Once I had the swash and head loctite assembled and lubricated I installed them onto the main shaft.
I assembled the five links per the manual and popped them all onto the swash balls. The links are a turn buckle design making field adjustments fast and easy. Lastly I assembled the tail push rod and slid it into the guide. After checking everything over the airframe assembly was complete. With all my builds I have the electronics all soldered up and servos centered in the FBL system before I begin my builds. This makes the next step of the build go much quicker. With that said let’s move onto the electronics.
ELECTROINCS INSTALLATION
For my 516 build I chose to use the MKS HV9767 high voltage servos on cyclic and a MKS HBL980 for tail control. After installing the servos I routed my wires up towards the back of the frame and secured them using servo wire loom and small black zip ties. I installed the Scorpion 4020-1350kv and stock 18T pinion onto the motor mount and secured it into place leaving a little pinion backlash. You don’t want it so tight to stress the motor but if it’s too loose it could slip and strip the helical main gear. I mounted the Castle Talon 90 up on the front electronics tray. This location is perfect on the 516 as the wires from the motor can can run under the ESC tray and plug directly into the ESC with jumper wires. I mounted the NEO flybarless unit on the rear electronics tray with the wires facing front and used the top gyro to secure my bundle of excess servo wires. For a 500 class model the 516 is very spacious when mounting the models electronics and wires. With the electronics installed I bolted on the RAIL 516mm mains and 80.6mm tails before entering NEO setup. Setup with the Mikado Vbar Control radio and NEO flybarless system was extremely fast and EASY. When you are setting up a new “Other 500” model in the NEO wizard it automatically puts basic presets in the NEO leaving the builder just a few quick setup steps before getting your model into the air! On all my helis I leave the stock NEO settings except for increasing all my head rates to 120. I also leave the head and tail optimizer on for the first few flights. With the 516 built and setup she was ready for the honorary driveway test hover. I highly recommend if you are new to helis to always do your first hover over some sort of smooth surface. This way is something is setup backwards or wrong it won’t tip over in the grass and eat itself up.
Build Video
IN THE AIR
Flipping out of throttle hold the little 516 hopped right up into its first hover. Blade tracking was spot on and the heli just sat there waiting on my inputs. Fighting the sunset I rang up my Dad to see if he could meet me at the local school yard for a quick maiden flight before dusk. Knowing she hovered perfect 20mins prior in my driveway I spooled the 516 up in bank 1 and went right it a soft 3D routine. The 516 tracked perfectly through the corners with crisp collective and cyclic response. Flips and rolls were smooth and stable with no noticeable wobbles at all head speeds. The bright multicolored canopy was extremely easy to see in all orientations.
Maiden Flight
Running the stock pinion I have my Castle Talon 90 running head speeds at 2300, 2500, 2700rpm. I fly my 516 with Pulse Ultra 4100 mAh 45C to keep the weight down for harder 3D flight. If you want to just have fun and sport fly you can sacrifice weight performance but gain minutes of flight time by using 4500mAh packs. My recommendation is lean towards the 4400 packs if you plan on flying aggressively. You could even get more flight time if you optimize your power system to run at lower head speeds.
For sport flying the 516 really flies well at 2300 with zero bobble and really extends your flight time by minutes. I tend to fly in Bank 2 at 2500 because it gives me a decent time and still gives me plenty of performance to fly 3D. If I want to really show off the 516's abilities I can crank her up to 2700 in Bank 3 for extreme fast forward flying and hard 3D. Some guys are even going as high as 2800rpm.
The battery easily fit on the included slide out locking battery tray. If you only have one battery tray swapping out flight packs is as easy as un-strapping the Velcro strap and throwing another pack on. I highly recommend buying a few extra battery trays and straps though. It makes swapping batteries between flights a breeze.
THE LAST WORD
I still to this day a firm believer that a mid size helicopter with 500-550mm main blades is the best choice for a beginner to step into up to a “bigger size” helicopter (just my personal opinion). The 516 will definitely become a great companion next to my trusty Synergy E5. For $520 this helicopter kit comes as upgraded as it gets with a full metal head, metal tail and fiber carbon parts. Even though it's a small 500 Matt still gave it all the great things it's bigger Synergy models have. Overall the new Synergy 516 is an extremely fun and 3D helicopter. It has very good power to weight ratio and also a lighter disc loading than most mid class models on the market. This makes it very agile but also capable of handling a variety of different pack sizes. The 516 proves it has the stability of larger helicopters, while maintaining portability and economical operation of a smaller helicopter. The kit was well packaged, the manual was very well thought out and easy to follow.
The 516 is everything I expected it would be for a Synergy model helicopter. This helicopter can satisfy all the needs for a model in the midsize class. From the ability to fly smooth for 6 minutes or to fly hard and fast in the same model is nice. Amazing performance and a stunning appearance will certainly keep it at the top of its class for a long time!
For more pictures and video you can see them on my helicopter Facebook page "3D and Scale R/C Helicopters".
See you guys at the field
-Chris