You must Sign-in or Register to post messages in the Hobby Squawk community
Registration is FREE and only takes a few moments

Register now

Announcement

Collapse
No announcement yet.

Official Discussion Thread: Bancroft 1/150 scale "Scharnhorst" - RTR (Ready to Run)

Collapse
X
Collapse
First Prev Next Last
 
  • Filter
  • Time
  • Show
Clear All
new posts

  • Official Discussion Thread: Bancroft 1/150 scale "Scharnhorst" - RTR (Ready to Run)

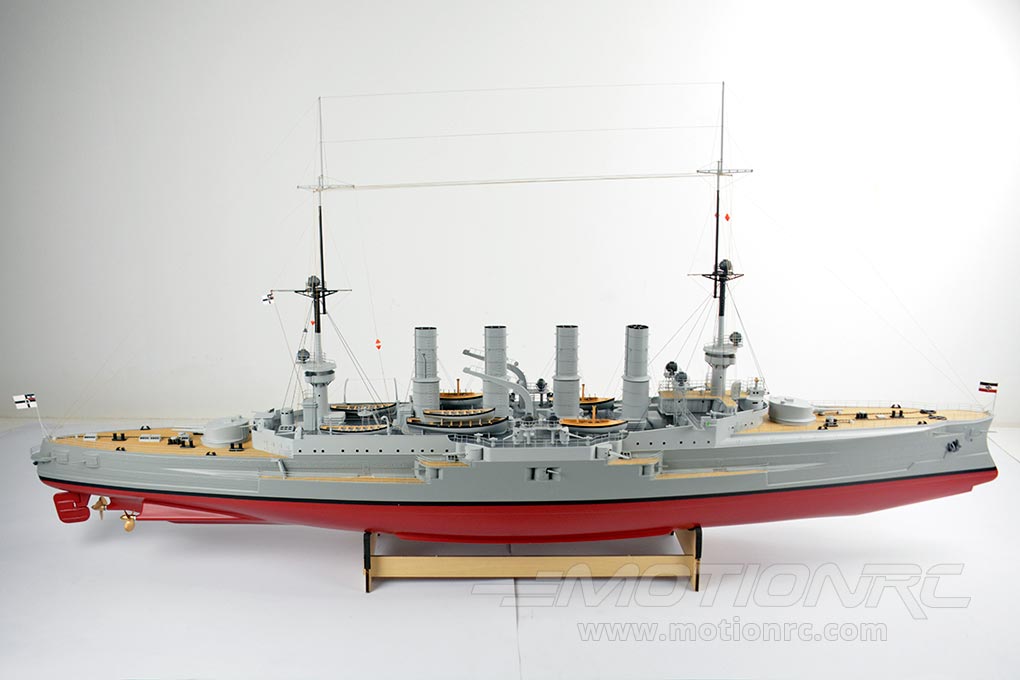
    Scharnhorst 1/150 Scale 1475mm (58") Battleship
    Click image for larger version  Name:	mastera.jpg Views:	0 Size:	73.3 KB ID:	252791


    Battleship? Battlecruiser? Heavy Cruiser? Yes to All!

    First laid down in 1935, the Scharnhorst class was the last traditional class of armored cruisers built by the Kaiserliche Marine. The class comprised two ships, Scharnhorst and Gneisenau. Both vessels worked together in actions which included the sinking of the British aircraft carrier HMS Glorious, during which Scharnhorst scored one of the longest recorded hits in naval history at ~16 miles range.

    Bancroft’s Elite Series of warships continues with the 1/150 scale Scharnhorst. Display this museum piece on your mantle or astonish your RC boat club with this functional RTR (Ready to Run) RC battleship. Over 400 total parts and 100 man-hours of work are already completed for you. Delivered Ready to Run (RTR), the vessel can be sailing within minutes of arrival, using the included 2.4Ghz radio transmitter and 2s Li-Ion battery. Only four AA batteries and minimal final assembly is required.
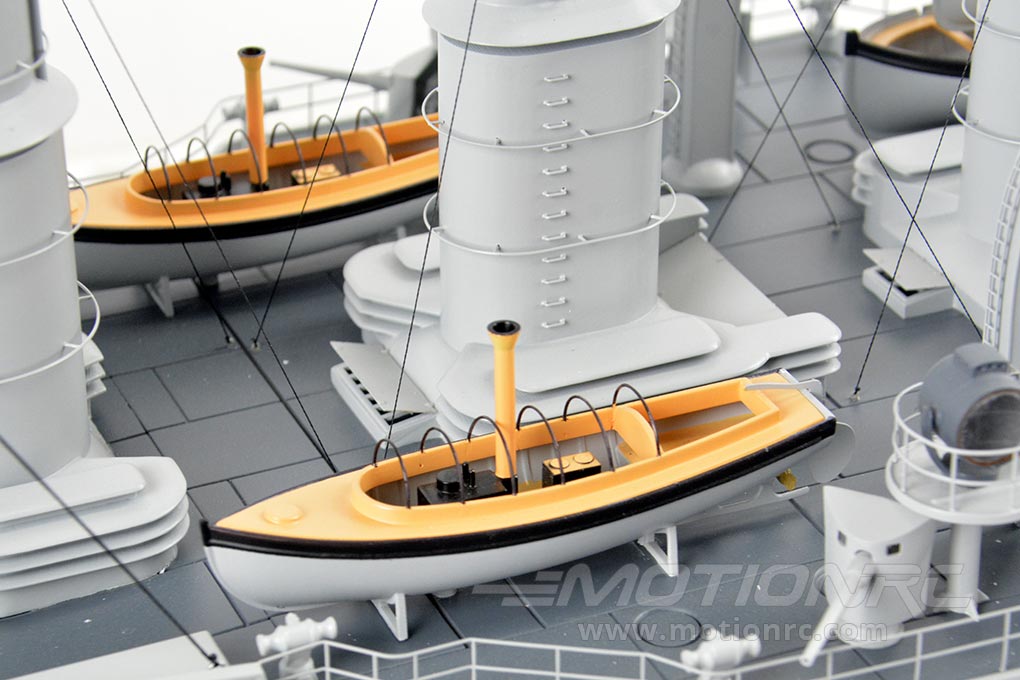
    Pin-Sized Details


    Over 100 hours of handcrafted details are built at the factory using hundreds of fingernail sized brass Photo-Etched (PE) parts and larger sub-assemblies. Launches, rigging, railings and hand holds cover the vessel.
    Pre-Installed Superstructure


    Each Scharnhorst is hand crafted by factory artisans, assembling each component from multiple materials before painting and installation. Casement-mounted batteries, search and signal housings, crow's nests and davits are everywhere!
    Genuine Wood Deck


    The Scharnhorst's many exposed decks are planked with laser-cut and laser-etched genuine wood.
    Pre-Installed Rigging


    All rigging lines are pre-installed at the factory for your convenience.
    Photo-Etched Brass Foredeck


    Textured photo-etched (PE) foredeck and aftdeck is made of brass, pre-painted, and pre-installed. Amazingly sharp details are rendered in pin-sized resolution at 1/150 scale!
    RTR - Ready To Run


    A 2.4Ghz radio system is included and pre-installed, as are all internal electronics. A primary battery and charger are also included. Simply charge the included primary battery with the included charger, then insert your AA batteries into the radio transmitter to begin sailing!

    At 58" long, you'll need a large shelf or mantle to display this beast, and be mindful of its very tall masts. These are easily removable to facilitate transport.
    FEATURES:
    • RTR (Ready to Run) with 2.4Ghz radio, receiver, battery, and charger
    • 2.4Ghz radio system and all electronics Pre-Installed
    • Fully Painted and Detailed
    • Zero assembly required --Get underway in minutes!
    • Durable fiberglass one-piece molded hull and deck
    • Genuine wood decking, laser-cut and laser-etched
    • Over 100 brass photo-etched (PE) parts and high detail parts
    • Extensively detailed and hand finished
    • Three 550 electric motors with steel drive shafts
    • Quick-Detach Superstructure for easy access to the ship's interior
    • Pre-Installed Rigging with simple disconnect design
    • Positionable main turrets
    • Rated for calm ponds, pools, and lakes appropriate for RC Boats
    INCLUDES:
    • Bancroft Scharnhorst 1/150 Scale 1475mm (58") German Cruiser - RTR
    • 2.4Ghz Radio and Receiver, pre-installed
    • Three motors drive system, pre-installed, with XT60 battery connector
    • Steering servo, pre-installed
    • 2s 7.4V 2800mAh Battery
    • 2s Battery Charger
    • Basic Tabletop Display Stand
    REQUIRES:
    • Four (4) AA-sized 1.5V dry cell batteries, Alkaline or NiMH
    Live Q&A every Tuesday and Friday at 9pm EST on my Twitch Livestream

    Live chat with me and other RC Nuts on my Discord

    Camp my Instagram @Alpha.Makes

  • #2
    Reserved for photos and videos
    Live Q&A every Tuesday and Friday at 9pm EST on my Twitch Livestream

    Live chat with me and other RC Nuts on my Discord

    Camp my Instagram @Alpha.Makes

    Comment


    • #3
      Ahhh this is great you are bringing this model, so much history behind it. The wreck was discovered last year last I read.
      I'm repeating myself here but it is great MRC is making all these models available in the US. I don't know how many times I've watched documentaries about the Battles of Coronel and Falkland Islands. I believe in your intro you are referring to the WWII battleship, this one is the one who fought in WWI, commissioned into service in October 24th 1907, mostly serving with the East Asia Squadron, Tsingtao.

      Comment


      • #4
        Excellent concise article on this ship:
        https://en.mercopress.com/2019/12/05...very-direction
        Among the best of those days...
        Attached Files

        Comment


        • #5
          Anyone know if this is really coming out this Month?

          Comment


          • #6
            Originally posted by druiz100 View Post
            Anyone know if this is really coming out this Month?
            That is what MRC says but I would hold off until the issues with the electronics in these RTR are worked out. People are having issues with the PT, LC and I am having problem on my 1/200 Yamato. Dai

            Comment


            • #7
              Originally posted by dai phan View Post

              That is what MRC says but I would hold off until the issues with the electronics in these RTR are worked out. People are having issues with the PT, LC and I am having problem on my 1/200 Yamato. Dai
              Electronics I will most likely replace as I want to be able to aim all 8 inch guns from the transmitter. I also want to add smoke, not inside the boat as some people have said, lol. Out of the smoke stacks. I want a ESC per each motor. I run RC subs, fiting out a ship is way cheaper.

              Comment


              • #8
                Originally posted by druiz100 View Post

                Electronics I will most likely replace as I want to be able to aim all 8 inch guns from the transmitter. I also want to add smoke, not inside the boat as some people have said, lol. Out of the smoke stacks. I want a ESC per each motor. I run RC subs, fiting out a ship is way cheaper.
                With the ongoing issues with electronics, I hope MRC will offer ARR and leave the ESC to us. Cheaper that way too. Dai

                Comment


                • #9
                  I hope they make some more WW1 ships

                  Comment


                  • #10
                    Originally posted by druiz100 View Post
                    I hope they make some more WW1 ships
                    Yes and please in 1/150 scale. 1/200 is way too fragile. Dai

                    Comment


                    • #11
                      Alpha, any photos available with the superstructure detached and the internals visible? The available pictures don't seem to show an access hatch for the rudder servo.

                      Comment


                      • #12
                        Pulled the trigger on one myself. when it gets in if no pics have been posted I'll try and get some up showing internals.
                        PS. Alpha, if you still read these tell them they need to do a run of the WWII version of the Scharnhorst too. I've seen a few pics of them still floating around they should still have the old plans for them tucked in a back file cabinet or something and I for one would happily snatch one up myself.

                        Comment


                        • #13
                          Please Twodawgs post pics of the inside, agree w the above comments pics of the inside are a must have!

                          Comment


                          • #14
                            1 of 2
                            Welp she's in... DAMN SOMETIMES I REALLY HATE FEDEX...
                            Click image for larger version

Name:	IMG_2407.jpg
Views:	541
Size:	106.7 KB
ID:	382459Click image for larger version

Name:	IMG_2409.jpg
Views:	516
Size:	123.4 KB
ID:	382460
                            Yeah the box took some LOVEN...
                            So this'll be a bit of an unboxing done on my front portch. The box is similar in width to most of the other ships of this brand I've bought but she's a LOT taller. Like double my Yamato's box.
                            Good news is she's just as well packed as the others are.
                            Click image for larger version

Name:	IMG_2410.jpg
Views:	522
Size:	70.1 KB
ID:	382461Click image for larger version

Name:	IMG_2411.jpg
Views:	516
Size:	119.7 KB
ID:	382462Click image for larger version

Name:	IMG_2412.jpg
Views:	522
Size:	96.9 KB
ID:	382463
                            I only found 1 or 2 breaks that I can identify and a random small bit I haven't found the origin of. 1 break is a magnet that came loose from the cover. Not sure I really count that one.
                            Click image for larger version

Name:	IMG_2417.jpg
Views:	528
Size:	103.1 KB
ID:	382464Click image for larger version

Name:	IMG_2413.jpg
Views:	520
Size:	87.8 KB
ID:	382465
                            Paint wise she's great'ish. Didn't try to juggle a pick of it but on the bottom of the hull about midships there's a pretty ugly spot like she rested on something before it fully dried.
                            Click image for larger version

Name:	IMG_2436.jpg
Views:	540
Size:	114.0 KB
ID:	382466
                            She does come fully rigged with masts in place (hence the tall box) The vertical support foam has a minor improvement in that it splits from above. The tops are held together with tape and 3 bamboo skewers each. I was able to separate the tape push the skewers out one side and just rotate the vertical's forward or aft as needed.
                            Turrets are in the foward bow foam on either side of the bow.
                            Click image for larger version

Name:	IMG_2433.jpg
Views:	514
Size:	70.6 KB
ID:	382467

                            Comment


                            • #15
                              2 of 2
                              Now for the post some of you were waiting for. The inside.
                              Both turrets are open through and are pretty identical. Aft one has access to the aft servo. Around a 3 inch hole. just enough to get a screw driver in and maybe replace the servo... The rudder post... not so much.
                              Click image for larger version

Name:	IMG_2430.jpg
Views:	502
Size:	92.6 KB
ID:	382471Click image for larger version

Name:	IMG_2432.jpg
Views:	500
Size:	99.9 KB
ID:	382472
                              Center access is under the aft three funnels. (you can see the magnet in the center pic bottom right)
                              Click image for larger version

Name:	IMG_2439.jpg
Views:	501
Size:	133.8 KB
ID:	382477Click image for larger version

Name:	IMG_2438.jpg
Views:	489
Size:	96.5 KB
ID:	382473Click image for larger version

Name:	IMG_2442.jpg
Views:	491
Size:	124.5 KB
ID:	382474
                              Power switch has plastic covering switch, ESC looks a bit different from the older ones and is actually secured to the side of the hull near the deck making it much less likely to get flooded if there's any minor leakage or water splashing in. (good move in my opinion)
                              Click image for larger version

Name:	IMG_2438.jpg
Views:	490
Size:	96.5 KB
ID:	382480
                              Cover is fairly sturdy, and those 3 funnels actually go all the way through for a smoke system the Nr 1 funnel would need some modding as it is blanked off underneath.
                              The rigging requires 3 unhooks to remove the plate one from aft mast to Nr 4 funnel one Nr 1 funnel to Nr 2 funnel, and finally from forward mast to aft mast.
                              The center opening is great I can fit my big old meat hooks in there easily and my camera even fit inside for a shot looking back.
                              Click image for larger version

Name:	IMG_2441.jpg
Views:	490
Size:	51.4 KB
ID:	382476

                              The Parts box is fairly standard Controller, Battery, charger, somewhat meaningless "Instructions" Though the controller seems to be a nice upgrade from the old gray style ones.
                              Click image for larger version

Name:	IMG_2448.jpg
Views:	489
Size:	139.0 KB
ID:	382479Click image for larger version

Name:	IMG_2449.jpg
Views:	487
Size:	105.2 KB
ID:	382478

                              All in all only regret is not waiting for the peacetime color's one to arrive. I pulled the trigger on this one before I saw that one pop up into the list and have to admit I prefer that color scheme. If I'd known she was coming I might have waited a couple of days. Oh well she still looks pretty nice and all in all I'm pretty happy with her.
                              Attached Files

                              Comment


                              • #16
                                Great pics, thank you!
                                Questions, was motor shaft to prop shaft alignment good? it seems pretty well aligned for pics, and no rudder post access as far as I can see correct?, yes i just saw the peace time version, indeed it looks great.

                                Comment


                                • #17
                                  First the easy
                                  The shafts seem pretty well lined up to me and have U-joints but I don't feel any real flexing of them when I spin props by hand. The brief op test I did also didn't show any issues there. But she's not yet been on the water and I didn't throw any runout dial indicator sort of setup on her and don't plan on doing so unless serious issues crop up like repeated breaking of those u-joints.
                                  Next the not so easy.
                                  Good news bad news time. Good news I THINK you can actually access the rudder post...
                                  Bad news. I think the steering servo has to be disconnected first and you will need to do it from the main access hatch... Also the pics I got suck (not going to spend the time and/or sanity trying to get better). And I can NOT say 100% there is no screw on the top of the rudder post. What it looks like there is may be a set screw in the side facing forward.
                                  Click image for larger version

Name:	20230720_190940.jpg
Views:	446
Size:	26.6 KB
ID:	382638Click image for larger version

Name:	20230720_191142.jpg
Views:	441
Size:	52.0 KB
ID:	382639

                                  REALLY hard to see but the post in the back there is the rudder post. With a two horned servo arm on it. The silver circle looks to be an Allen headed screw. Not sure the size and you can do that bit of nightmare inducing research on your own if you need to. It looks like the sort of thing I'm not going to disturb unless I really need to. But with enough extensions I'm betting you can get a Allen wrench drill bit back there and operate it to drop the post... Putting it back together will require a good bit of sailor mouth and probably an equal amount of alcohol...
                                  Also to start a fight I suggest you try and use a METRIC Allen head. Or you'll likely strip it out. Why? I've noticed a lot of things on these boats are either really odd Standard sizes and still not quite right but metric fits perfect. Plus considering where they are made and in a lot of cases sold Metric sizes are probably a lot more common.

                                  Comment


                                  • #18
                                    Didn't get one myself but does anyone have a spare part rudder for this ship. I want a good pick of the post and one that shows the end of it. That should tell if there's a screw going down into it or just the side set screw.

                                    Comment


                                    • #19
                                      Great pics, twodawgs! Have you checked what grease they used in the shafts? All my Bancrofts to date have had that thick red stuff in there and that causes major issues. Coupled with the lack of easy rudder access makes repacking those tubes properly very near impossible.

                                      Comment


                                      • #20
                                        Great pics twodawgs thanks for posting them, no doubt it's going to be nightmare to try to re-assemble rudder post into servo arm, i don't see how it can be done with one hand inside (if it fits at all) model then trying to stick rudder post on arm center hole with the other, how sad they did not put a small access hatch of some sort.

                                        Comment

                                        Working...
                                        X