


Those of you whom are enjoying this little red speedster like I am may also have found themselves yearning for slightly better landing gear than the includes steel, coil sprung gear? RC Castle added a very nicely priced (US $25.88) set of aluminum, trailing link style suspension struts:
Top Design CNC Suspension Strut Set for Freewing 70mm Yak 130
I would have preferred to buy them from MRC ... Maybe Mark and Tom will be able to add them to the spare parts for the Yak?
They are described as being CNC machined out of 6061 aluminum, with the side note that they are also suitable for other 64-70mm EDF jets. Shipping to the West Coast of the US was around 5-6 dollars. It took about two and a half weeks for them to arrive from Hong Kong, including an almost one week stay in the SFO ISC.
I thought I would photo-document how I installed them. This is not necessarily the right way or the best way to do it but nonetheless the way that I did it. :)
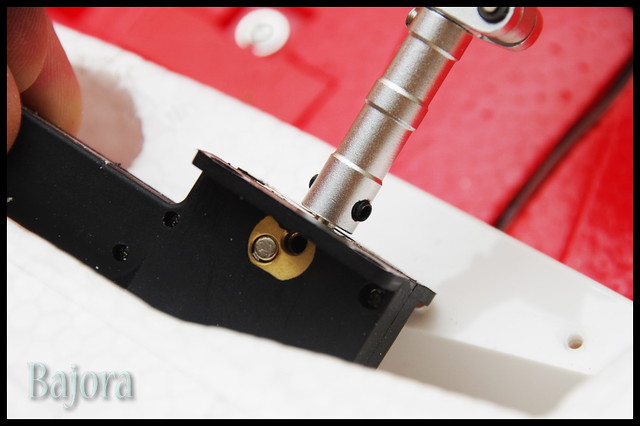
It is easiest to first remove the white plastic gear overlays that cover all three gear openings. They are attached with a contact glue style of adhesive and all three of mine peeled off without damage, though I did work slowly and deliberately while pulling them off. The next step is to remove the electric retract for each gear as you start the swap out. This is necessary to access the grub screw(s) that hold the existing steel legs in the retracts. One of the grub screws can be seen in the photo below, in the brass colored insert. There are two per gear, one on each side of the retracts.
I did the nose gear first. Once removed, I used this existing steel gear to measure the insertion depth of the new nose gear. I needed this dimension, as my plan was to cut the existing gear leg and use it as the mount for the new gear. And I think it a good idea to maintain the landing gear geometry, so that the three wheels will be on the same ultimate elevations, an in reference to one another, as the existing gear. I measured the insertion depth at about 10mm.
NOTE: Modelers who have some steel rods of the same diameter lying around and/or wish to keep the stock gear intact so that they can go back to using them might prefer to not cut the existing gear. A complete set of new stock struts can be had from MotionRC for $5.50 however. I figured if I ever needed or wanted to go back to the stock gear, I will just buy a new set. ;)
I measured and marked about 10mm up from where the strut enters the retract. The nose gear is a little different than the mains, as it includes a steering control arm. This assembly must remain in place on the steel shaft, with an additional 10mm of shaft left protruding out of it for the new gear to mount to.

Though I would advise against making the cut with the shaft still installed in the retract; as a lot of heat is generated when cutting though the steel and it is probably best to protect the electronics of the retracts from this heat., the means of removing the existing steel nose gear was not 100% obvious to me. It is held captive and unlike the two mains, it is able to pivot within the retract block. I thus left it installed but was careful to let too much heat build up as I cut the shaft. The new nose gear can now be slipped over the now much shorter shaft. The new strut includes four grub screws to secure it in pace. Though I did not, it may be advantageous to try and grind four flat spots on the shaft. Don't forget the thread lock!
The new nose strut completed and reinstalled.

The two mains are competed in the same fashion. Pull them out of the gear wells one at a time and mark 10mm up on the shaft. It was easy to remove the shaft on the two mains. I made the cuts with them removed and then reinstalled them.

The two new main trialing link style struts each use two grub screws to secure the strut in position. It is best to grind a new pair of flat spots on the shaft for the new struts grub screws to bite into, using the flat spots already ground into the shafts as a guide. I will not detail how one transfers the three wheels from the old gear to the new gear, as it is pretty obvious what needs to happen. The axles on the mains are on the long side, I just left them protruding out of the back side of the strut, as they do not interfere with the gear operating or fitting into the gear wells when retracted. Some may go ahead and cut them off.
With the two new main struts installed, I decided to cycle the gear to make sure that the would go up into the gear wells with no problems. I found that the tires were contacting the outer edges of the foam gear wells. I used a sanding drum in my Dremel to flare the openings at the upper edge. The next two photos show a before and after, as well as what the gear look like when retracted.


With the three new struts attached, it was time to remount the white plastic bay overlays. I retracted the gear, placed the nose gear overlay in place and lightly held it in place as I deployed the gear. This allowed me to check the clearance without damaging anything. I found it necessary to widen the narrow channel in which the strut itself travels, as well as the larger part of the opening where the nose wheel enters the gear bay. The photos below show the subtle changes I had to make; before and after.


Next, the same trimming process for the main gear overlays. A pair of curved tip Lexan scissors is invaluable in making the necessary curving cuts. Most of the adjustment on the mains involved lengthening and widening the narrow channels in which the new struts ride in. The photos below show the main piece that I removed. It was also necessary to ever so slightly open up the large opening through which the tire passes.


As much as I hated to do it, I laboriously picked all of the old contact style adhesive off of the inside edges of the plastic gear overlays before reattaching them in place over the new struts. I used contact glue.
Total time to complete the upgrade was approximately ninety minutes. The very next day, I took the Yak out and had two of the better landings that I have managed since I begun flying it! The springs are properly tensioned IMO ... the struts do partially load up when I have a 6S 400mAH pack loaded for flight. And there is less tendency for the Yak to bounce back into the air after an approach in which a little too much energy is carried down to the runway!

Top Design CNC Suspension Strut Set for Freewing 70mm Yak 130
I would have preferred to buy them from MRC ... Maybe Mark and Tom will be able to add them to the spare parts for the Yak?
They are described as being CNC machined out of 6061 aluminum, with the side note that they are also suitable for other 64-70mm EDF jets. Shipping to the West Coast of the US was around 5-6 dollars. It took about two and a half weeks for them to arrive from Hong Kong, including an almost one week stay in the SFO ISC.
I thought I would photo-document how I installed them. This is not necessarily the right way or the best way to do it but nonetheless the way that I did it. :)
It is easiest to first remove the white plastic gear overlays that cover all three gear openings. They are attached with a contact glue style of adhesive and all three of mine peeled off without damage, though I did work slowly and deliberately while pulling them off. The next step is to remove the electric retract for each gear as you start the swap out. This is necessary to access the grub screw(s) that hold the existing steel legs in the retracts. One of the grub screws can be seen in the photo below, in the brass colored insert. There are two per gear, one on each side of the retracts.
I did the nose gear first. Once removed, I used this existing steel gear to measure the insertion depth of the new nose gear. I needed this dimension, as my plan was to cut the existing gear leg and use it as the mount for the new gear. And I think it a good idea to maintain the landing gear geometry, so that the three wheels will be on the same ultimate elevations, an in reference to one another, as the existing gear. I measured the insertion depth at about 10mm.
NOTE: Modelers who have some steel rods of the same diameter lying around and/or wish to keep the stock gear intact so that they can go back to using them might prefer to not cut the existing gear. A complete set of new stock struts can be had from MotionRC for $5.50 however. I figured if I ever needed or wanted to go back to the stock gear, I will just buy a new set. ;)
I measured and marked about 10mm up from where the strut enters the retract. The nose gear is a little different than the mains, as it includes a steering control arm. This assembly must remain in place on the steel shaft, with an additional 10mm of shaft left protruding out of it for the new gear to mount to.
Though I would advise against making the cut with the shaft still installed in the retract; as a lot of heat is generated when cutting though the steel and it is probably best to protect the electronics of the retracts from this heat., the means of removing the existing steel nose gear was not 100% obvious to me. It is held captive and unlike the two mains, it is able to pivot within the retract block. I thus left it installed but was careful to let too much heat build up as I cut the shaft. The new nose gear can now be slipped over the now much shorter shaft. The new strut includes four grub screws to secure it in pace. Though I did not, it may be advantageous to try and grind four flat spots on the shaft. Don't forget the thread lock!
The new nose strut completed and reinstalled.
The two mains are competed in the same fashion. Pull them out of the gear wells one at a time and mark 10mm up on the shaft. It was easy to remove the shaft on the two mains. I made the cuts with them removed and then reinstalled them.
The two new main trialing link style struts each use two grub screws to secure the strut in position. It is best to grind a new pair of flat spots on the shaft for the new struts grub screws to bite into, using the flat spots already ground into the shafts as a guide. I will not detail how one transfers the three wheels from the old gear to the new gear, as it is pretty obvious what needs to happen. The axles on the mains are on the long side, I just left them protruding out of the back side of the strut, as they do not interfere with the gear operating or fitting into the gear wells when retracted. Some may go ahead and cut them off.
With the two new main struts installed, I decided to cycle the gear to make sure that the would go up into the gear wells with no problems. I found that the tires were contacting the outer edges of the foam gear wells. I used a sanding drum in my Dremel to flare the openings at the upper edge. The next two photos show a before and after, as well as what the gear look like when retracted.
With the three new struts attached, it was time to remount the white plastic bay overlays. I retracted the gear, placed the nose gear overlay in place and lightly held it in place as I deployed the gear. This allowed me to check the clearance without damaging anything. I found it necessary to widen the narrow channel in which the strut itself travels, as well as the larger part of the opening where the nose wheel enters the gear bay. The photos below show the subtle changes I had to make; before and after.
Next, the same trimming process for the main gear overlays. A pair of curved tip Lexan scissors is invaluable in making the necessary curving cuts. Most of the adjustment on the mains involved lengthening and widening the narrow channels in which the new struts ride in. The photos below show the main piece that I removed. It was also necessary to ever so slightly open up the large opening through which the tire passes.
As much as I hated to do it, I laboriously picked all of the old contact style adhesive off of the inside edges of the plastic gear overlays before reattaching them in place over the new struts. I used contact glue.
Total time to complete the upgrade was approximately ninety minutes. The very next day, I took the Yak out and had two of the better landings that I have managed since I begun flying it! The springs are properly tensioned IMO ... the struts do partially load up when I have a 6S 400mAH pack loaded for flight. And there is less tendency for the Yak to bounce back into the air after an approach in which a little too much energy is carried down to the runway!


Comment