


-
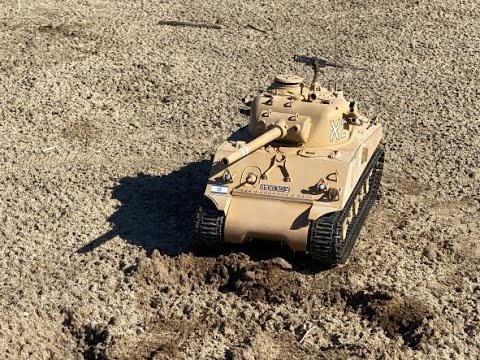
Took my M4 out doors for a drive in the sun. I practiced driving with one hand and recording with the other. it takes a little coordination, but it works.
-
Yes the HL 6.0-7.0 Sherman’s with added T49 “duck bill” tracks or really any quality metal aggressive tracks make for a nibble, smooth handling, smooth running and all around excellent IR fighting platform. I dare say with some minor tweaks like moving the IR bulb to the barrel and adding the LegoDEI IR receiver, the Sherman is one of the top five if not the best of the top five performing IR battles tank available today. A topic of discussion for its own thread perhaps?Leave a comment:
-
The sand color the IDF used in the 60s 70s changed color with weathering based on where it was operated. In the Angolan heights and the West Bank they got dirty and muddy with brown and red dirt and grime. In the Siani, it was mostly dust covering them with the grime normally found at lubed service points. Color also faded much more in the siani than other theaters. Even though I prefer the old model aster armor sand weathered on my m50, the lighter brighter color on my m51 of lightly weathered Tamiya buff is more accurate. Either way, with a desert sand color weathered up lightly you can’t go wrong.Leave a comment:
-
Ooo, twin desert IDF’s! The combination of a relatively small tank and duckbill tracks make for a nimble surefooted fighting vehicle. I really drove it hard on the nasty hill area in last weeks battle, and it handled it superbly.
Regarding my tank’s color, I saw quite a few examples online that were bright like mine. I still have to dry pigment dust over it all.Leave a comment:
-
-
Looks good Bob. One thing about the Hollywood pun, yeah the big bin on the back was added mid 70s. I made that mistake initially thinking they were used in 73 but learned the details and pulled it off mid build. The standard wwii blanket roll shelf was used up through the 73 war but if that how you want it to look that’s fine.Leave a comment:
-
Structurally complete, waiting for add-ons and weathering. Rich, I noticed the jerry cans on your tank were dark - OD green, or? Also, I added the big bin on back. Remember, this is a "Hollywood" rendition.
I placed an Israeli flag on the front. Fellow tanker Mike made them, printing on decal paper. He almost lost his fingers when he held the flags out and offered some to us. Thanks Mike!
Perhaps you are wondering why I posed this tank with the turret angled to the right. The on/off switch is under the left hatch, which can't be opened with the turret facing straight ahead! How many times I've turned off the tank at the transmitter and had to restart the tank to get to the switch!!!
 Attached Files
Leave a comment:
-
-
Thanks for the info, Rich. I'll leave the vent off. Your photo is helpful too. Don't need the deck, thanks..Leave a comment:
-
Yes Bob, that is the very late post 1973 exhaust that was redirected to come out the top of the deck. If you can leave that ducting off and just use the deck without it I would for the era tank you have there.
This is the 1967- 1973/75 era deck
pre 1967 the diesel deck did not have louver for air flow.
As built nearly all IDF Sherman’s except the M51 started with the radial engine deck regardless of what the manufacturer installed in the tank new. If you want a radial deck for an early build I believe I have a spare in my stash.
Leave a comment:
-
Having seen this tank in action through its different color scheme, you are getting your money’s worth out of it👍👍Leave a comment:
-
While researching (surfing), I found decals and modification parts to help with the transformation. Forgebear in the UK makes IDF decals, a back deck and smoke grenade launchers to add on. Also, Rich Johnson graciously donated a call box for the rear end and a first aid box for the side. So now I have a question for Sherman experts. The Forgebear parts did not come with any information. There is a part on the top of the rear deck that appears to be an exhaust vent. Is it? And if it is, does that mean the original exhausts were eliminated?
Leave a comment:
-
IDF M4 Sherman
I am "updating" my HL Sherman to something from the Israeli Defense Force theatre. It's not meant to be a finescale rendition, more of a 'Hollywood, inspired by" model. This was a spur of the moment decision, prompted by the need for a tank to use at the San Diego battle. My Sherman started life as a winter camo M4 - not wanted, but I bought it online thinking the picture was black & white. Oops! It went green, then to a WW2 camo pattern.
So now it's tan.


Leave a comment: