You must Sign-in or Register to post messages in the Hobby Squawk community
Registration is FREE and only takes a few moments

Register now

Announcement

Collapse
No announcement yet.

3D Printed 500 size Gazelle

Collapse
X
Collapse
First Prev Next Last
 
  • Filter
  • Time
  • Show
Clear All
new posts

  • 3D Printed 500 size Gazelle

    Despite having around 10 projects running in parallel, I recently started another one, a 500 size 3D printed Gazelle from Mastercraft. The Gazelle has always been a difficult one to figure out due to the small fenestron, but I wanted to try out a few things. First, it was a chance to try a 3D printed airframe. Second, I wanted to try a direct motor driven fixed pitch tail. Recent props from cinewhoops have had increasing numbers of blades and even had 8 blade props available. As soon as I saw those, I wanted to use one to mimic the look of a fenestron without the complexity of a traditional one.

    I threw together a quick test bed to try out the concept. Started with a beater Trex 500 and removed the tail gears and belt, then 3D printed a fenestron housing and motor mount from PLA. While I didn’t have a spare 3 blade head, I did have an extra Align 4 blade. I figured more torque would be more conservative, so I fitted it to test bed as well. Setup of the motor driven tail was easy. I just used the Brain2’s option for motor tails, and put the tail ESC in airplane mode.

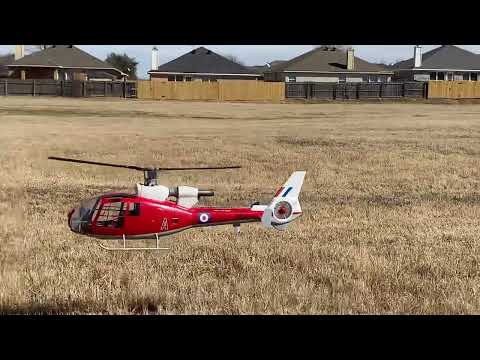
    After a few tuning flights I was very impressed. The tail had excellent performance. No authority issues, and minimal (if any) impact on flight time. I also ballast the aircraft up to max gross weight where it could barely hover, loaded down with a 6S 4000mah pack (flight battery) and a 6S 5800mah pack (ballast). I then did collective pulses. The tail didn’t even waver. Next steps are to obtain a 3 blade head, and keep printing, sanding, and painting the fuselage. Planning on finishing the model in an RAF Red/White Training paint scheme.

    Here’s the components I used for the tail:
    Motor: https://www.racedayquads.com/product...clid=IwAR0phOB MqExA5i6JcPojZygJivjs_6sqlYv238zixmAnhs1PvZZSDaTLj SU
    Prop: https://www.racedayquads.com/collect...6MMtKVih8IRY4Q tMSft-vqz8VlxwSZbzDx0PA
    ESC: HobbyWing V4 60A Platinum (massive overkill)

    Link to the parts that I designed for the test bed: https://grabcad.com/library/trex-500...hVr3kJRBzcMRIb BQZOBm9EmrYMIIrR-pWY


  • #2
    I gotta quit following your posts, F106. Makes me want to spend more money.

    Comment


    • #3
      Originally posted by PawPaw View Post
      I gotta quit following your posts, F106. Makes me want to spend more money.
      I'll second that motion!

      Comment


      • #4
        Great to meet you DeltaDart at Roundtop a few weekends ago. As always, you come up with awesome builds! Looking forward to seeing the finished model

        Comment


        • #5
          A few more updates on the Gazelle. Have been busy with a lot of priming, filling, and sanding to get a smooth finish over the last few weeks. Also ended up doing a lot of modding to the original aircraft. The H-stabs were too far forward as printed, so I relocated them to the scale position. I also cut off the oversized tail rotor drive shaft and used an aluminum tube to make a smaller, more scale version with resin printed bearings. In addition, I fabricated some skids from brass tubing that were substantially more scale than the included 3D printable versions. Finally making progress. Next will be doing the rivet detail.

          Comment


          • #6
            Originally posted by CM_Aero View Post
            Great to meet you DeltaDart at Roundtop a few weekends ago. As always, you come up with awesome builds! Looking forward to seeing the finished model
            Thanks, was great to meet you there!

            Comment


            • #7
              More progress on the 500 size 3D printed Gazelle. First coat of each color is on, and the windshield sections have been formed. Need to print a new nose section, but it’s slowly getting there! The extended main shaft is being turned, and I’ve got the 3 blade head on the way.

              Comment


              • #8
                Simply awesome, F106….

                Comment


                • #9
                  Originally posted by PawPaw View Post
                  Simply awesome, F106….
                  Thanks PawPaw!

                  Continuing to make slow progress on the Gazelle. All of the windshield plastics are finally glued in place, and the motor driven fenestron is installed. Starting to work on the interior and experimenting with some ways to get the battery farther forward and not interfere with the panel or pilots. Finished modeling the panel, and will be printing a test version soon.

                  Click image for larger version

Name:	72119BBE-A0AC-4236-81D0-4DFBADD966CD.jpeg
Views:	1028
Size:	160.3 KB
ID:	334184Click image for larger version

Name:	68F67162-AB66-41ED-835E-59730D58FF83.jpeg
Views:	960
Size:	111.3 KB
ID:	334186Click image for larger version

Name:	5C2E067E-62F5-405E-90BD-668928DB4EAE.jpeg
Views:	979
Size:	97.5 KB
ID:	334185Click image for larger version

Name:	FE3231ED-E87D-4983-910F-5F559A720004.png
Views:	985
Size:	270.2 KB
ID:	334182Click image for larger version

Name:	4710C350-80E5-493F-97C8-F5B5B201FCC6.jpeg
Views:	978
Size:	138.8 KB
ID:	334187Click image for larger version

Name:	8CB7FC97-2B0D-4453-8BE2-46E8A15915A8.jpeg
Views:	949
Size:	112.8 KB
ID:	334183

                  Comment


                  • #10
                    Making more progress. Decals have been completed and applied. Just waiting on the head and working on the interior details.

                    Comment


                    • #11
                      Yup. Pretty cool. What 3 blade did you get - go with ?

                      Comment


                      • #12
                        Originally posted by kiwi_craig View Post
                        Yup. Pretty cool. What 3 blade did you get - go with ?
                        Thanks, I’m going with the PSG Dynamics head. Unfortunately, they don’t sell to the USA, so I had to have a friend in Germany re-ship it to the USA. Expensive, and a pain but it’s the only real option.

                        Comment


                        • #13
                          Received the head yesterday and got it painted up this afternoon. Couldn’t resist some test fits..

                          Comment


                          • #14
                            Mechanics are set up and ready to go. Took a bit to get everything working for the longer mast and long pushrods.

                            Comment


                            • #15
                              Nice work. Where did you get the blue alloy tail drive block ???

                              Comment


                              • #16
                                Originally posted by kiwi_craig View Post
                                Nice work. Where did you get the blue alloy tail drive block ???
                                Thanks, It came with the heli, was a clone of the Trex 500 belt drive version, possibly EXI. I’m not a huge fan of the belt driven Trex setup, so I used it with this project where a tail drive wouldn’t be needed. Removed all the old tail drive gears and pulleys as well.

                                Comment


                                • #17
                                  First flight on the 3D printed Gazelle is a success! Still need to finish the interior and paint the rear antenna, but it’s nearly complete. Flew well with no issues, and plenty of tail authority.

                                  That said, I had a strange issue on the ground with Brain2 that I was able to repeat several times. After switching from normal mode to flight mode 1 and turning off the throttle cut, the Brain2 seemed to do its preflight built in test again, swashplate twitches in each axis and all. After this occurred, I could switch flight modes and turn on/off throttle cut as much as I wanted to without problems. Just that first switch up in flight modes and disabling throttle cut seemed to mess with it. Any theories on what might be happening?

                                  Comment


                                  • #18
                                    Last night I downloaded the event log and found my issue. My RX voltage was a steady 6V for the full time, so it was good. However, my failure to setup telemetry completely seemed to have screwed with it a bit. I did all the software setup for Spektrum/HobbyWing telemetry but forgot to plug in the ESC programming cable to Brain2 connection to make the telemetry function correctly. I had the “min volt to go” parameter set to 6S, so the unit was expecting to see a 6S battery. Instead, it saw nothing and flagged that it was “not good to go”. After adding the cable, everything works fine. No more twitches or warnings, and my telemetry works fine now.

                                    Also managed to squeeze in a short flight this afternoon. Unfortunately was flying an older battery that wasn’t fully charged, so I didn’t get my full flight time. Definitely a bit starts getting used to the sound of the motor driven tail. Sounds more like an EDF than a tail rotor:

                                    Comment


                                    • #19
                                      Looks great... that tail is definitely loud!

                                      Comment


                                      • #20
                                        Finally finished up the 3D printed Gazelle this morning, and flew it in the afternoon. Finally has pilots and an interior. On to the next project....

                                        Comment

                                        Working...
                                        X