


The right retract on my new Bearcat was defective out of the box, it cycled two or three times and then locked in the down position. Motion sent out a replacement right away (thanks guys).
While waiting on the retract I really want to fly the plane so I flew it four times with the gear down and this is a great flying plane so I was anxious to get the gear replaced and today was the day I replaced it.
I've never been much of a builder (was never good at it), I've really enjoyed the planes I've bought from Motion, the go together quickly and fly great.
I'm sharing my experience with the gear replacement for other new people out there on how I did this and what I did wrong.
One solution is to pull up the blue tape, remove the old retract, install the new one, put masking tape back down (the blue tape that came up will not stick a second time) and paint the masking tape blue to match the wing. I do not have any matching paint (yet) and I really wanted to get this done. I know I could still fly it without the tape being painted but I didn't want to. :)
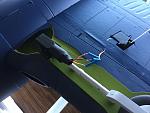
The other option was to cut the servo wire at retract and solder the new retract to existing wiring and that's what I did.
I cut the servo wires on the bad retract as close to the unit as I could, I then cut the servo lead off the new retract close to the unit. I stripped the wires and prepared to solder them.
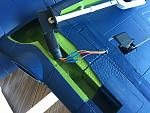
Wires are soldered together and I'm ready to shrink the heat shrink tubing.
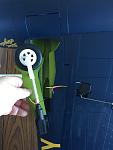
The tubing has been shrunk. Notice the bubbling in the foam? Yeah, I wasn't thinking when I fired up the heat gun and did not protect the foam so the heat bubbled it up. ARGH! I should have out a towel over the foam to protect it from the heat. I'll know better the next time I use heat around foam.
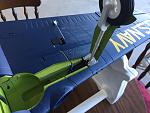
The completed job, works like a charm!

While waiting on the retract I really want to fly the plane so I flew it four times with the gear down and this is a great flying plane so I was anxious to get the gear replaced and today was the day I replaced it.
I've never been much of a builder (was never good at it), I've really enjoyed the planes I've bought from Motion, the go together quickly and fly great.
I'm sharing my experience with the gear replacement for other new people out there on how I did this and what I did wrong.
One solution is to pull up the blue tape, remove the old retract, install the new one, put masking tape back down (the blue tape that came up will not stick a second time) and paint the masking tape blue to match the wing. I do not have any matching paint (yet) and I really wanted to get this done. I know I could still fly it without the tape being painted but I didn't want to. :)
The other option was to cut the servo wire at retract and solder the new retract to existing wiring and that's what I did.
I cut the servo wires on the bad retract as close to the unit as I could, I then cut the servo lead off the new retract close to the unit. I stripped the wires and prepared to solder them.
Wires are soldered together and I'm ready to shrink the heat shrink tubing.
The tubing has been shrunk. Notice the bubbling in the foam? Yeah, I wasn't thinking when I fired up the heat gun and did not protect the foam so the heat bubbled it up. ARGH! I should have out a towel over the foam to protect it from the heat. I'll know better the next time I use heat around foam.
The completed job, works like a charm!


Comment