-
Thanks! Yeah I don't think adding that bell crank helped matters weight-wise...Oh well, whatever it takes. I added two more ounces...Hopefully that is enough. I'll try again tomorrow. -
Bravo!!! Beautiful plane, beautiful scenery. I think they are all tail heavy when converted to electric. The amount of weight I had to add to the nose was ridiculous. Once you get it weighted right, it'll land almost all by itself (eventually).Leave a comment:
-
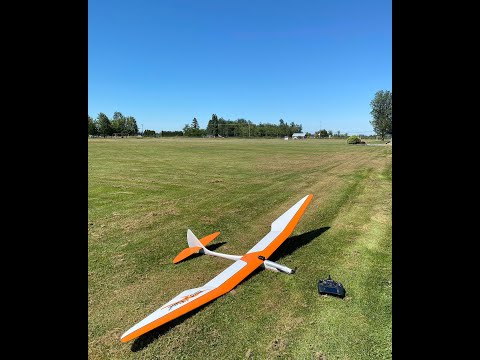
xviper maiden success. Beautiful day to maiden, found a nice open grass field. She needed several clicks of down and was a bit tail heavy. I have the CG marked at the manufacturer's location. I had to add a couple ounces of ballast and looks like I will need another couple ounces or so. But she flew beautifully and didn't want to come down, lol. She just wants to keep soaring. I found adding a little bit of power actually helped on the landing sequence. Looking forward to really getting her specked out at some point. Very pleased!
Leave a comment:
-
Okay my ZTW 65A ESC and Admiral 3000 4S arrived today and all went well. The only thing left to do is CG and throws and she’s ready for launch. The plan is Maiden this Saturday. I will put my RunCam2 on her somewhere to record the flight.Leave a comment:
-
I've heard that very thing...I have a spot picked out with plenty of open grass fields...Should be perfect!Leave a comment:
-
Happy to have been of some help. Looking forward to the video and your impressions. When you do maiden, the first landing may show you just how well this thing hangs when about 15 feet off the deck, especially going into even a slight breeze. Plan a long straight final and don’t be too surprised if it just doesn’t want to come down that last few feet. Don’t worry if you have to go around and try again. I flew mine last weekend and it took me about 3 go rounds before it landed. It kept just floating past me at about 10 feet up.Leave a comment:
-
xviper well I am happy to report the enigma of the motor mount has been solved. I knew a certain Boeing engineer's eyes would be just what the doctor ordered. It really wasn't anything major...In fact all it really involved was dremeling out the center hole and one of the screw holes a bit more to free it up. Now the motor is mounted, prop/spinner installed. All that's left to do now is snag the ZTW 65A ESC that will fit the motor, get the CG dialed and take her for her rightful place in the skies. I want to once again thank you for all of your help it's been definitely appreciated. The next post from me hopefully is the maiden video.Leave a comment:
-
Well my friend you're a little late on the bald diagnosis...If I had any to pull out it would be gone!
Leave a comment:
-
You may be a bald man when you're finished. But so far, it looks real purdy. I don't think I recall having quite the time that you've experienced. May the rest of it go smoothly for you.Leave a comment:
-
Well xviper if I could capture my experiences trying to get the motor mounted it would make for quite the comedy show. So after wracking my brain initially, I finally realized the screws I was using (stock from the plane) were too small. No wonder the motor didn't settle! Oy vay. So I tried the screws that came with the Power 32 and they were too short because they are meant for an external X mount. So I went to the local hardware store to find the same size diameter but longer (8-32 - 1/2") and those proved to be too long. Sigh. So I took my dremel and eye-balled cutting them down to the approx. size I needed. So as I stand before you today, I have TWO screws tightened. The motor seems fine. Doesn't wobble. Solid. If I try to add the other two suddenly the motor stops turning. Where is my cursing emoji?
To add to my poop show, the ESC the guy bought for it has the wrong size bullet connectors. The P32 takes 3.5mm and the ESC he bought for it (80A which is overkill) looks like 3.6 or 3.8mm bullets. I was at least able to wrap Gorilla Tape around the connectors so I could bind the plane and get the servos working which thankfully they were working fine. Not enough connection to spin the prop so here I wait for another week or two to buy the proper ESC for it. I am looking at the ZTW 65A with XT60 connector. Has 3.5mm connectors.
So here's a "so close but so far away" shot of her thus far. ONE DAY I will be able to report a maiden I swear!
Leave a comment:
-
Both good points...It doesn't seem to be too narrow for the front edge of the motor...I can get it to spin freely when one or two screws are secure. It's when I try to secure all 4 then it starts wobbling again. I may have to try longer screws. I definitely need a different pair of eyes taking a look, and he's a Boeing engineer so that is favorable, lol.Leave a comment:
-
I think on mine, the cowl next to the firewall is a bit narrower (curls inward). Can you tell if the front edge of the motor is touching the cowl, preventing it from seating against the firewall. Another consideration is that when they glued the firewall onto the nose, they over-did the glue and you've got a bead of it going around the inside circumference of the firewall. This bead may be hindering the full seating of the motor.Leave a comment:
-
Well the motor has been a major PITA to mount. I can't get it to seat and lock in. I will get some screws tightened but it still wobbles and backs out with slight pulling. Grrrrr.... I have it loosely seated for now with the prop and spinner in place temporarily just until I can have my buddy take a look and see if he is the secret ingredient.Leave a comment:
-
Yeah reading other threads I get that same consensus. Definitely overpowered on the recommended setup unless you like to achieve altitude straight up like a rocket, lol.Leave a comment:
-
My Gliderdrive is 38mm diameter, so there was plenty of room. I find the way they spec out the Eflite motors to be hard to make comparisons easily, at least not without some digging. I run mine on 3cells and the motor is a 960kv and it has lots of pull. I original planned on 4s and I could still do that but I don't think the plane needs that kind of get up and go.Leave a comment:
-
Ahhh, I see what you are saying now. Thanks for taking the time to explain it very well! Hopefully once I get it aligned and seated/mounted it will fit okay since it is recommended for a 32-size brushless. They recommend Rimfire 32 specifically but I would think the E-flite Power 32 is the same specs overall? Edit: I just checked and both outer diameters are 42mm so I should be good to go. Thanks again!Leave a comment:
-
I think you know what I meant about the “stuff spinning” (as in the motor casing). The other part ........... If you find that the motor touches on one side or the other or on top or bottom, that means you have to move the motor away from that side of the nose wall. To do that, you have to shift the holes over but once drilled, you can’t move the holes, so you extend the hole(s) by elongating them with the drill bit in the direction that the motor needs to move. You don’t make the hole bigger in diameter, but you drag the hole away from the side that’s touching. By doing that, the screw still fits and won’t pull through the hole. If you make the hole too large, you can always use some small washers.
Now, if you have a case where the whole motor touches on all sides as it goes toward the firewall, that means the motor is too large in diameter. Your option then, is to reach into the nose cavity with a Dremel and sanding drum and file down the wall to make it thinner. You don’t have much thickness to work with so be careful not to grind it all the way through. The other option is to get a motor that’s totally encased, like the HobbyKing GliderDrive. With those, it doesn’t matter if parts of the casing touches or gets wedged into the nose since nothing turns there.Leave a comment:
-
Yeah it's a real bear because the main casing spins which is why I can't get the orientation to stay where I want it as I feed it closer to the firewall. And boy is it a TIGHT fit, I hope it spins freely once mounted. I'm trying to visualize what you mean by that last sentence; "If you've got a motor where stuff is spinning, then you may have to ream out a hole or two in the proper direction so the motor won't touch the sides when spinning."
Leave a comment:
-
Nicely done. That bellcrank assembly looks real professional. As for getting the holes lined up for the motor screws, I also shed a bit of sweat with that. If you can just get one screw started, the rest is a lot easier. Don't tighten the first on up until you get all of them threaded. Then you can cinch them down evenly. The motor will suck right up to the firewall. Mind you, I used a HobbyKing GliderDrive motor, so there's no moving parts on the outside, just the shaft spins. If you've got a motor where stuff is spinning, then you may have to ream out a hole or two in the proper direction so the motor won't touch the sides when spinning.Leave a comment:
-
Shocked myself by getting the elevator installed without too much peripheral profanity. Wow, talk about a major PITA!! I just stuck with it and tried to be as patient as possible (had to take more than one break to step away before I threw it against a wall lol)...Got the holes drilled for the motor mount. That part actually was a lot easier than I anticipated. However, I can't get the motor seated and in the right orientation to screw it in place. Looks like I am going to need my buddy after all. Once that's complete it's easy sailing from there pun intended. Thanks again xviper for all your guidance!
Leave a comment:


You must Sign-in or Register to post messages in the Hobby Squawk community
Registration is FREE and only takes a few moments

Leave a comment: