


I have been posting some of my out of the ordinary EDF jets made by LX models like F22 twin 70mm, Mig29, and SU47. Most of those builds did not get much interest according to the number of views posted. I just wanted to make sure I am not wasting my time posting something that a few people are interested in. I have finished building the 90 MM Sabre and will wait to see some of the responses.
-
-
I’d like to see it. Big fan of the F86. Which kit did you start with? -
Sure give us the review all ways great to see what people are building.Comment
-
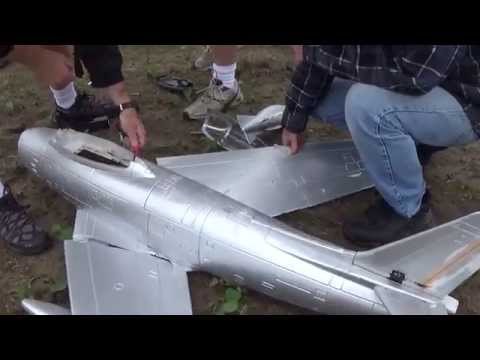
Got the Fly Fly F86 90mm KIT.
The Jet turned out awesome, but it didn't start out that way. If you think LX models puts out junk, wait until you see the MODs it takes to make this one into a decent flying F86.
I will post photos tonight.Comment
-
The Kit includes the foam only
I added Freewing Metal gear servos
HSD 3541 1550KV motor
Freewomg 90MM Metal EDF unit
130A Freewing ESC
After Burner from 90mm Freewing F16
HSD Viper 90 Landing gears
Freewing Jet Pilot
Comment
-
yea LX and fly fly are not always the best planes to buy. But you did it right though get the KIT and add your own electronics. Their servos retract and etc not great stuff that's for sure. Put up some pics up like to see that.
Comment
-
Yep, I bought a kit a few years back, I never put it together and ended up selling it on as I thought it would take too much time to make it nice. Glad you've done it though and I look forward to the build pictures.Originally posted by ddsjoseph View PostComment
-
Dude,Originally posted by ddsjoseph View Post
Your attention to detail makes all your build topics worth reading regardless of the model. You offer up interesting and innovative ideas and techniques we, as your readers, can apply to other models.
There's always something new to learn when sharing to the public what we have to tinker with from our work benches. :Cool:Comment
-
I guess a good starting point for this F86 could be the wings. I am not sure if its the cost factor or the lack of care in Fly Fly's part in designing such a weak wing and fuselage . The Jet has a 56in wing span with no carbon spars running through it. What were they thinking of? Although granted, that EPS foam is rigid and has less flex during loading, it will not be able to withstand the high G forces placed upon this wing. Just watch the YouTube Video of this same F86 model loose a wing mid flight. Even though the builder of that plane had added carbon spars in each wing, he failed to reinforce with fiber glass or carbon fiber mesh, at the part where the wing joins the fuselage.Comment
-
Here are some of the Mods I did to reinforce the wings and to make sure my Jet does not clap the wings during flight. As shown in one of the photos, sharpening the carbon rods at a 45 degree angle helps push them in with ease. The Main Landing gear area and the part closest to the fuselage was reinforced with epoxy and fiber glass cloth. That is always a messy job but it gets hidden inside the wing and there is a thin cover under the wing that conceals it. The landing gears that this jet comes with are pneumatic and are useless. In my case, I decided to go with upgraded HSD Viper 90 gears from Banana Hobby. The leading edge of the wing that inserts to the fuselage has a lip that would be prone to fracture, therefore I added a few thin carbon spars, as shown in the photo. As the wires exit the wing I soldered the aileron wires together to avoid a bulky Y connector where the wing meets the fuselage. I did the same thing for the Landing Gear wires. This way, there are only two wires to connect, every time the wing is removed and reinstalled after transportComment
-
... and now on to the fuselage. The nose landing gear is designed to be attached to a 2 inch square piece of plywood. How is this small piece of plywood supposed to stop the impact upon a hard landing. They give you two small curved pieces of wood to reinforce the front section, which is a joke. I used 1/32 in plywood to reinforce the haul. This plywood can be cut with scissors, just like cutting paper. Here are some photos showing where the reinforcements were added. I also added a servo for the steering. One of the photos will show the servo sitting in a piece of plywood. The shiny Chrome nose ring is not factory. I smeared a thin layer of Epoxy and used a razor blade to thin it out as much as possible while it was wet. Once the epoxy set, I used the silver chrome paint from Home Depot. That will shine like chrome and be very rigid.Attached FilesComment
-
-
The fuselage comes in two sections, front 1/2 and the tail 1/2. The rear part has two halves, between which runs the clear tube for the exhaust. I used an F16 afterburner and adapted it to the trailing part of the exhaust. The nice thing about the Afterburner is that it works with just a Y connector from the Throttle. The second nice thing about it is the diameter of the afterburner ring gives the right exhaust diameter at the exit point. The original exhaust diameter is almost the same as the 90mm EDF. This combination would not give optimum thrust. Be sure to run the Servo Wires properly before you glue the two halves together. I ran an extra servo for the Rudder, since the model is Rudder Delete.Comment
-
Before joining the front and rear halves of the fuselage, a few things need to buttoned up. One of them is the wing mounts. The factory gives you two blind nuts and a 1/4 in strip of plywood to set it in foam in order to have anchors for the wing bolts. While the back portion is not attached to anything, it is easier to fit the wing and determine the proper path of insertion for the wing bolts. Second thing to look for is the placement of the ESC just in front of the EDF, but in the front half of the fuselage. Be sure to measure the length of the esc wires leading to the motor, because the channel that houses the wires leaves no room for lack. Once these things are taken care of, you are ready to join the two halves of the fuselage.Comment
-
Once the fuselage is in one piece,and since EPS is so soft and dents so easily it is necessary to fill in the gaps with some foam filler. Also, the elevators are very flexible, and for a jet this size that is not acceptable. Although, initially I inserted a carbon rod between the two halves of the elevators, it still was not sufficient to stabilize the movement. To reinforce the elevators, I added plywood from the underside. of the elevators.Also the canopy is very basic and does not come with a pilot. I used a sheet of Dollar Tree foam board to construct the seat and the instrument panel. I also used electrical wire for the simulation tubing and the chair support. I used coffee mixing sticks from StarBucks to reinforce the canopy, as shown in the photo.Comment
-
At this stage of the build, all the major components are put together. The only thing left is paint and body.
I will post photos of the final paint job shortly .Another thing worth noting is that I used Freewing F86 plastic parts to reinforce the wing mount to the fuselage and the Freewing plastic gun ports look much better.Comment
-
Since this is made of EPS , the spray paints will just eat up and melt the foam. To make the soft and easily dented foam a bit stronger and provide a protective barrier and a smooth surface for paint, I clear coated it with water based MINWAX polyurethane from Home Depot. I sprayed three coats to fill in all the pits and cracks. Then used a silver RUSTOLIUM Metalic Finish paint from Home Depot. The final outcome is very impressive and Scale.Comment
-
Finally! The F86 is done. It's ready for a Maiden Flight. It's been windy in Southern California for the past 2 weeks. I hope tomorrow the weather permits the maiden flight of this F86. Here are some photos of the finished build. There is also a FreeWing F86 next to this FLY FLY F86 for size comparison. I will post videos of the maiden flight and landing, as soon as I am able to fly this jet.Comment
-
Brilliant work there!
It really is so much bigger than the FW Sabre. :Smug:Comment
-
Thank you "Porkster" for your positive comments. It makes a difference for me to see people taking interest in my builds and appreciate the results. I hope what I post will help others build and enjoy their models to the highest degree.
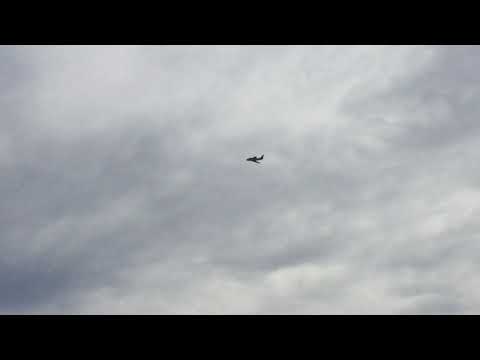
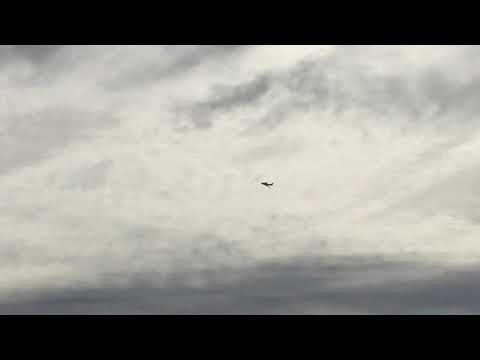
I flew the F86 today and to my amazement it turned out to be an awesome Jet. From a scale of 1-10, this thing is a 10. It took off very easy and light. It landed nicely the first time, but the guy who was supposed to video tape it, was so mesmerized, that he forgot to turn on the camera. Then during the second flight, my front landing gear did not open, because the push rod got mixed up with the steering arm. So I ended up doing a belly landing. I will post the take off and during the flight videos, but ill include the landing video next week.Comment
-
Here is a video of it in mid flight.
Comment


Comment