


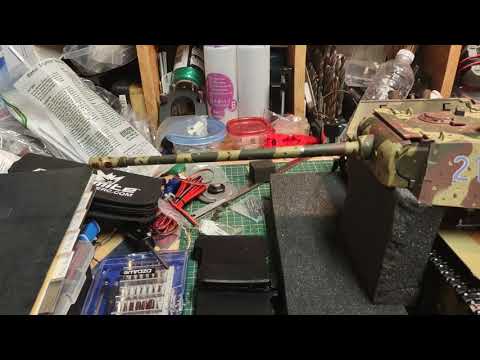
So Panzermechaniker asked me to take his stock Taigen Panther (painted but without electronics) and make it into a battler!

Removing all the plastic tray and switches and stuff from the lower hull.
Added n a 2mm thick plate of aluminum that has spacers and is thru hull bolted down.
Adds a bit more stiffness and allows or more floor space for mounting.

Doing a rough layout with loose components. I always try and allow for a Lipo Hard Case battery for space claiming.
TK board and Speaker box provided by Owner. (Standard Clark mounting board in image).

First up once layout is completed? Get rid of that crappy mounting base for the TK and add in on of my customs that is elevated from the floor for more airflow.
This tank will have an option for an added fan under the base to enhance MFU cooling if needed.

Completed lower hull. Customer did not want a smoker (My personal preference as well), Padded battery base and hull side for preventing battery shift during operation.
Frame stiffening bar behind gearboxes, large poser switch between TK board and the speaker box, Volume Pot mounted on side hull. He has a bunch of tamiya batteries, so that is the customer's choice for power connection.

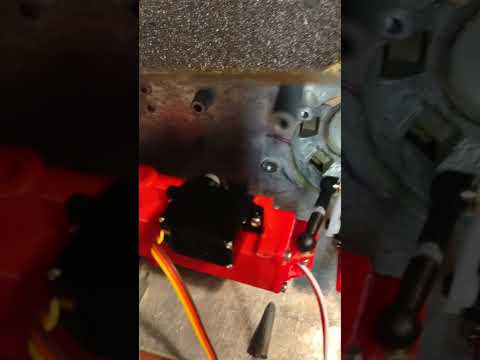
Customer hates the stock Asiatam recoil/elevation unit and requested accurate cannon elevation/depression.
So out with the old unwanted turret equipment.

JCC Compact II recoil unit, with servo tail installed. Custom Servo mount for elevation, Ball end linkages.
A custom TBU base to allow for the servo elevation and the added IR emitter harness. Plus the High intensity SMD LED Flash.
Elevation range with the Clark Board control of the servo is +20, and -8 degrees of depression.

The finished product all boxed up. A tamiya style IR emitter that is removable (connection using JST-GH through the cupola front viewport under the MG mount), and the TBU base that hides when the hatch is closed.
Removing all the plastic tray and switches and stuff from the lower hull.
Added n a 2mm thick plate of aluminum that has spacers and is thru hull bolted down.
Adds a bit more stiffness and allows or more floor space for mounting.
Doing a rough layout with loose components. I always try and allow for a Lipo Hard Case battery for space claiming.
TK board and Speaker box provided by Owner. (Standard Clark mounting board in image).
First up once layout is completed? Get rid of that crappy mounting base for the TK and add in on of my customs that is elevated from the floor for more airflow.
This tank will have an option for an added fan under the base to enhance MFU cooling if needed.
Completed lower hull. Customer did not want a smoker (My personal preference as well), Padded battery base and hull side for preventing battery shift during operation.
Frame stiffening bar behind gearboxes, large poser switch between TK board and the speaker box, Volume Pot mounted on side hull. He has a bunch of tamiya batteries, so that is the customer's choice for power connection.
Customer hates the stock Asiatam recoil/elevation unit and requested accurate cannon elevation/depression.
So out with the old unwanted turret equipment.
JCC Compact II recoil unit, with servo tail installed. Custom Servo mount for elevation, Ball end linkages.
A custom TBU base to allow for the servo elevation and the added IR emitter harness. Plus the High intensity SMD LED Flash.
Elevation range with the Clark Board control of the servo is +20, and -8 degrees of depression.
The finished product all boxed up. A tamiya style IR emitter that is removable (connection using JST-GH through the cupola front viewport under the MG mount), and the TBU base that hides when the hatch is closed.
Attached Files


Comment