You must Sign-in or Register to post messages in the Hobby Squawk community
Registration is FREE and only takes a few moments

Register now

Announcement

Collapse
No announcement yet.

Just picked up 2 tanks, would love to know more!

Collapse
X
Collapse
First Prev Next Last
 
  • Filter
  • Time
  • Show
Clear All
new posts

  • Just picked up 2 tanks, would love to know more!

    Hi all,

    I recently picked up 2 RC tanks from a local hobby shop that didn't know much about them, I did a bit of research and found this forum along with motionRC.
    I saw some really cool upgrades and builds on this forum and would love to know more about how this is done.
    These are the 2 tanks that I picked up:


    Click image for larger version

Name:	image2.jpg
Views:	299
Size:	101.6 KB
ID:	392514

    Click image for larger version

Name:	image3.jpg
Views:	301
Size:	141.4 KB
ID:	392515

    ​They are Heng Long brand Panther and Jagdpanther respectively.
    I believe the Panther is fully stock, however its BB firing mechanism seems to be quite weak, otherwise it drives good, the turret rotates well, but the plastic holding the gun mantle in place is broken and it wobbles around during movement and turret rotation.

    The Jagdpanther has a label in its battery bay that states it has a metal gearbox installed. It drives better than the Panther and the BB gun mechanism is significantly more powerful than the Panther's. However, the gun elevation mechanism seems to have an issue, as it doesn't depress and snaps to the highest location when trying to depress the gun.

    If anyone has any recommendations for upgrades/mods/fixes that would be much appreciated!

    It came with these styles batteries and connectors, if this can help identify their age:

    Click image for larger version

Name:	image1.jpg
Views:	290
Size:	52.2 KB
ID:	392516Click image for larger version

Name:	image0.jpg
Views:	298
Size:	180.7 KB
ID:	392517

    I would like to put a better battery in due to not knowing their age, after doing some research the new ones seems to have a different connector. Is there upgrades for this older style, or are they the same plug as the new ones?

    I just discovered this hobby, and am really interested in getting more into it. Any suggestions/recommendations are highly appreciated.

    Thanks everyone!

  • #2
    Those two are very old. My guess is that they are an RX13 or RX18 main board since they seem to be the old FM frequency radios and probably close to 10 years old. The older systems like that have very poor driving characteristics as they are very jerky. The newer 6.0 or 7.0 systems use a 2.4Ghz radio and greatly improved the driving characteristics of the tanks. Those newer systems now come with an XT60 connector. The one you have there is a Tamiya standard connector. It's not a direct swap of the old electronics to the new ones as there are connectors that may need to be rewired or have a new plug put on.

    I hate to say it, but I really hope you didn't pay the price that's on the box as the new tanks are much nicer for less money.

    Comment


    • #3
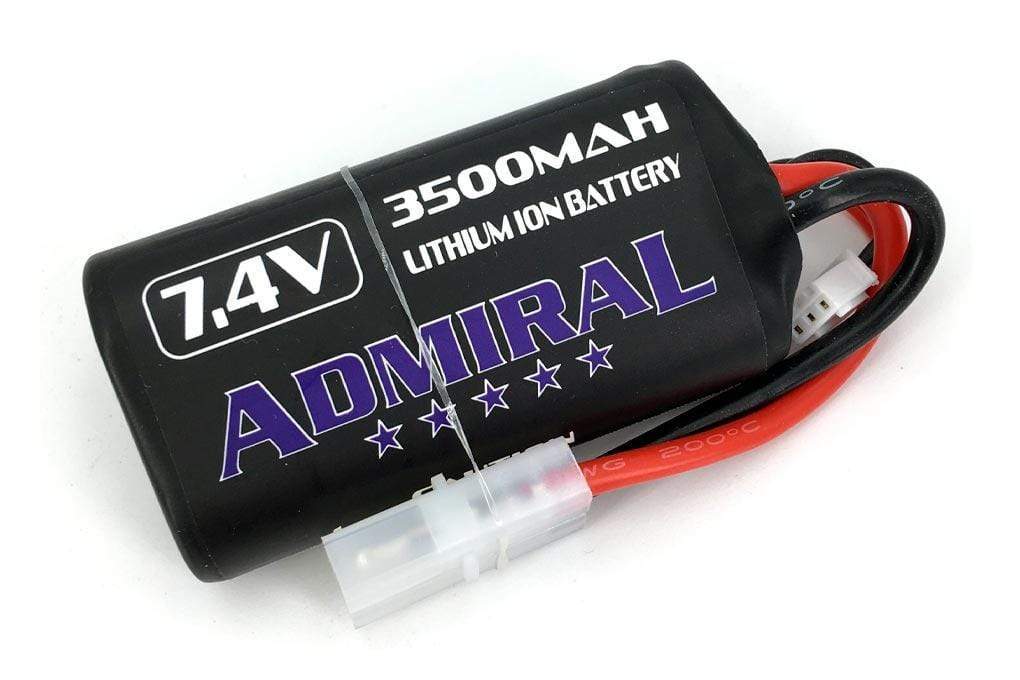
      I think those batteries are what they call Tamiya connector. Since you already knew about MotionRC, you should get the batteries form them and check out their tanks in their stock to see their pricing. Here is the type of battery they sell that will fit your tanks....

      2 Cell 7.4V Li-ion NCR 18650 3500mAh Battery with Tamiya Connector from Admiral - ADM6024-012 Assembled using high quality imported Taiwanese NCR 18650 cells, this Admiral Li-ion battery is intended as an upgrade battery for Heng Long tanks and other 2s powered surface vehicles with the pre-soldered Tamiya connector. D

      Comment


      • #4
        Originally posted by tank_me View Post
        Those two are very old. My guess is that they are an RX13 or RX18 main board since they seem to be the old FM frequency radios and probably close to 10 years old. The older systems like that have very poor driving characteristics as they are very jerky. The newer 6.0 or 7.0 systems use a 2.4Ghz radio and greatly improved the driving characteristics of the tanks. Those newer systems now come with an XT60 connector. The one you have there is a Tamiya standard connector. It's not a direct swap of the old electronics to the new ones as there are connectors that may need to be rewired or have a new plug put on.

        I hate to say it, but I really hope you didn't pay the price that's on the box as the new tanks are much nicer for less money.
        Thanks for the info! I had no idea these were close to a decade old. I didn’t even realize the box had a price on them it’s so tiny. Don’t worry, since the shop wanted to get rid of them they were pretty discounted compared to the price on the box.

        Comment


        • #5
          Originally posted by DavidN View Post
          I think those batteries are what they call Tamiya connector. Since you already knew about MotionRC, you should get the batteries form them and check out their tanks in their stock to see their pricing. Here is the type of battery they sell that will fit your tanks....

          https://www.motionrc.com/products/ad...or-adm6024-012
          Thanks for the link! I didn’t know they sold a better version of the old battery type.

          Comment


          • #6
            These tanks look like the 2000 ventage Heng Long using the 27 MHz radio system. You can, but not necessarily cheaply or easily, upgrade them to 2020 Heng Long 2.4 GHz. Parts are easily available. Heng Long deserves the credit for keeping their RC tank compatible over a 20 years period. If you are mechanically and electrically inclined, you may find the upgrade very enjoyable. However, it would be cheaper to buy the 2023 version of the same Heng Long tanks instead of upgrading. Shipping is cheap if the seller has US inventory.
            Brand-Henglong – TOUCAN RC HOBBY (toucanhobby.com)

            US Stock 2.4Ghz 1/16 Scale 7.0 Henglong German Panther G Plastic Track – TOUCAN RC HOBBY (toucanhobby.com)​​

            You can separate the upper and lower half of the tank by removing 5 to 7 holding screws accessible from the tank bottom. Below are the pictures of my 2005 HL Snow Leopard upgraded to the 2023 Pershing metal version.
            Click image for larger version  Name:	HLpershing_TK27inside.jpg Views:	0 Size:	127.3 KB ID:	392530 Click image for larger version  Name:	IMG_5130.jpg Views:	0 Size:	192.5 KB ID:	392531 Click image for larger version  Name:	IMG_5122.jpg Views:	0 Size:	194.3 KB ID:	392534 Click image for larger version  Name:	IMG_5124.jpg Views:	0 Size:	90.2 KB ID:	392533 Click image for larger version  Name:	IMG_5176.jpg Views:	0 Size:	133.4 KB ID:	392532
            Welcome to the forum!

            Comment


            • #7
              It wouldn't hurt giving them a nicer Paint Job 🤔

              Have a look at Night Shifts Videos - In particular the Jagdtiger Chipping one will basically transform the looks of your model from zero to hero...

              I did my scratch built E-100 like this:
              Click image for larger version

Name:	jH2dWU4.jpg
Views:	165
Size:	164.4 KB
ID:	393288
              Freshly painted Model using Tamiya XF-88 Dark Yellow 2, Tamiya XF-89 Dark Green 2, Tamiya XF-90 Red Brown 2 ( and Tamiya XF-9 Hull Red ) without any weathering applied to it yet...
              ( Unless it's not obvious, I'm kinda suggesting a repaint of your models with less saturated colors 😏 )

              Click image for larger version

Name:	BKUMbAH.jpg
Views:	154
Size:	217.4 KB
ID:	393289
              Sponge Chipped with a lighter color than the Base Color ( added a few drops of Tamiya XF-3 Flat Yellow to the Tamiya XF-89 Dark Green 2 ) followed by smaller Fine Brush Chipping into the sponged Chipping using an "exposed" metal color. I cannot stress the importance of the Sponge Chipping using a lighter than the Base Color before doing the Fine Brush Metal Color Chipping.

              Click image for larger version

Name:	ezLYtaf.jpg
Views:	149
Size:	126.6 KB
ID:	393290
              Went over all the raised corners and edges of the model with a Graphite Art Pencil to deposit some of it, then rubbed with my fingers over them to spread the love all over the model to create the metal sheen you can kinda make out. Add a bit of wash into recesses, welds, etc... and you'll have a surprisingly decent looking model which you can then follow up with dirt buildup, rust, and the likes.

              Comment


              • #8
                Welcome the addiction, errr I mean hobby...

                Both of mine used to look like yours awhile ago-

                Comment


                • #9
                  With a little TLC you can do wonders with those tanks.

                  Comment


                  • #10
                    Originally posted by keilau View Post
                    These tanks look like the 2000 ventage Heng Long using the 27 MHz radio system. You can, but not necessarily cheaply or easily, upgrade them to 2020 Heng Long 2.4 GHz. Parts are easily available. Heng Long deserves the credit for keeping their RC tank compatible over a 20 years period. If you are mechanically and electrically inclined, you may find the upgrade very enjoyable. However, it would be cheaper to buy the 2023 version of the same Heng Long tanks instead of upgrading. Shipping is cheap if the seller has US inventory.
                    Brand-Henglong – TOUCAN RC HOBBY (toucanhobby.com)

                    US Stock 2.4Ghz 1/16 Scale 7.0 Henglong German Panther G Plastic Track – TOUCAN RC HOBBY (toucanhobby.com)​​

                    You can separate the upper and lower half of the tank by removing 5 to 7 holding screws accessible from the tank bottom. Below are the pictures of my 2005 HL Snow Leopard upgraded to the 2023 Pershing metal version.
                    Click image for larger version Name:	HLpershing_TK27inside.jpg Views:	0 Size:	127.3 KB ID:	392530 Click image for larger version Name:	IMG_5130.jpg Views:	0 Size:	192.5 KB ID:	392531 Click image for larger version Name:	IMG_5122.jpg Views:	0 Size:	194.3 KB ID:	392534 Click image for larger version Name:	IMG_5124.jpg Views:	0 Size:	90.2 KB ID:	392533 Click image for larger version Name:	IMG_5176.jpg Views:	0 Size:	133.4 KB ID:	392532
                    Welcome to the forum!
                    That's an impressive upgrade! Looks like my tanks are quite old, I'll have to look into the cost of upgrading and go from there.

                    Comment


                    • #11
                      Originally posted by Durahl View Post
                      It wouldn't hurt giving them a nicer Paint Job 🤔

                      Have a look at Night Shifts Videos - In particular the Jagdtiger Chipping one will basically transform the looks of your model from zero to hero...

                      I did my scratch built E-100 like this:
                      Click image for larger version

Name:	jH2dWU4.jpg
Views:	165
Size:	164.4 KB
ID:	393288
                      Freshly painted Model using Tamiya XF-88 Dark Yellow 2, Tamiya XF-89 Dark Green 2, Tamiya XF-90 Red Brown 2 ( and Tamiya XF-9 Hull Red ) without any weathering applied to it yet...
                      ( Unless it's not obvious, I'm kinda suggesting a repaint of your models with less saturated colors 😏 )

                      Click image for larger version

Name:	BKUMbAH.jpg
Views:	154
Size:	217.4 KB
ID:	393289
                      Sponge Chipped with a lighter color than the Base Color ( added a few drops of Tamiya XF-3 Flat Yellow to the Tamiya XF-89 Dark Green 2 ) followed by smaller Fine Brush Chipping into the sponged Chipping using an "exposed" metal color. I cannot stress the importance of the Sponge Chipping using a lighter than the Base Color before doing the Fine Brush Metal Color Chipping.

                      Click image for larger version

Name:	ezLYtaf.jpg
Views:	149
Size:	126.6 KB
ID:	393290
                      Went over all the raised corners and edges of the model with a Graphite Art Pencil to deposit some of it, then rubbed with my fingers over them to spread the love all over the model to create the metal sheen you can kinda make out. Add a bit of wash into recesses, welds, etc... and you'll have a surprisingly decent looking model which you can then follow up with dirt buildup, rust, and the likes.
                      I agree, a paint job could really do them well, and the current paint scheme is way too saturated. That video was really cool, that Jagdtiger was completely transformed! Also I really like your E-100 build! What'd you make it out of?

                      Comment


                      • #12
                        Originally posted by MrChef View Post
                        Welcome the addiction, errr I mean hobby...

                        Both of mine used to look like yours awhile ago-

                        Love the detail! The rust on the exhaust really brings it together.

                        Comment


                        • #13
                          Originally posted by WingedBarb View Post
                          That's an impressive upgrade! Looks like my tanks are quite old, I'll have to look into the cost of upgrading and go from there.
                          When I do DIY metal upgrade, I spend money to have fun. The biggest improvement of a 2023 Heng Long tank over an early 2000's version is the proportional ESC. The modern HL drive like a real tank and the old HL drives like a toy car. Buying a 2023 professional version HL RTR tank gets the same improvement at a much lower cost than doing DIY upgrade.

                          When I do metal ugrade, I do not use HL parts. I use components from Taigen, Torro or Mato which are slightly higher in price, but much higher in quality and accuracy.

                          Comment


                          • #14
                            Originally posted by WingedBarb View Post
                            What'd you make it out of?
                            The major parts of the Hull and Turret were done in FDM using Dutch Filament ASA-X 🤔 Easier to post process ( gluing, sanding, surfacing, etc... ) than PLA / PETG whereas the Detail Parts were made in SLA using Formlabs Grey04. Some parts like the Swing Arms and Shackles were cast in ZAMAK after creating the necessary Molds in High Temperature Silicone.If you're interested in more details.

                            Comment

                            Working...
                            X