


Originally posted by Sureshot
View Post
-
I agree. I haven't tried it yet, but the interior door panel appears to be secured with two screws; unscrew, remove, reinstall. I think.The more screws it takes to reassemble a tank, the more likely it is you left something out! -
Got mine today, charged the battery and put it in, pushed and held the button under the hood for more than 2 seconds and NOTHING HAPPENS!!! Checked battery with multi-meter, fully charged (8.2v), reinstalled battery and still nothing. I wrote to banggood but I don't expect much. Their name isn't banggood for nothing, they'll bang ya every chance they get. I guess I'll have to take it apart and see what I can see.
Anyway, here's the box opening video
Comment
-
I had a non starter too but got it to work. Does your controller light up? Mine didn't so I took the controller apart, reseated all the plugs and played a bit with the on/off button on the board. One of those things made it begin to work and it has ever since. Like most cheap 2.4g systems, the controller has to be on before you turn on the receiver in order to bind. This needs to be done each time. I noticed in your video you hadn't found the instructions. You turn on the controller by holding the button down for a few seconds. Same for turning it off. Hope you get it to work, it's a kick to run!
By the way, the stickers are the "three part" variety. Take off the backing, place the sticker on your spot, rub it to ensure adhesion then remove the top clear covering. My photo on post 17 shows them applied. They look acceptable.The more screws it takes to reassemble a tank, the more likely it is you left something out!Comment
-
I took some shots of the steering options of this weirdly set up vehicle. I think it's cool regardless!
 The more screws it takes to reassemble a tank, the more likely it is you left something out!
Comment
-
My controller turns on, lights up and seems to be fine, but when I push the button under the hood and hold for 2 seconds or more nothing happens. Does anything happen when you turn on the car, like lights coming on or a noise or anything? Mind does absolutely nothing. My first suspect will be the JST plug for the battery. Hard to tell if it's getting a good connection, the way they have it set up. I also plan to make a little adapter so I can use other batteries. On the stock battery, the 3 prong JST plug only has 2 live sockets, the one towards the middle of the battery is negative, the 1 towards the edge of the battery is positive, and the 1 in the middle is empty. I want to make an adapter that goes from the white 3 prong JST plug in the car to the red 2 prong JST plug that's on the little 2s lipos that all my other trucks use. I get those from hobby king, they're only 350 mah but that's enough for at least 20 mjnutes on a truck that light and the best part is that they put them on sale once in a while for under 3 bucks each. The last time I bought them I ordered 10 so I have plenty laying around. I already checked and they're a good fit and I can swap batteries in under a minute.Comment
-
When you push the receiver power button the headlights should begin to flash. The instructions state to hold down the button for two seconds.
Looking down at the receiver, the power switch will be at the top right. There is a power indicator light at top center. The top left port is the power port. If you have a multimeter with the right connectors (I had to make a set for mine) you could check the power cable for energy. If you are really bold, you could take one of your other batteries and plug it directly into the receiver. Not recommending it, but I’d be tempted if I were in your situation!The more screws it takes to reassemble a tank, the more likely it is you left something out!Comment
-
Originally posted by Max-U52 View Post
Is this the right adapter/power cord ?
I planned to use also Red JST 2P upon arrival of my Steyr 1500A.
thank you Hobby Squawk RC Tank community !!
Attached FilesComment
-
-
That looks like it. I have a couple of jst plug kits so I'll just make one of my own, but I checked my battery and negative is toward the center of the battery and positive is toward the outside edge. The center pin is just empty.Comment
-
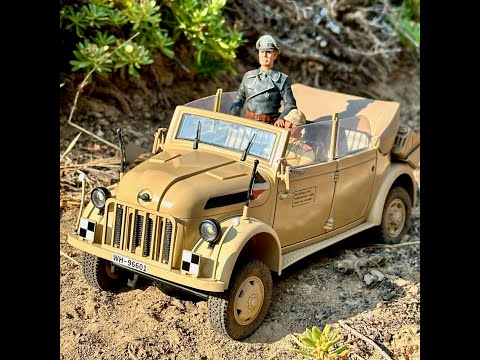
My command car arrived yesterday. So far so good.
SoCal RC Tank Club Facebook Group
Largest active RC Tank club in Southern California
Gathering 1-2x monthly/All Ages & Experience levels welcomeComment
-
I really like the dashboard lights.
SoCal RC Tank Club Facebook Group
Largest active RC Tank club in Southern California
Gathering 1-2x monthly/All Ages & Experience levels welcomeComment
-
Mine arrived yesterday as well. Charged the battery and discovered you have to push it all the way in to make a connection. After that small problem everything turned on and worked fine. I added some heng long smoke oil this morning and turned on the #5 dip switch and a lot of white smoke began pouring out of the exhaust pipe. (Wish my M5A1 would do that!). Just need to add the decals today.
Very happy with the Steyr 1500A so far. I ordered a set of larger 48mm tires for it from Amazon today so the wheel wells don't look so empty.
Steve. 😀Comment
-
Hi David,
I see you chose the camo version also. Did you make the pennant for the left hand flag? Looks good!
Steve. 😀
Comment
-
Can you please post a link to the tires and rims you ordered?Originally posted by Sureshot View PostComment
-
Here are the tires I ordered. I got the idea from a YouTube video.

Steve. 😀Comment
-
-
The extra detail (paint, flags, etc.) are definitely worthwhile! Congratulations.Originally posted by DavidN View PostThe more screws it takes to reassemble a tank, the more likely it is you left something out!Comment
-
The order of my version came with 2 set of decals. All the decals on the car you saw are from inside the box. I did not make anything. I will weather it this weekend.SoCal RC Tank Club Facebook Group
Largest active RC Tank club in Southern California
Gathering 1-2x monthly/All Ages & Experience levels welcomeComment
-
This is the other decal set.
SoCal RC Tank Club Facebook Group
Largest active RC Tank club in Southern California
Gathering 1-2x monthly/All Ages & Experience levels welcomeComment
-
1st picture submitted;Originally posted by Sureshot View Post
From Hooben
Tire for 1:16 Opel Blitz. (no specs submitted by Hooben)
Pattern of the tire look similar based on picture WW2 era.
Are they gonna fit the STEYR 1500A 1:18 RC kommandeurwagen ?
And if is a good fit; visual improvement of the "wheels looking empty" problematic reduced /mitigated?
Always a pleasure Hobby Squawk community !
Attached FilesComment
-
-
In order to fit they need to be 1" inside diameter. Most of the small-scale crawler tires are that size.
Looks like my tires will arrive in about 2 weeks. The ones in the link and the video I posted above look good but perhaps not as scale as your Hooben tires.
Steve. 😀Comment


Comment