


Heng Long 1/16 Scale "Challenger II" Main Battle Tank
Introduction:
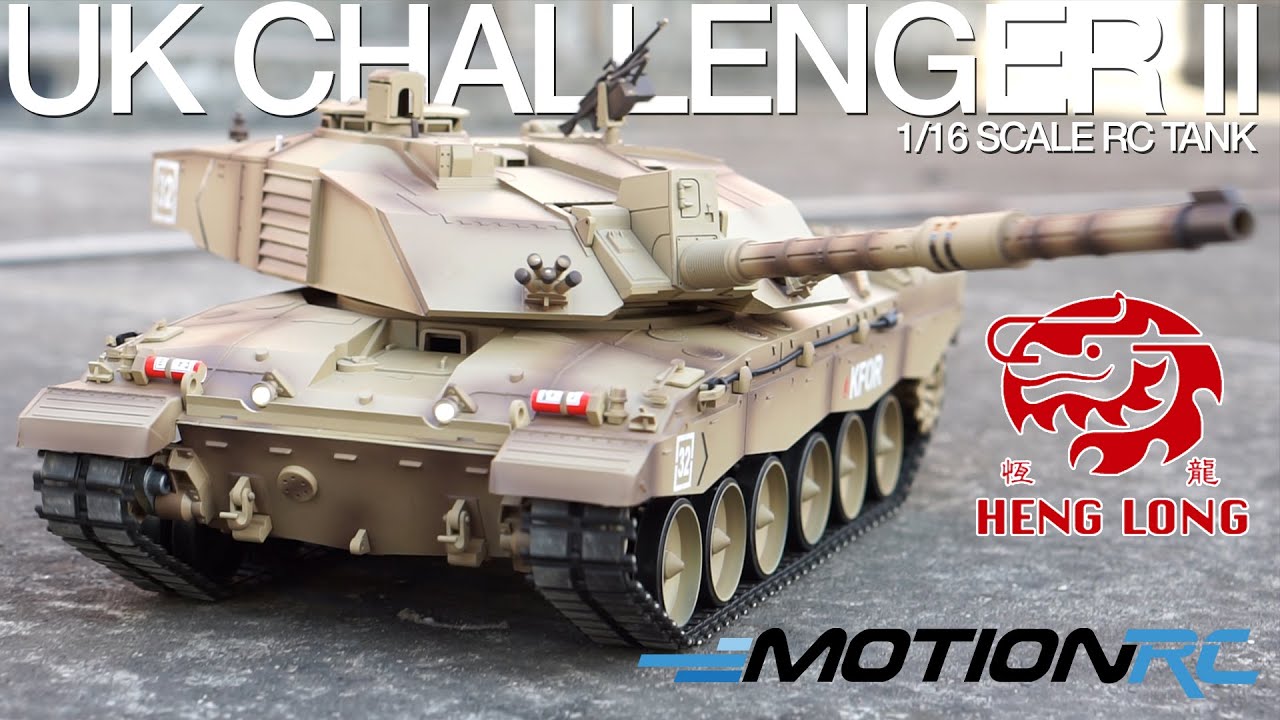
The Challenger II is the British Army's modern Main Battle Tank. Having distinguished itself in the Gulf War, the Challenger II remains the apex of British tank technology. Reliable, powerful, and well armored, the Challenger II is reputed as a "tank that wasn't made to win competitions, but to win wars".
My Personal Averaged Total Score for the Heng Long 1/16 Scale "Challenger II" UK Main Battle Tank: 90 out of 100
Heng Long's Challenger II is a faithful representation of the UK's most fearsome modern tank, in all its rifled barrel glory! Read below to see how I arrived at this rating, as I evaluate the "Upgrade" version of this tank. "Upgrade" means that its exterior is plastic but its interior gears are steel. Note, where shown, the metal tracks denote a "Professional" version which includes more external metal parts at higher cost.
As a visual companion to this written review, our Overview and Build Summary Video can be found *here*
Featuring the latest TK6.0 MFCB (Multi-Function Control Board), this tank is full of features:
1) Proportional acceleration, steering, turret traverse, and gun elevation/depression
2) Programmable radio settings for the amount of recoil, the sensitivity in turns, the overall sensitivity in acceleration, etc
3) Smoke (On/Off)
4) Volume (five settings including Off)
5) Four different Sound Sets. Each Sound Set contains a unique engine start sound, idle sound, accelerating sound, traverse sound, elevate sound, machine gun, cannon, and shutdown sound.
6) Track Recoil (Three settings from low, medium, and high) -- Low or Medium are the most realistic.
7) Fires a 6mm plastic BB
8) Fires an invisible IR signal to be used as part of Heng Long's Infrared Battle System to disable other tanks during simulated combat between up to 20 tanks at the same time
Scale Fidelity:
The Challenger II is one of the more recent tanks to be produced by Heng Long in 1/16 Scale RC, and it shows. The overall lines of the tank are accurate and the proportions don't leave any glaring issues. Being a very large tank in real life, the Heng Long 1/16 scale Challenger II is the longest tank offered by Heng Long. Two sets of decals are included to depict accurate markings from real units that were in
active service.
What's In the Box:
As an RTR or "Ready To Run" RC model, everything is included in the box except six AA batteries for the radio transmitter. In areas where shipping liquids is restricted, the glycerin used for the "smoke effect" is absent, but can be found locally at hardware or convenience stores that sell glycerin oil.
The radio, tank, cosmetic accessory parts, tank battery, tank battery charger, and plastic BBs, don't require any "assembly", other than installing the aforementioned "cosmetic accessory parts".
Initial Two Minute Function Test:
Because the tank itself is functionally complete and it doesn't require the cosmetic accessory parts to run, I recommend testing your tank's basic functions immediately after unboxing the tank, before you install the cosmetic accessory parts. If there happens to be any problems, it is better to report them to Motion RC for warranty support before the tank has any cosmetic parts attached to it.
To conduct this initial two minute test, insert six AA batteries in the radio and turn it on. Plug in the tank's included 2s battery and slide the tank's switch to On. The radio and tank are already "bound" to each other via 2.4Ghz signal, so simply press the Key button on the radio and your tank will activate. Move all the tank's controls in every direction to evaluate their function. Refer to the Manual for all controls. Note that the turret and cannon barrel will produce a "clacking" sound when they reach their maximum travel points. This sound is normal and is a warning for you to stop moving it in that direction. Importantly, DO NOT run the tank more than two minutes for this initial test, since it arrives with only a storage charge.
Once satisfied that your tank is operating normally, plug the battery into the included wall charger. While it's charging, turn your attention to the installation of the "cosmetic accessory parts", covered in the Details section, below. Installing the cosmetic parts onto the exterior of the tank result in the finished result:
Exterior Quality:
The tank is primarily composed of ABS plastic, which is nicely molded. There are a couple small sunken areas, but these are barely visible. The fit and finish of the tank is superb, considering its price, and I consider it a very good value. This version of Challenger II arrives fully painted in a base desert color and a factory-applied shading. The shading varies in weight at different areas of the tank, resulting in a nice, inconsistent shaded appearance. Some people may prefer an unshaded version, but in my case I plan on eventually using the factory shading as pre-shaded base for a custom airbrushed paintjob.
.
Details:
Several sprues of plastic parts are provided for the modeler to install on the tank. These all plug into pre-drilled holes, and are nearly "snap fit". A few of the parts were loose, so I bonded them with ABS glue. But otherwise, I prefer to keep the parts unglued so they're easy to remove or replace if needed in the future. Installing the plastic "accessory parts", from the smoke grenade launchers, 7.62mm MG, fuel drums, tow cables, shackles, and various other surface parts took me about 45 minutes. I wish there were more, but the real Challenger II's exterior is fairly plain so there isn't much work to be done. The tank's engine deck is nicely detailed and pre-painted as shown below. The smoke grenade launchers could use a bit of touch-up paint, as could the bottom of the fire extinguishers.
Assembly:
The tank arrives RTR, with a radio, tank, accessories, tank battery, tank battery charger, and plastic BBs. The glycerin needed for the smoker may not be included depending on your area's local shipping restrictions, but it's cheap enough to source locally. The main thing you'll need to run the tank out of the box is six AA batteries for the tank's radio.
Assembly of the tank itself is complete, and the tank can be running literally within a couple minutes of opening the box and inserting the batteries.
Once you're done verifying everything works, plug the tank's battery into the charger, since it only arrives with a storage charge.
While the tank's battery is charging, attach the plastic cosmetic parts, or "accessory parts" as they're called on the website. This took me as mentioned about 45 minutes to complete.
Apply the decals, as desired, on a cleaned and dried surface, using the instruction manual's clear diagrams. These are simple adhesive vinyl decals. They are NOT water slide decals. After applying them, you may want to seal them in with a clear coat. I didn't, and the decals continue to hold well to the surface. See the Build Video for tips on how to install the decals on the fire extinguishers which are mounted on the front glacis. I chose to paint the bottom of the fire extinguishers red, rather than use the included red circle decal.
By the time you're done detailing your tank with the parts sprues and decals, your tank's battery should be fully charged and you're ready for your first full run.


 . I appreciate the detailed responses. Thankfully, I enjoy painting and customizing, so I don't mind the added process to complete the look of the Professional version.


Comment