You must Sign-in or Register to post messages in the Hobby Squawk community
Registration is FREE and only takes a few moments

Register now

Announcement

Collapse
No announcement yet.

Customization Build Log and Tutorial: Heng Long King Tiger

Collapse
X
Collapse
First Prev Next Last
 
  • Filter
  • Time
  • Show
Clear All
new posts

  • #21
    Originally posted by Alpha View Post
    STEP 3: Upgrades: Running Gear

    With the steel gears and red motors installed, I opted to install the complete metal running gear set that is used on the Professional Edition of Heng Long’s 1/16 King Tiger. This running gear set includes
    1) Metal tracks
    2) Metal road wheels with two internal bearings each
    3) Metal road wheel hub covers
    4) Metal idler suspension arms
    5) Metal idler wheel
    6) Metal drive sprocket with two internal bearings

    Normally, I don’t like installing metal road wheels, since they just weigh down the tank. But again, I made an exception to my usual preferences.
    All the screws and springs remain the same, so swapping these takes about 20 minutes per side. It’s easy work. Shown below is the progression from left to right of the stock plastic road wheels mounted, then removing the wheel to show the arm, then swapping the arm to metal (while retaining the original spring), then mounting the metal road wheels.
    Click image for larger version

Name:	IMG_20200113_103120.jpg
Views:	4146
Size:	100.7 KB
ID:	232922


    The metal parts are finished well in general, but I did take a few minutes to deburr the road wheels. This ensures they run evenly along the tracks.
    Click image for larger version

Name:	IMG_20200113_193712.jpg
Views:	3778
Size:	70.1 KB
ID:	232918


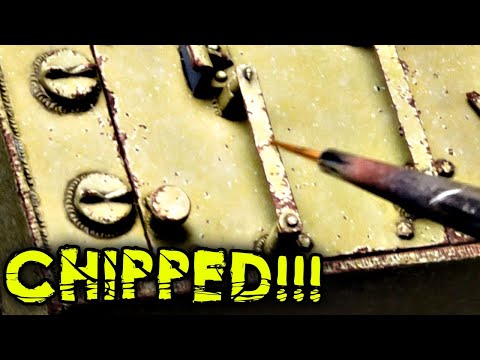
    Note the metal wheels arrive unpainted. I etch them with Gun Bluing fluid, then primer and paint with enamels. I use the hairspray method and four different colors of undercoats to achieve the layered weathering as seen below, followed by filters and washes applied in various techniques along the surface, followed by three coats of lacquer. I don’t get *too* finicky about weathering on the running gear of an RC tank, because practically speaking the first run in with a pile of gravel tends to wear down the paint quickly. I prefer natural wear, anyway.
    Click image for larger version

Name:	IMG_20200119_042858.jpg
Views:	3557
Size:	179.1 KB
ID:	232923


    After installing the new wheels, spin them with your finger to ensure they spin freely for several seconds. Adjust the screw tightness to ensure the wheels spin without binding. The bearings, two per road wheel as seen below, help reduce rolling resistance throughout the system. They do benefit from a cleaning every now and then if you plan to run through muddy or sandy surfaces.
    Click image for larger version

Name:	IMG_20200119_052710.jpg
Views:	3617
Size:	85.7 KB
ID:	232920


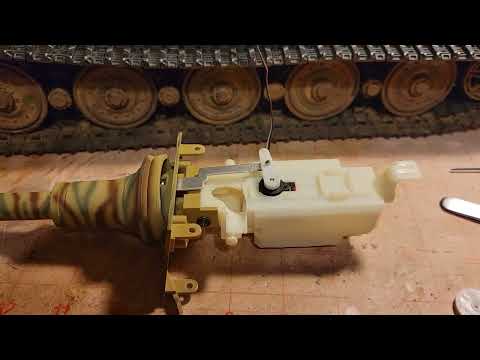
    Finally, before remounting the track, I adjusted the track tension by use of the adjustable idler. Note that the Heng Long 1/16 scale King Tiger, in ALL of its Editions, includes a metal adjustable idler as shown. This is not an upgrade I purchased separately –it was factory-installed on the tank. A very thoughtful feature!

    Click image for larger version

Name:	IMG_20200113_104048.jpg
Views:	3583
Size:	66.1 KB
ID:	232919Click image for larger version

Name:	IMG_20200113_104316.jpg
Views:	3660
Size:	81.6 KB
ID:	232921
    Can you explain what the "hairspray method" is as mentioned in your posting ?

    Comment


    • #22
      Originally posted by Cascabel View Post

      Can you explain what the "hairspray method" is as mentioned in your posting ?

      Comment


      • #23

        Comment


        • #24
          Interesting, but what does hairspray have to do with any of this ??

          Comment


          • #25
            Originally posted by Cascabel View Post
            Interesting, but what does hairspray have to do with any of this ??
            The hairspray makes the paint come off easier and in flakes.

            Comment


            • #26
              So how about some more info ?? How and when would you use it ?? I am totally unfamiliar with the procedure, but want to learn about it......

              Comment


              • #27
                You put down the red oxide primer on a German tank let that fully cure, spray hairspray over it, it only takes a couple seconds to dry, then immediately spray on your base coat (acrylic), and let that cure for a few minutes get a toothgrush, wet it a bit and brush over the surface where you want to chip the paint, you can scratch with a toothpick as well to get say a gouge mark or more control to scrape paint off a specific detail. , how long you let the base coat of paint cure dictates how big the chips are and how hard youll have to work to get your chips, longer dry time up to about 15-20 minutes will net smaller chips that take more work to achieve doing it within a few minutes results in large flakes of paint coming off. , How it does this is the hairspray is also water soluble, but much more so than the acrylic paint, so once you scratch through the layer of paint the water wicks under the paint, spreading along the hairspray lifting it slightly and allowing it to be scratched or brushed away. after about the 20-25 minute mark, the acrylic is pretty much cured to the point were its almost impossible to scratch through and chip. It is important to use dissimilar paint/ and primer here because if you use both an acrylic primer and paint you risk reactivating the primer wet scrubbing like you do with this technique lacquer/enamels stick better to the henglong tanks for your prime coat anyway. Night Shift, the guy that did those 2 YT videos posted earlier is the freaking rust MAN, Ive spent evenings just watching his tutorials. The ones doing flame torch scoring on plates and epoxy putty welds, and texturing with Mr Surfacer are avbsolutely just brilliant
                .

                Comment


                • #28
                  Night Shift is THE MAN!!!

                  Comment


                  • Elbee
                    Elbee commented
                    Editing a comment
                    HS, Thanks for leading us to NS. He is one funny guy. I like his work, too. Best, LB

                • #29
                  Originally posted by Vaseline View Post
                  You put down the red oxide primer on a German tank let that fully cure, spray hairspray over it, it only takes a couple seconds to dry, then immediately spray on your base coat (acrylic), and let that cure for a few minutes get a toothgrush, wet it a bit and brush over the surface where you want to chip the paint, you can scratch with a toothpick as well to get say a gouge mark or more control to scrape paint off a specific detail. , how long you let the base coat of paint cure dictates how big the chips are and how hard youll have to work to get your chips, longer dry time up to about 15-20 minutes will net smaller chips that take more work to achieve doing it within a few minutes results in large flakes of paint coming off. , How it does this is the hairspray is also water soluble, but much more so than the acrylic paint, so once you scratch through the layer of paint the water wicks under the paint, spreading along the hairspray lifting it slightly and allowing it to be scratched or brushed away. after about the 20-25 minute mark, the acrylic is pretty much cured to the point were its almost impossible to scratch through and chip. It is important to use dissimilar paint/ and primer here because if you use both an acrylic primer and paint you risk reactivating the primer wet scrubbing like you do with this technique lacquer/enamels stick better to the henglong tanks for your prime coat anyway. Night Shift, the guy that did those 2 YT videos posted earlier is the freaking rust MAN, Ive spent evenings just watching his tutorials. The ones doing flame torch scoring on plates and epoxy putty welds, and texturing with Mr Surfacer are avbsolutely just brilliant
                  .
                  Thanks much !!! I was looking for a complete explanation so I could better understand the technique.......

                  Comment


                  • #30
                    I blatantly copied Alpha's technique on my King Tiger. In my case I used Tamiya TS spraycans over the hairspray on the metal wheels. It still works, but the spray paint is much harder to chip away. So yeah, it's best to use a thin layer of acrylic through an airbrush. It's fun to do though, and looks better than painted on chipping.

                    Comment


                    • #31
                      Originally posted by UltraVargen View Post
                      I blatantly copied Alpha's technique on my King Tiger. In my case I used Tamiya TS spraycans over the hairspray on the metal wheels. It still works, but the spray paint is much harder to chip away. So yeah, it's best to use a thin layer of acrylic through an airbrush. It's fun to do though, and looks better than painted on chipping.
                      I use a combination of the hairspray chipping, and "additive" painted on chipping. I personally dont like a heavily weathered vehicle, so I dont use alot of rusting effects, sometimes even if you let it cure a while you just get too much chipping with the hairspray method, you just dont really have much control with what comes off. long story short I mostly use the hairspray on the fenders and wheels that would see alot of wear, or I did a King Tiger for a friend and I had a spot on the upper and lower frontal plates I imagined hit a big hokin tree and weathered that crap out of that spot.

                      Comment


                      • #32
                        Originally posted by Alpha View Post
                        STEP 2: Motor Upgrade


                        I like that Heng Long’s 2020 era tanks include steel gears for all editions except the most basic edition. Motion RC is only carrying editions with steel gears. For the general tanker, I think the stock motors and gears are more than adequate. I try not to dump too much money into my RC machines unless/until I need to. In this King Tiger’s case, I made an exception and opted to install red motors. This is a simple “upgrade” that bolts right in with zero modification to the tank. It takes about five minutes to do:

                        1) Unscrew the stock motor gearboxes and unplug them
                        2) Remove the hex screw holding the sprocket to the shaft
                        3) Wiggle the sprocket off the shaft. This makes swapping easy because you don’t need to separate the tracks.
                        4) Reverse the process to install the new gearboxes

                        Click image for larger version  Name:	IMG_20191224_012425.jpg Views:	2187 Size:	93.1 KB ID:	232911Click image for larger version  Name:	IMG_20191224_012929.jpg Views:	2085 Size:	94.4 KB ID:	232912
                        Click image for larger version  Name:	IMG_20191224_013220.jpg Views:	2114 Size:	113.4 KB ID:	232914Click image for larger version  Name:	IMG_20191224_014823.jpg Views:	2081 Size:	121.3 KB ID:	232913

                        I also installed a servo driven recoil and elevation unit. More on this later… Subscribe to this thread for future updates!

                        Click image for larger version  Name:	IMG_20191201_231209.jpg Views:	2151 Size:	88.3 KB ID:	232916Click image for larger version  Name:	IMG_20191201_230132.jpg Views:	2095 Size:	80.5 KB ID:	232915
                        Well, I'm working with a later edition and trying to figure out how feasible it would be to put more powerful motors on my upgrade edition Tiger II on Edition 7.0. But when I look at the gearbox and compare the two it has these "covers" that block access. Do you know of a way to disassemble one of these?

                        Comment


                        • #33
                          Originally posted by phalanx View Post

                          Well, I'm working with a later edition and trying to figure out how feasible it would be to put more powerful motors on my upgrade edition Tiger II on Edition 7.0. But when I look at the gearbox and compare the two it has these "covers" that block access. Do you know of a way to disassemble one of these?
                          The covers just pull off. They are simply snapped on. The gearboxes are the same dimensions as the prior generation boxes.

                          Comment


                          • #34
                            Originally posted by Rubicon99 View Post
                            The covers just pull off. They are simply snapped on. The gearboxes are the same dimensions as the prior generation boxes.
                            Wow, I did not expect a reply so fast, thank you, it worked!

                            Comment


                            • #35
                              Just to confirm.....I use a screw driver to open them from the front

                              Click image for larger version

Name:	IMG_0586.JPG
Views:	434
Size:	114.2 KB
ID:	348442

                              Comment


                              • #36
                                Originally posted by Alpha View Post
                                STEP 2: Motor Upgrade

                                I like that Heng Long’s 2020 era tanks include steel gears for all editions except the most basic edition. Motion RC is only carrying editions with steel gears. For the general tanker, I think the stock motors and gears are more than adequate. I try not to dump too much money into my RC machines unless/until I need to. In this King Tiger’s case, I made an exception and opted to install red motors. This is a simple “upgrade” that bolts right in with zero modification to the tank. It takes about five minutes to do:

                                1) Unscrew the stock motor gearboxes and unplug them
                                2) Remove the hex screw holding the sprocket to the shaft
                                3) Wiggle the sprocket off the shaft. This makes swapping easy because you don’t need to separate the tracks.
                                4) Reverse the process to install the new gearboxes

                                Click image for larger version

Name:	IMG_20191224_012425.jpg
Views:	3669
Size:	93.1 KB
ID:	232911Click image for larger version

Name:	IMG_20191224_012929.jpg
Views:	3540
Size:	94.4 KB
ID:	232912
                                Click image for larger version

Name:	IMG_20191224_013220.jpg
Views:	3583
Size:	113.4 KB
ID:	232914Click image for larger version

Name:	IMG_20191224_014823.jpg
Views:	3556
Size:	121.3 KB
ID:	232913

                                I also installed a servo driven recoil and elevation unit. More on this later… Subscribe to this thread for future updates!

                                Click image for larger version

Name:	IMG_20191201_231209.jpg
Views:	3695
Size:	88.3 KB
ID:	232916Click image for larger version

Name:	IMG_20191201_230132.jpg
Views:	3542
Size:	80.5 KB
ID:	232915
                                Very interested in the Servo recoil conversion. Where is the conclusion of this build?

                                Comment


                                • #37
                                  FANTASTIC!!! You have given me a lot of help. I have the Taigen version and want to improve the detail. Question. Are the red motors a better proportional speed? While the original motors are fine, I seem to lack the touch to not haul a$$. My HL Sherman and Tiger one have stock mottors and really look the speed of a tank. Subscribed. Again, great work sir!

                                  Comment


                                  • #38
                                    Originally posted by 761st View Post
                                    FANTASTIC!!! You have given me a lot of help. I have the Taigen version and want to improve the detail. Question. Are the red motors a better proportional speed? While the original motors are fine, I seem to lack the touch to not haul a$$. My HL Sherman and Tiger one have stock mottors and really look the speed of a tank. Subscribed. Again, great work sir!
                                    Hi, 761. There is a speed adjustment in Heng Long tanks, if you're not already aware of it. Hold down the G button and push the right stick down for low gear, up for high. I've found it works on some tanks better than others, not sure why, I'm guessing it depends on the main board version. Low gear decreases the voltage, so counterintuitively you may have to "shift up" to climb an incline! I have a Tiger II that slows down significantly in low gear.

                                    Red motors can take higher current, but I'll let others address that.
                                    Twenty six tanks, and not done yet!

                                    Comment


                                    • #39
                                      Originally posted by 761st View Post
                                      FANTASTIC!!! You have given me a lot of help. I have the Taigen version and want to improve the detail. Question. Are the red motors a better proportional speed? While the original motors are fine, I seem to lack the touch to not haul a$$. My HL Sherman and Tiger one have stock mottors and really look the speed of a tank. Subscribed. Again, great work sir!
                                      Two very simple and easy options for increased speed and torque in addition what Bod pointed out. Up grade the battery voltage to 9.6 using a NiMH battery pack or add red 390 motors. Don’t do both unless you want stupid fast ridiculous speed for a Tiger.

                                      The 6.0-7.0 system are rated up to 12.6v. In low power/gear mode the system limits the max voltage output to 7.2v regardless of battery. In high power/gear mode the system can use up the 12.6v. But much past 9.6v and thing can start to get hot (usually when a 11.1 Lipo is being used=12v+ at peak output) so you must remember to use max power sparingly.

                                      Comment


                                      • #40
                                        King Tiger-Recoil Servo, Option B


                                        Comment

                                        Working...
                                        X