You must Sign-in or Register to post messages in the Hobby Squawk community
Registration is FREE and only takes a few moments

Register now

Announcement

Collapse
No announcement yet.

CBC's Pershing project

Collapse
X
Collapse
First Prev Next Last
 
  • Filter
  • Time
  • Show
Clear All
new posts

  • CBC's Pershing project

    Alright, I did it; I've ordered parts from here or there and they've arrived. I've got some work ahead of me now.

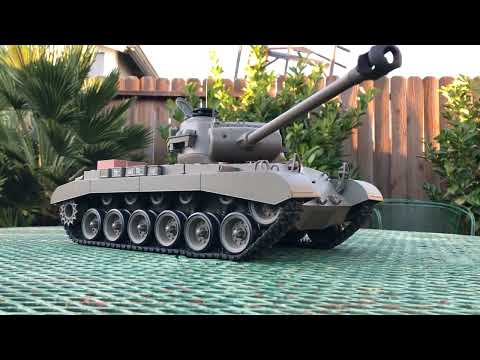
    Kenny (DAK) sent over the electronics for my Pershing; the Clark TK50E, and the FlySky radio system. I had already ordered the connector kits suggested in the other thread which has been a huge help so far (thanks tank_me!). I've also received a longer recoiling barrel and a barrel smoke/flash kit. I'm going to switch the recoiling system over to a servo though. The barrel came from Toucan on ebay but is a few inches longer than what is on the tank now; I have heard that the original barrel is too short for scale, but this might be closer. I did also receive a LegoDEI IR receiver (for this and at least 1 for another tank) and some of the high output IR emitters.

    As I go through this conversion I'll be taking photos of the process, and will definitely get video once it's complete. There's a lot of wiring to do... and I'm still on the fence on re-painting the tank. I'd like to make it more "my own" for sure but at the same time I want to end up with something that is somewhat realistic looking. There will be some other bits & pieces I need to either purchase or make during this process but I gotta say, I am happy that I went with the Clark board at this point. Not only for the sounds, but so far as I'm testing things out there seems to be better (finer) control over the turret and main gun as well. Kenny hooked me up with the new E variant for the M26 and it's got some cool additional voices, and 1 track of parade music...

    Clay

  • #2
    Slow Mo cannon firing of the Henglong Pershing currently undergoing a transformation to a T26E4 "Super Pershing". Trying out the 240fps setting of the DJI Os...

    Comment


    • #3
      Looks good Zippersnapper!

      I made some progress but this is time consuming (along with other holiday projects). Photos from yesterday, just getting started.

      Click image for larger version  Name:	IMG_0717.jpg Views:	0 Size:	90.3 KB ID:	363909

      What I found today though is that the Clark board does not fit where the HL board fits; it's too tall. It's now sitting next to the battery compartment, on the Right side. The receiver is double stick taped to the Left side. I located a pair of volume control pots on Amazon although the wiring is backwards; not a big deal, just needed to switch a couple wires in the connector to make it function. The drive motor wires had to be lengthened and it appears I plugged them into the wrong sockets as left turn = right turn, and vice versa. Easy fix that I should be able to get to tomorrow...

      The small speaker is handling the output just fine but with the hull together it reduces volume a bit and muffles the output. I may end up going with a bigger speaker later on just for more volume 😎

      So I need to disassemble the turret and see what I'm going to do for the smoke & flash unit still, before connecting any of those wires, in addition to swapping out the IR emitter. I still need to modify the new gun/airsoft unit for the servo recoil as well. I've been reading the "manual" online for the Clark board and I'm excited over all the features and adjustability it has. The more progress I make, the more interested my daughter is now as well!

      Clay

      P.S., the cold start is incredibly similar to this:
      The only remaining documented Pershing Tank that cross the Ludendorff Bridge at Remagen resides at the Wright Museum in Wolfeboro, New Hampshire. This tank ...


      "two more pumps"... "Try again!"
      Attached Files

      Comment


      • #4
        Your not going to use the airsoft-Right? So get rid of it or chop off the bottom half for more clearance. I modded my Mantlet to fit the aluminum Hellcat barrel and then used the Clark recoil. Works flawlessly. Click image for larger version

Name:	recoil pershing.jpg
Views:	337
Size:	82.1 KB
ID:	363931
        Don't just fly--WREAK HAVOC!!!

        Comment


        • #5
          Some progress last night.

          I disassembled the airsoft unit on the new gun and cut the bottom off. I also cut off the nipple from the firing mechanism but kept the large cylinder, but removed everything else. The barrel still connects to the large cylinder which seems to keep it stable and gives it positive stops, as well as the small return spring, but I will mount the servo on the side and connect it with a small servo rod to try and get the right travel from the servo arm. I didn't get photos last night but I will tonight of that progress.

          Hopefully, removing the nipple from the firing mechanism will allow enough room for the smoke tube along with the LED wiring to pass through the loading port into the barrel. I was thinking that it probably doesn't matter how far down the barrel that silicone tube goes, but it may be beneficial to trim the length. Not sure on that yet but hopefully I'll have time to test that out this weekend, of course before installing the new assembly :)

          We tested the LegoDEI receiver using a standard Heng Long Sherman. That unit is sensitive for sure! Seems as though the IR beam must be incredibly wide coming out of a standard Heng Long tank. We were indoors of course and not exactly testing distance but aiming didn't really seem to matter. I'm planning on getting (or making) some small tubes as I've read that should help narrow down that beam a bit.

          As far as the motor leads were concerned, it seems that I did have them connected correctly and I just needed to reverse the steering input. I was a dummy and swapped the leads... the tank then went backwards instead of forwards. I do need to work with the radio a bit anyway as the stick layout is different at the moment. The touch screen on it is a nice "touch" but the resolution is not high so you don't get a lot of info on a single screen.

          Clay

          Comment


          • #6
            Lego receivers are sensitive and indoors you will get lots of reflection/scatter from the IR. You can do what I do and cut a drinking straw(black) and make an extension over the IR bulb. I cut mine down the middle so you can roll them tighter to fit into the mantlet. This will focus the Beam. Length is relevant. Some bulbs need longer to focus then others. the 9-10mm rule on IR depth is just a reference point.
            Don't just fly--WREAK HAVOC!!!

            Comment


            • #7

              Comment


              • #8
                I was thinking something like the old coffee stir sticks (that look like tiny straws) could be an option. The nice thing with this tank now is that I have a "spare" main gun assembly, including mantlet :)

                I worked on the recoil last night and apparently after getting my covid booster didn't get all the photos I thought I was going to get 🤔

                I used the remote to adjust the servo direction which worked great. For lack of a servo mount, I gave it a suitable location on the side of the breech and drilled 2 holes to pass a zip-tie through, and added 3M double-sticky tape (the gray stuff). Drilled a small hole in the arm for the gun recoil but left the arm connected to the cylinder with the small return spring. I added some bends to the linkage between the servo and the arm, for adjustability and it works well. I did have to trim a lot from the airsoft loading channel to make room for the head of the servo, but since it's not shooting airsoft that doesn't matter. The loading channel is used as support (a pivot point) for the main gun though and is necessary.

                Click image for larger version

Name:	IMG_0726.jpg
Views:	258
Size:	102.2 KB
ID:	364229

                Click image for larger version

Name:	IMG_0727.jpg
Views:	242
Size:	93.1 KB
ID:	364230

                Making progress... today looks like I'll be breaking out the soldering gun.

                Clay

                Comment


                • #9
                  looks good...an easier way to add servo recoil.......

                  A quick step by step on how I do a servo recoil conversion for Henglong Tanks. Keep in mind this only applies for 6.1s & 7.1 Henglong MFU's and aftermarket b...


                  Comment


                  • #10
                    That looks like a much better method Zippersnapper, the servo has a lot more support mounted that way for sure! I'll remember that for next time.

                    I was able to spend some time over the weekend on the tank and got the muzzle flash LED and smoke tubing in the barrel, trimming more of the loading channel to make room for the tubing to exit. The smoke unit and control board seem to not work as intended unfortunately. Any time power is applied to it's power plug, both the smoke unit heats and the air pump starts going. It doesn't matter if the trigger wire is "triggered" or not so I need to see what else I can do there. On the smoker topic, can I give the heating coil full battery voltage for engine smoke (and barrel smoke)? The TK50 appears to not have an internal switch for that, but looks to require an external manual switch to activate the blower motor.

                    I had placed the LED right at the end of the barrel in hopes that, while not really poking into the muzzle break, the flash with smoke would give a nice effect anyway. Well, even without the smoke, I found that as the barrel recoils, the LED is exposed making it brighter, and then once the barrel returns it's basically hidden again. I like how that ended up 😎 and will be getting video of course soon.

                    Clay

                    Comment


                    • #11
                      Clay, I wish I could give constructive advice on your setup as it pertains to the Clark style of boards, but I never was able to wrap my head around them and traded off all that I had.
                      I have however installed many barrel smoke/LED setups. If you have a Henglong board lying around, step one would be to verify if its in working order. If it still wants to run without being triggered, then the unit (control board) is probably defective. If bought from Toucan or one of thier sellers, ask if they will swap it out-chances are they will. As far as the LED poking out the barrel when fired, Its going to do that unless you put a tiny dab of super glue on the LED itself, place the LED where you want it while the barrel is fully extended.

                      Finished up another conversion late last night...This servo needs a lube job-noisy as hell.


                      Please keep us posted...

                      Comment


                      • #12
                        I did get some more electrical done, now the hull machine gun lights up, the new IR emitter is installed/wired, and the LegoDEI apple is "installed" and wired up. This has the 360 shade on it. Tested with the KV-1 and they can both hit each other (the KV-1 is stock Heng Long).

                        Since we are in Nor-Cal, (I.E, not close to El Monte or clubs) I am going to set this board to accept the same number of hits as the HL tanks, and reduce the reload time a bit as well to hopefully keep our battles somewhat fair, since I would likely die quickly with this tank!

                        I do like the way the LED in the barrel works, since during recoil it pokes into the muzzle break and is brighter on firing, then it's hidden again. I just received a package of on/off switches so the next step is to work on the smoke units in the tank. The hull sure is packed with wires & such at this point as the air pump and smoker for the cannon are located there, along with everything else.

                        Clay

                        Comment


                        • #13
                          Barrel smoke update:

                          Got it working last night! Power to the smoker controller is supplied by CN3, pins 1 and 3 on the Clark board. The smoker and the smoke pump both come off that smoker controller. I tied the trigger to J3 on the board, same connector used for barrel flash. The flash is still driven directly by the Clark since I already had it connected that way. I now have flash & smoke on firing the main gun!

                          As I was going through the settings on the Clark, somehow my servo recoil stopped working. I *thought* I set the board to servo recoil only (no airsoft) but maybe I need to go back to the default setting, which worked. Recoil did have some intermittent issues... I think if you shut the engine off (or died in battle), and then restarted the engine, it stopped recoiling. Maybe I'll get some time this weekend to go through those settings. The servo seems to be OK although I did not test a different servo yet; unplugging the servo, and plugging it back in results in it re-aligning itself to battery position (main gun forward, not rearward like during recoil).

                          Clay

                          Comment


                          • #14
                            Hi Clay,
                            very important that you check for any drag in the recoil system by manually moving it while the servo isn't connected to the mechanism. The problem you describe sounds like the servo stalls out and stops working. Not good. You run the risk of burning out the servo. Sand the barrel to get it as friction free as possible. Don't rely on lube.
                            Don't just fly--WREAK HAVOC!!!

                            Comment


                            • #15
                              Ahh, interesting to know. I had left the light recoil spring in place as it seemed to assist with keeping everything stable. It moves freely enough, but has that spring to return to battery. Maybe I did fry that servo from keeping the spring in place... I'll definitely take a look at that!

                              Clay

                              Comment


                              • #16

                                Comment


                                • #17
                                  Going over what else needs to be done, looks like I'm down to hull lighting, engine smoke, check the recoil, and once it's all done start doing some weathering. I was waiting to do that last...

                                  I might end up getting the metal sprockets in the future, not sure if I really need to do any other metal upgrades. I already did the tracks; they are blued with Oxpho blue. This tank so far is quite heavy, heavier than you would think with all that's inside. Although I have what was advertised as the Mato speaker upgrade inside, with the air pump and 2nd smoke unit mounted in the lower hull there's not a lot of room for anything bigger but I will be measuring to see what I can do, as it would be nice to have an even better speaker.

                                  I know there has been discussions on smoke units. After what I've read I'm guessing I'll need to "top off" both smokers at around the same time I go through a battery, using those large Li-Ion batteries that last seemingly forever. once everything is working. I'll be opening them up to see what they look like inside. The unit that came with the barrel smoke kit is metal and has a fill port on top; I've seen it mounted in the turret on some models (maybe a Leopard?) which makes for easy filling via a hatch, but mine is in the lower hull so I'll be opening it often. Might need to convert it to magnets.

                                  Aside from all that she's battle ready. I have not tested IR range outdoors but it is quite excellent in the house.

                                  Clay

                                  Comment


                                  • #18
                                    We've had some sun for a bit now to dry things out, and I was able to mow the grass after work and do some "testing" in the back yard. No photos or video unfortunately but wanted to share the results of the testing.

                                    Hidden across the yard 20' away was my HL KV-1. Only mod it has is the LegoDEI receiver mounted on top. As I was by myself the enemy tank just hung out hidden next to the wood shed.

                                    Firing up the Pershing, the engine smoke goes well enough (although, it may have too much fluid in the tank but it's not over the heating element). Driving it with the Clark is different especially since I disabled the tight turn feature; the tank only turns if you have the stick pushed left or right and throttle is applied. Pushing the stick left or right with no throttle results in no movement; expected behavior. The Heng Long with disabled spin does turn if you push the stick left or right, it just won't do a 360 in place anymore. Anyway, shots across the yard to the KV-1 work well. The high output IR emitter in the original location still needs to be aimed pretty much dead on to register a hit. The flash and barrel smoke are much cooler in "battle". I noticed in the instructions that the Clark has "momentum", and I can see that when traversing the turret. Not only will the turret traverse faster (or is it just smoother?), it takes a moment to slow down after movement.

                                    I need to get some more paint thinner before I can start weathering but I think, aside from the recoil not functioning at the moment, it's ready. I haven't opened it up again to try re-programming that or test with another servo just yet for the recoil. I'm going to "need" a new tow cable... probably something like an actual cable and not just the molded plastic thing. One of the tow hooks is missing in the grass somewhere as well, so I'll have to figure something out that works better there. Audio... I will likely be picking up one of those Dayton speakers and attempting to see what kind of box I can fab up for it on the 3d printer. There's really not a lot of room in the hull at this point; the air pump for the barrel smoke is in the front of the hull which limits space for a speaker but maybe I can make a box that is small on the bottom and gets larger where there is space, so then the speaker could mount in it. I am super stoked though with the way this tank is running now

                                    Clay

                                    Comment


                                    • #19
                                      Click image for larger version

Name:	IMG_0912.jpg
Views:	113
Size:	136.1 KB
ID:	369776

                                      Click image for larger version

Name:	IMG_0914.jpg
Views:	106
Size:	128.8 KB
ID:	369777

                                      Comment

                                      Working...
                                      X