You must Sign-in or Register to post messages in the Hobby Squawk community
Registration is FREE and only takes a few moments

Register now

Announcement

Collapse
No announcement yet.

Challenging, Challenger for Keilau.

Collapse
X
Collapse
First Prev Next Last
 
  • Filter
  • Time
  • Show
Clear All
new posts

  • Challenging, Challenger for Keilau.

    As requested by Keilau, this is the full build and my amateurish approach to a Challenger 2, as used by the Scots Dragoon Guards. My previous thread was the abbreviated write up. This has all the failing, breakages, and general fu#* ups. A warts an all write up. I purchased a basic spec model, but with metal road wheels and tracks. I hope to move on having learnt a lot from building my Abrams. With this one I have not rushed in like I did with the Abrams, and have more of a plan.
    Anyway a couple of weeks ago a box came from DKLMRC, containing tracks, drive sprockets, idlers and the Chobham Armour. The tank was dismantled and the new tracks, idlers, and sprockets fitted. 1FF66230-437C-4705-9EBC-007B08E74B82.jpeg A6F3D3D8-B1C0-4D79-88C8-DABC0F87306F.jpeg
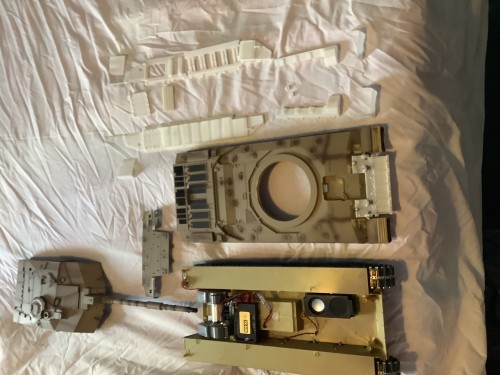
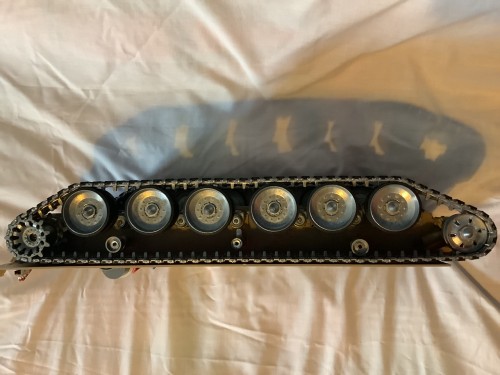
    First problem, the DKLM drive sprockets are too narrow, so used the original sprockets, which resulted in a very smooth drive.
    Next I assembled on side of the add on armour, just for ****s and giggles and to see what it looked like. B7BFABB4-3116-442E-97CE-A3D7B20358FF.jpeg
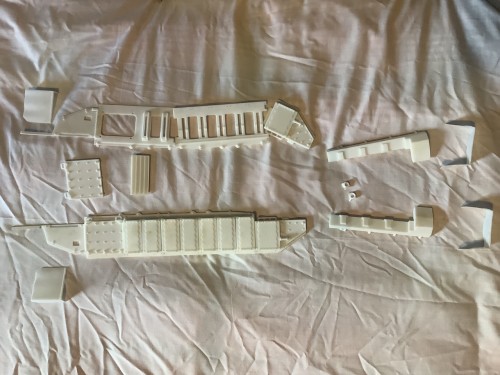
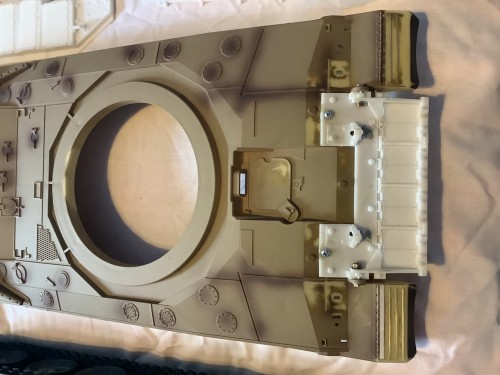
    A start has been made on the nose armour pack, which was glued into place and a pair of screws and nuts were used to represent the large nuts and bolts that hold the armour to the recovery points. Two self tappers were used to get a good glue bond. The nose armour required the detail removing from the front and a small amount of filling to fit.These will be filled later. JB Weld was used to attach the front armour. Please note, for our colonial cousins the correct spelling of the word armour. 🤣
    5467F2CB-94BC-4576-9C1C-460E6439CC1D.jpeg
    While this was drying a start was made on the taillights. Slowly, slowly one at a time. 62188BBC-1C03-48B3-9936-3167563584FA.jpeg
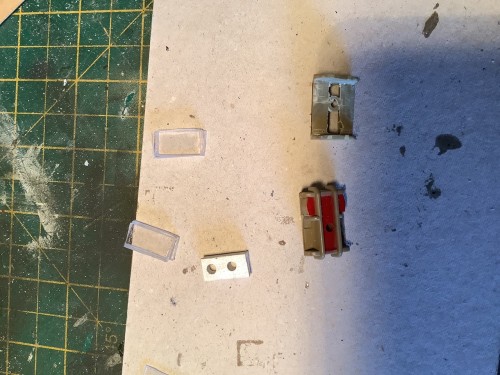
    Again I hope to get it looking good from 3m away, .
    Electronic wise, I think I am going to keep it simple, as I do not battle, unless my friends autistic son is around, I might just tell him we can not fight, as he kept beating me when I used the Challenger and he used my T72, and mainly just run for pleasure around the garden. I am thinking a 6.1 control, with a 360 turret, flashing and smoking gun, with recoil,and the bb mechanism removed. I will try to get working indicators and brake lights.​

  • #2
    Today I have been held up on the re-wiring of the house we are building, in Argyll. And being the West Coast of Scotland it is slightly damp, so cannot work outside. So a little work has been done on the rear. The rear has been loosely assembled to see what can be improved. Looks like all of it! 27285EA4-D919-4073-A364-5E2E9BC8D56A.jpeg 3303338E-2118-4E23-A0C8-F4DFE33ABDB1.jpeg
    Back lights and lenses. Drilled out for 3mm LED’s. When looking at photos of the real lights there is an awful lot of detail to make, especially the mounting brackets A6469909-B6EC-4BD8-B3E1-B95DB15E336E.jpeg
    Looks like every bit will need something doing to it. By breaking things down to more manageable sections the whole thing becomes less daunting. Unlike the Abrams where I flitted from one job to another. The light will be finished to the point where they can be painted and attached, the lens will then be fitted.
    The towing eye looks to be the next to come under knife.​

    Comment


    • #3
      This is for the tail lights being built. Back lights attached. The lens are not fixed in place yet, as they are just dry fitted. When you look at these lights, you realise how much detail there is, like the rubber mounts and the guard bars/cage. Slowly and working on one part and at a time. Next work will be on the tow hooks. 3459D822-4FBA-49F5-97C0-F033B478BC3D.jpeg 4DC18B3E-463B-402D-BA2E-6A7035E05442.jpeg 78879F96-D850-463F-9DCA-D01ADC18DE75.jpeg
      By working on one part at a time, things definitely become manageable, and this seems to be raising my skills.​

      Comment


      • #4
        Small update. Over the last couple of evenings work has been on the towing pinitle. The first thing to note is that the movable part is a lot closer to the rear bulkhead than the model. With a bit of reworking, I was able to to build a working pinitle, that looked, imho, a lot better.. C78CD371-DF19-4548-8E35-0C7BAF19F8BB.jpeg FFD45683-52A1-40BA-8311-55C4AF5BA002.jpeg

        Comment


        • #5
          Work on the back end. To get it to look respectable. Spare track hangers made, details added to the telephone box, backs of jerry cans filled, cable and winding handle added to telephone drum, thinner base made for jerry can holder. Now need to make the top of the can holder, the reversing indicator for the centre of the tank, drums need completing, and straps and buckles will be added after paint. It will the be stripped all down for sanding and filling, ready for paint. This may not be 100%, but working from photographsit does not look too bad. E81D0D38-932D-4FA6-AC77-ADF413261F7E.jpeg E543A60D-9E45-48DB-9555-37184BB23211.jpeg BA56C4E0-C659-4DDC-88D0-49322EE1FF0E.jpeg ATTACHMENTS F0DCC017-99B4-4DE8-A52B-B03463343F5C.jpeg

          Comment


          • #6
            Small update on this build. An unexpected day off work has allowed a bit of work to be carried out today. Indicators, conduits to headlights, and front mud guards fitted.
            Indicators, conduits to headlights, and front mud guards fitted. Front mud guard
            Side dust skirting. They are different on each side, to replicate the tank i an building.
            Side dust skirts
            Rear mudguards
            Rear mud guards
            Went to the trouble of making the gun lock open as well. Then found I had glued it together. I need to find some small nuts and bolts and make the little plates that join the skirts together, and make the plates that hold the mud guards in place.

            I 645431B5-2A21-4374-9ECA-B01C2FD404DD.jpeg

            Comment


            • #7
              Installed one these recoils.

              Comment


              • #8
                After a two year hiatus, this is how it looked. A largely finished lower hull, apart from some details. DA31532E-E431-413C-81F3-E82B7D88C405.jpeg (290.77 KiB) Viewed 730 times Fire extinguisher, and protective shield, and wing mirrors.
                42B36C6B-4D3F-478C-AFDE-3A7B34169473.jpeg (208.2 KiB) Viewed 730 times D344EA67-34D1-4ED8-ACE3-17D9168B2E21.jpeg (284.75 KiB) Viewed 730 times​. Subsequently changed for brass arm for the mirrors.

                Comment


                • #9
                  More of this rubbish to follow.

                  Comment


                  • #10
                    After failing miserably to use a servo for the gun elevation, I resorted to using the existing motor unit and extending the arm to give more elevation and depression. 26DCA8CA-5D43-4EB8-9B67-F45235B03E47.jpeg (78.82 KiB) Viewed 698 times
                    I then started to make the shroud between the gun and turret. The local shop only had pink marigolds. Gun barrel shroud was made from a ​Citroen XM clutch gator.

                    Comment


                    • #11
                      Lower hull and wheels painted. Wheels primed with etch primer and then black a top coat 7CA5C878-54D3-45CB-88C9-0294E559B8A8.jpeg (413.82 KiB) Viewed 601 times
                      Barrel also painted. Correct colour

                      Comment


                      • #12
                        Whilst building up the lower hull. This happened. 9AFF2B4B-A832-4950-AE3C-64AF4EBC6E3E.jpeg (317.88 KiB) Viewed 597 times A212294A-864C-463F-88C6-E144AB71A432.jpeg (423.35 KiB) Viewed 597 times
                        A suspension arm snapped.

                        Comment


                        • #13
                          Hopefully the DIY solution below explains my repair. 5E45A2B0-529D-4028-9E16-C2755AA53F56.jpeg (271.42 KiB) Viewed 1670 times
                          A short length of brass rod about 2.5mm diameter, was installed, passing into the axel and swing arm. This was filled with JB weld. All seems secure this morning. I will still leave it until tonight so it has had the full 24 hours to set. Then I will trim the pin down, as the moment it is catching on the suspension. Hopefully this will suffice as I do not run my tanks often or hard.​

                          Comment


                          • #14
                            ​Custom stencils made for numbers and unit markings.

                            Comment


                            • #15
                              Breakage on drive sprocket. ​The ongoing saga continues. After breaking the other rear drive sprocket, a pair of Abrams were fitted temporarily but tracks coming off was still a major problem. A complete strip down was required. That’s what I did. I found, half the lawn, and sand, compressed into the wheels and sprockets. IMG_4468.jpeg (2.38 MiB) Viewed 405 times IMG_4472.jpeg (2.47 MiB) Viewed 405 times
                              Neat little grass donut.

                              Also found were seized track adjusters and bearings.
                              B427A2A2-21A5-4230-BFBC-096735FD47DB.jpeg (77.79 KiB) Viewed 402 times
                              This required some serious removal etiquette using junior hacksaws and drill to remove the bolt head.
                              552224B7-E593-4F35-9656-CF0BFECF3EB6.jpeg (106.18 KiB) Viewed 402 times 0EEA667C-5F7F-4BD9-B4D3-FCD3B9419535.jpeg (68.38 KiB) Viewed 402 times 626C28BD-EC39-4641-8B51-B31FD99BF1DC.jpeg (65.26 KiB) Viewed 402 times
                              Pondering over a glass of red wine. I decided to replace as much as I could with 4mm stainless steel bolts. So every thing was drilled out to 4mm. 009C9196-BAFB-414F-90A8-2118F44C241E.jpeg (68.1 KiB) Viewed 402 times D84584DE-DE09-4CDC-90B6-075733ED317B.jpeg (72.36 KiB) Viewed 402 times C474ABB3-9583-4A1B-828A-74774328ED18.jpeg (54.92 KiB) Viewed 402 times

                              Comment


                              • #16
                                A frame was made to stop the chassis from flexing, and new bearing were installed, where required, and new rear sprockets fitted. These were filled with resin to stop a repeat of the failure of the previous sprockets.
                                EBF484EE-673A-4265-A7F8-C43DA3AA1955.jpeg (98.98 KiB) Viewed 402 times
                                New red motors were also installed, and the track reinstated. Previously the tracks were tight, but now they would not go on. Links two had been removed from each track to get the correct tension. Now I needed to add two links back in. A first I thought the sprockets might be bigger, they certainly looked it. But comparing them with old one the were the same size.
                                I can only assume that the chassis was flexing, before the tension was being put on the idlers, and by adding the frame it has stopped this.
                                A quick test in the garden last night seems to show an improvement and our rather steep piece of long grass was take at a fair lick, where as before it would struggle to get up. It also turned without shedding the track. It still managed to build up a fair amount of grass , which it seems to rip out, so 20 minutes was spent cleaning it. Hopefully I will get to test it properly over the weekend.​

                                New gearboxes arrived today. Heng Long Ultimate. Forgot to take a before, during, so you will have to put up with an after. Apparently they will also improve my sex life. 57EE6251-EF17-437B-993A-E4D605B106E0.jpeg (355.63 KiB) Viewed 632 times ​I can thoroughly recommend the gear boxes.

                                Comment


                                • #17
                                  Maintenance done on the Challenger. Sprockets, and tracks were removed. Wheel stations tightened, and lock tighted in place. Various ones come loose. I need to remove the gear boxes, and beef up the two rear wheel mounts, to stop them coming loose. These will probably be drilled out and more substantial stainless bolt fitt

                                  As you can see the amount of material picked up by the track is quite an amount. With all the work it now runs flawlessly on all terrains . This is the full build, and as it stands today. It will spin tracks on smooth surfaces, grip like nothing else on rough surfaces, have enough power to overcome any grip on uneven surfaces. Regular maintenance is required, due to the terrain I run on, as can be seen by the above image, and the amount of grass removed from the sprockets.

                                  Comment


                                  • #18

                                    Originally posted by Meter Rat View Post
                                    Maintenance done on the Challenger. Sprockets, and tracks were removed. Wheel stations tightened, and lock tighted in place. Various ones come loose. I need to remove the gear boxes, and beef up the two rear wheel mounts, to stop them coming loose. These will probably be drilled out and more substantial stainless bolt fitt

                                    As you can see the amount of material picked up by the track is quite an amount. With all the work it now runs flawlessly on all terrains . This is the full build, and as it stands today. It will spin tracks on smooth surfaces, grip like nothing else on rough surfaces, have enough power to overcome any grip on uneven surfaces. Regular maintenance is required, due to the terrain I run on, as can be seen by the above image, and the amount of grass removed from the sprockets.
                                    Originally posted by Rubicon99 View Post

                                    It's is sold under a few other names. DKLM and Toucan sell this track under their names. I have several sets of it and have run it very very hard. It is good tough track overall. It has a few issues that may or may not be a problem for some people.

                                    This first issue is the track guide teeth are a little short in height and as such do not hold as well against the sprocket track retaining rings as they could like taller like the Tamiya guides. So detracting at the sprockets can be more common then with Tamiya tracks.

                                    The second issue is the rubber used on the pads. It is soft and has a high coefficient of friction when used on hard packed surfaces or concrete/asphalt. It grips so well it actually can cause the tracks to pull off the idler and road wheels in a turn on the above surfaces. Tamiya uses a harder rubber compound and this greatly reduces the coefficient of friction so the "pulling off" issue is not a big of problem.

                                    Lastly the track is heavy and needs to be used with at least 390 motor upgrades if you want to turn with any authority.

                                    I have largely pulled this type of tracks "out of service" as the Tamiya tracks are functionally superior in every aspect.

                                    As Rubicon99 said, the Tamiya original track is a perfect fit for the HL Challenger2 sprockets.
                                    Click image for larger version

Name:	IMG_5314.jpg
Views:	164
Size:	112.7 KB
ID:	401727 Click image for larger version

Name:	IMG_5315.jpg
Views:	170
Size:	129.4 KB
ID:	401726 Click image for larger version

Name:	metalsprocket.jpg
Views:	162
Size:	76.7 KB
ID:	401725

                                    Comment


                                    • #19
                                      Excellent post sharing your many trials and finally tribulations with your Challenging Challenger Mr, Rat.👍👍👍 I'm sure your information shared will be helpful to others and at the very least console others who may experience similar issues.

                                      Comment


                                      • #20
                                        Originally posted by keilau View Post
                                        https://www.toucanhobby.com/products...f8b6e367&_ss=r


                                        As Rubicon99 said, the Tamiya original track is a perfect fit for the HL Challenger2 sprockets.
                                        Click image for larger version

Name:	IMG_5314.jpg
Views:	164
Size:	112.7 KB
ID:	401727 Click image for larger version

Name:	IMG_5315.jpg
Views:	170
Size:	129.4 KB
ID:	401726 Click image for larger version

Name:	metalsprocket.jpg
Views:	162
Size:	76.7 KB
ID:	401725
                                        Not even the Tamiya tracks would be helpful being run as shown with all that "grass" gumming up the works. Wet "tall" grass or even wet "medium" grass is a track killer especially if one is doing a number of turns in it. It's almost as bad as mud.

                                        Grass and mud are two thing I have learned to avoid if turns are going to be needed.

                                        Comment

                                        Working...
                                        X