Roban - World Class Scale Helicopters

You must Sign-in or Register to post messages in the Hobby Squawk community
Registration is FREE and only takes a few moments

Register now

Announcement

Collapse
No announcement yet.

Official RotorScale 470 Size Airwolf Super Scale GPS Stabilized Helicopter Thread

Collapse
X
Collapse
First Prev Next Last
 
  • Filter
  • Time
  • Show
Clear All
new posts

  • Official RotorScale 470 Size Airwolf Super Scale GPS Stabilized Helicopter Thread

    Click image for larger version

Name:	master.jpg
Views:	4638
Size:	63.4 KB
ID:	418158

    Airwolf Super Scale 470 Size GPS Stabilized Helicopter from RotorScale - RTF - HSM-470-R-AW


    Experience the next level of scale helicopter flying with the RotorScale GPS-Stabilized Super Scale 470 Series. Designed for pilots of all skill levels, this series combines stunning scale realism with advanced GPS and gyro-stabilized technology. Whether you're a beginner or an experienced pilot, these helicopters make scale flight both accessible and exciting. With their large, 840mm rotor size, unparalleled craftsmanship and attention to detail, the 470 series sets a new standard in scale RC helicopters.

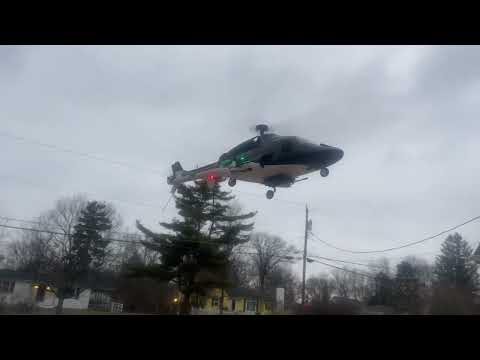
    The RotorScale 470-size Airwolf captures the essence of the classic 1980’s TV series helicopter with its meticulously detailed, fiberglass fuselage, complete with panel lines, rivet detail and scale exhaust features. Faithfully replicating the full-scale aircraft used in the show, this model includes accurately detailed ordnance for stunning scale realism. Adding to its lifelike appearance, retractable landing gear operate seamlessly for a fully immersive experience. Equipped with advanced GPS stabilization and multiple flight modes, the Airwolf offers effortless control and adaptability for pilots of all skill levels. Combining exceptional craftsmanship, ease of use, and impressive performance, the 470 size Airwolf delivers an unmatched scale helicopter experience.
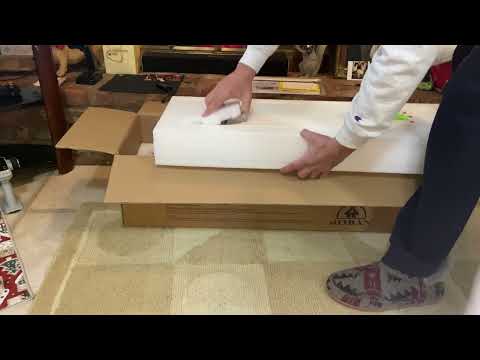
    Fly Out of the Box!

    The RotorScale Airwolf arrives fully assembled and ready to take to the skies. No setup hassle—just charge the battery, install the main blades and you're ready to fly!
    Advanced GPS Stabilization

    Advanced GPS stabilization ensures a rock-solid, beginner friendly flight performance that can also be turned up a notch for more advanced pilots or progressing beginners. Available modes include GPS Mode, Angle Mode and Manual/Traditional Helicopter Mode for a wide variety of skill levels.
    Retractable Landing Gear

    Retractable landing gear enhances scale realism and functionality for a more immersive experience.
    High Quality, Detailed Fiberglass Fuselage

    Exquisitely crafted fiberglass fuselage is molded with panel lines, rivet details and also includes exhaust details for the highest level of scale appearance.
    TV Show Inspired

    Equipped with scale ordnance details, the RotorScale Airwolf faithfully emulates the iconic full-scale aircraft from the 1980’s TV series.
    Realistic LED Lights

    LED lighting adds scale authenticity and added visibility for early morning or late evening operations.
    Painted Carbon Fiber Blades

    Realistically painted, carbon fiber main blades provide that extra bit of detail for the maximum in scale appearance.
    Large, 470 Size

    The large 470 size with 840mm diameter main rotor provides impressive stability, power and presence in the air.
    Features:
    • Completely ready to fly package includes everything you need to start flying right away, just add 4AA batteries
    • Advanced GPS stabilization provides rock solid, steady, beginner-friendly flight
    • Larger, 470 size offers enhanced stability and power
    • Retractable landing gear for unmatched scale realism and lifelike operation
    • High quality and professionally painted fiberglass fuselage is molded with panel lines, rivet details, and also includes exhaust details for maximum scale appeal
    • Realistic LED lighting adds authenticity and visibility
    • Painted main blades and tail rotor provide enhanced scale realism
    • Inspired by the full-scale aircraft used in the iconic TV series, featuring stunning accuracy including detailed ordnance
    • Three flight modes provide adaptable in-flight choices for pilots of all skill levels – GPS Mode, Angle Mode, and Manual/traditional helicopter Mode
    • Return Home and Land feature ensures safe, easy recovery for beginner pilots
    • Low voltage auto-return home automatically returns the aircraft to land at the home point if the battery voltage drops too low
    • Carbon fiber frames provide superior rigidity while remaining lightweight
    • Brushless main and tail motors for high efficiency and long term reliability
    • Reliable 2.4GHz control provides solid, interference free connectivity
    Includes:
    • RotorScale Airwolf Super Scale 470 Size GPS Stabilized Helicopter - RTF
    • 2.4 GHz Transmitter
    • Flight Battery
    • Charger
    • Instruction Manual
    Requires:Optional:Product Specifications:

    AGE LEVEL :14 and up
    SKILL LEVEL :beginner/intermediate
    BUILD TIME :less than 10 minutes
    Class / Size 470 Size
    Power Type Electric
    Rotor Type Collective Pitch
    Body Material Fiberglass
    Overall Size (L x W x H) 890 x 330 x 260mm
    Flying Weight 1600g (3lb 8oz) without battery
    Main Rotor Diameter 840mm
    Main Rotor Blade Length 376mm
    Tail Rotor Diameter 130mm
    Tail Rotor Blade Length N/A
    Tail Drive Type 2205 2450Kv Brushless Motor
    Cyclic Servos 3x 12g, Digital, Metal Gear Servos
    Tail Servo N/A
    Power System 2820 1300Kv Brushless Motor
    Electronic Speed Control 60A, 2-in-1 ESC
    Recommended Battery 4S 4000-5000mAh LiPo Battery
    Battery Compartment Size (L x W x H) N/A
    Required Radio 2.4GHz Radio (included)
    Skill Level Beginner/Intermediate
    Build Time Less than 10 minutes
    Recommended Environment Outdoors
    My YouTube RC videos:
    https://www.youtube.com/@toddbreda

  • #2
    Notice from the pictures of this in flight, the tail rotor has a chipped propeller, don’t know if you realized it or not

    Comment


    • #3
      Woah! The only thing missing is the transmitter start playing the Airwolf Theme Song when you power it up!

      Comment


      • #4
        Should be here Sunday , Been wanting a great scale AirWolf for a Long time, This is the one I hope 🙏

        Comment


        • #5
          Part3 coming soon!

          Comment


          • #6

            fully charged battery , hovered in video , than got to somewhat fly for about 2 minutes and went into RTH mode...
            Does anyone know what the RTF Volts is set to?
            or what is considered average flight times?

            Comment


            • #7
              Hi Air-Furbanator, I was told about 10 minutes flight time. I received mine yesterday and am building as time permits. I'll try to get some average flight times. Ensure your battery charger says FUL before flights. Did you have any trouble with the tail splitting while installing the "wheelie bar"?

              Comment


              • #8
                Was curious how you transport heli. When you add the guns and pods it no longer fits in the styrofoam that it came in. Any thoughts?

                Comment


                • #9
                  ​garshompilot, I have the same question!
                  I considered cutting some foam away to make room for the extra parts.
                  Also, when transporting, should the landing gear be up and rest the weight of the heli on its belly? Or down? Can the landing gear take the shock of bumping along in a box in the car while driving to and from your flight site?

                  Comment


                  • #10
                    My landing gear was malfunctioning upon unboxing due to a loose grub screw on the rod to the right of the front wheel. It caused the front and left wheels to extend only halfway and not all the way to the locked position. Those two wheels were also moveable when extended until I called and talked to Tim at Motion RC, who directed me to tighten the Allen key.
                    Click image for larger versionName:	Landing Gear Repair.jpgViews:	2Size:	169.2 KBID:	419763
                    I am glad I noticed the issue, as it could have resulted in a rollover when landing the heli.

                    My tail started to split when threading in the tail support rod. I only threaded it in about half way and then bent the rod a few degrees to compensate for the remaining length. The windows do have film on both sides. I had to use a table vice to press the side gun rods into the outer covers albeit very gently and carefully.

                    Click image for larger version

Name:	Splitting Tail.jpg
Views:	3051
Size:	78.0 KB
ID:	419762

                    Click image for larger versionName:	Tail Bar.jpgViews:	2Size:	125.9 KBID:	419764

                    Comment


                    • #11
                      I noticed that the landing gear switch on the the transmitter has 3 positions. When the swich is in the up position the landing gear is down. pushing it down one detent causes the landing gear to partially retract and then all the way down it retracts compltely.Not sure if they use the 2nd position on the switch to pack heli into the box or not,

                      Comment


                      • #12
                        The wheels were all the way up on my heli when I unboxed.

                        Comment


                        • #13
                          Does anyone know where these stickers belong?
                          Click image for larger version

Name:	2025-02-12 18.34.13.jpg
Views:	3119
Size:	64.4 KB
ID:	419786

                          Comment


                          • #14
                            Originally posted by AlreadyReadyAlready View Post
                            Does anyone know where these stickers belong?
                            Click image for larger version

Name:	2025-02-12 18.34.13.jpg
Views:	3119
Size:	64.4 KB
ID:	419786
                            those on the right are your window stickers , the little white window, makes it look like one .. I did not get the one on the left so i have no clue

                            Comment


                            • #15
                              Originally posted by AlreadyReadyAlready View Post
                              My landing gear was malfunctioning upon unboxing due to a loose grub screw on the rod to the right of the front wheel. It caused the front and left wheels to extend only halfway and not all the way to the locked position. Those two wheels were also moveable when extended until I called and talked to Tim at Motion RC, who directed me to tighten the Allen key.
                              Click image for larger versionName:	Landing Gear Repair.jpgViews:	2Size:	169.2 KBID:	419763
                              I am glad I noticed the issue, as it could have resulted in a rollover when landing the heli.

                              My tail started to split when threading in the tail support rod. I only threaded it in about half way and then bent the rod a few degrees to compensate for the remaining length. The windows do have film on both sides. I had to use a table vice to press the side gun rods into the outer covers albeit very gently and carefully.

                              Click image for larger version

Name:	Splitting Tail.jpg
Views:	3051
Size:	78.0 KB
ID:	419762

                              Click image for larger versionName:	Tail Bar.jpgViews:	2Size:	125.9 KBID:	419764
                              I highly recommend you remove that tail support rod as soon as possible. If your helicopter's landing gear malfunctions, its main rotor blades will hit the ground and be destroyed. Mine did not have it installed, and the landing gear gave way, causing the helicopter to fall on its belly and the tail propeller to scrape the ground slightly. Luckily, there was no damage other than a slightly scraped paint finish on the propeller.

                              You can check out my heli's maiden flight here.


                              Have a great rest of your night 🌙 Greetings from Douglas, Arizona 🌵 👍🏾 😁 🇵🇷

                              Comment


                              • #16
                                Here's the maiden flight video of my Airwolf 470.

                                Comment


                                • #17
                                  Mine flew one time and now won’t fly at all. My retracts and lights work off the transmitter and all I did was turn fly mode on so I could see which mode I was in when I flicked the switches. Can anyone s d me the settings on their radioes for each of the flight modes ? I’ve tried everything and customer support has not been able this far to help

                                  Comment


                                  • #18
                                    Originally posted by garshompilot View Post
                                    Was curious how you transport heli. When you add the guns and pods it no longer fits in the styrofoam that it came in. Any thoughts?
                                    hello i just got my airwolf and messed with the transmitter setting now cannot get anything to work does any one have a list of the default setting cheers As for the transportation i was looking at makeing my own carry case found this site sell everything but the wood /aluminium sheet for the sides https://www.adamhall.com/shop/en/flight-case-material

                                    Comment


                                    • #19
                                      update on flight case found this 1195x400x423 mm £212.00 inc vat
                                      https://www.terralec.co.uk/flight_ca...m/20944_p.html Click image for larger version

Name:	image.png
Views:	2326
Size:	88.7 KB
ID:	421872

                                      Comment


                                      • #20
                                        Just got done finishing a repair on my Airwolf which involves me replacing the tail motor and tail rotor propeller. . When I went to install the nut I couldn’t get it to tighten all the way down but was only using a needle nose pliers. I guess I need a socket wrench to get it to go down further until it clamps down and locks the propeller. Correct? Also which way is the tail propeller mounted one side has a flat smooth surface the other side has grooves. I assume the grooved surface faces out. Is that correct?

                                        Comment

                                        Working...
                                        X