You must Sign-in or Register to post messages in the Hobby Squawk community
Registration is FREE and only takes a few moments

Register now

Announcement

Collapse
No announcement yet.

EDF to Turbine Conversions

Collapse
X
Collapse
First Prev Next Last
 
  • Filter
  • Time
  • Show
Clear All
new posts

  • janmb
    replied
    ms200a, great work, looking forward to hear how it performs. I assume you have gone through all the upgrades/fixes this model needs (thinking about the tailerons primarily)?


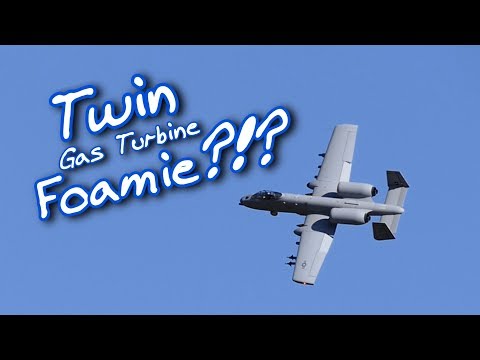
    As for conversions, I'm sure most are familiar with it by now, but link to my A-10 conversion is in my signature. Tons of pictures, videos etc to be found there. The model is still going strong, but not flying her as often these days. After 165 electric flights, and another 80 on kero, I needed a break and fly something different for a while.

    Maiden flight from about 3:30 in.

    Leave a comment:


  • Scale Master
    replied
    Also If you guys want me to put pics up of my FW F-16 T-Bird or F-22 or HSD F-16 let me know. I have them up on other threads but this one probably is a better more focused category. Just let me know and I'll do it.

    Leave a comment:


  • Scale Master
    replied
    Originally posted by ms200a View Post
    So that's about it Flight performance is very good. C G of 88mm is a good start because everybody is different. I'm using a 3000 NiMi 7 cell truck pack for ECU and a voltage regulator for the receiver. I have 4 of these truck packs ($16.00) each (take that lipo/ life) and use them in my thurbinator as well. The 8.4v pack and 4 each lead .45cal slugs in the nose to balance mine at 88mm. The plane dry is 8.8 lbs add 20oz to that for ready to fly weight. No flaps on take off, and take off flap on landing, Pitch is easy 5% expo roll is sensitive 30%expo JR 10x radio. Will post more pics as i get the back of plane cleaned up,. Remember it's a toy not a scale master entry. Click image for larger version

Name:	IMG_4535.JPG
Views:	2622
Size:	80.4 KB
ID:	211493
    Well done and thanks for the detail pics on your bird. I was thinking on ding the FW F-4 and the F-14 with two turbines

    Leave a comment:


  • ms200a
    replied
    So that's about it Flight performance is very good. C G of 88mm is a good start because everybody is different. I'm using a 3000 NiMH 7 cell truck pack for ECU and a voltage regulator for the receiver. I have 4 of these truck packs ($16.00) each (take that lipo/ life) and use them in my thurbinator as well. The 8.4v pack and 4 each lead .45cal slugs in the nose to balance mine at 88mm. The plane dry is 8.8 lbs add 20oz to that for ready to fly weight. No flaps on take off, and take off flap on landing, Pitch is easy 5% expo, the roll is sensitive 30%expo JR 10x radio. Will post more pics as i get the back of plane cleaned up,. Remember it's a toy not a scale master entry. Click image for larger version  Name:	IMG_4535.JPG Views:	0 Size:	80.4 KB ID:	211493

    Leave a comment:


  • ms200a
    replied
    Click image for larger version  Name:	image_44550.jpg Views:	3 Size:	50.7 KB ID:	211497 Getting close, I used the foil tape to line the engine compartment. Click image for larger version  Name:	IMG_4526.JPG Views:	0 Size:	144.6 KB ID:	211486Click image for larger version  Name:	IMG_4525.jpg Views:	0 Size:	65.8 KB ID:	211487Click image for larger version  Name:	IMG_4528.jpg Views:	0 Size:	71.3 KB ID:	211488Click image for larger version  Name:	IMG_4527.jpg Views:	0 Size:	67.8 KB ID:	211489 My UAT is a small gas filter that i Areopoxy (hysol) glued brass tube to reduce nipple size for fuel tubing, I also very carefully drilled and glued a brass fill tube into the filter body DON'T poke the filter Element, they work great just make sure ALL of the air is out of the down stream side.

    Leave a comment:


  • ms200a
    replied
    Click image for larger version

Name:	IMG_4514.jpg
Views:	2570
Size:	57.0 KB
ID:	211484 Oops i missed these pics, using the cut out foam pieces i trimmed them to fit as best i could and foam tac'd them back in place Click image for larger version

Name:	IMG_4508.JPG
Views:	2545
Size:	106.1 KB
ID:	211480Click image for larger version

Name:	IMG_4511.jpg
Views:	2528
Size:	59.6 KB
ID:	211481Click image for larger version

Name:	IMG_4514.jpg
Views:	2557
Size:	57.0 KB
ID:	211482
    Attached Files

    Leave a comment:


  • ms200a
    replied
    Click image for larger version  Name:	IMG_4521.jpg Views:	0 Size:	45.3 KB ID:	211476Click image for larger version  Name:	IMG_4522.jpg Views:	0 Size:	56.7 KB ID:	211477Click image for larger version  Name:	IMG_4520.jpg Views:	0 Size:	70.5 KB ID:	211478 I removed the wood plate, then flattened out the floor in the back, an 8oz nail polish remover bottle is a nice fit in the well, on top of that is a 16oz tank, the top tank feeds the bottom. So far 4min mixed throttle only uses the 16oz, i like the extra reserve in case I have to loiter, out of fuel is no good.

    Leave a comment:


  • Aussie1
    replied
    This conversion was done some time ago, but as the X45 is smaller and lighter than a P20, it opens up alot more options. http://www.youtube.com/watch?v=pRR_22-5CUo

    Leave a comment:


  • ms200a
    replied
    Click image for larger version  Name:	IMG_4516.jpg Views:	0 Size:	61.2 KB ID:	211472Click image for larger version  Name:	IMG_4519.jpg Views:	0 Size:	51.4 KB ID:	211473Click image for larger version  Name:	IMG_4517.jpg Views:	0 Size:	52.6 KB ID:	211470Click image for larger version  Name:	IMG_4518.jpg Views:	0 Size:	50.4 KB ID:	211471 I used 1/8th (i think) ply to make a collar that would support my pipe and allow air to pass thru. I used silicone to glue it to the inside of the wood tube, Make sure pipe is centered up down and side to side. As you can see my pipe is a single wall that I made out of 316 .008 stainless steel with a 48mm Weber carburetor velocity stack. The wood mount ring is ideal for my application. The back of the pipe is spaced with hard wood trimmed to fit gap and maintain center. Back of pipe has a servo size screw (not shown) to secure it to the top rear wood spacer block, easy breezy

    Leave a comment:


  • Scale Master
    replied
    Originally posted by Patrnflyr View Post
    Can anybody give me the size of JP wheels/brake system to order for the F-22? Would like something around the same size as what the kit comes with. I can wait until it comes in but would like to start assembling parts. Also, some people have given me the wheel size when it was actually the total wheel/tire diameter. Would like to be know what people have used so I don't make an ordering mistake Thanks for your help
    Get the 60mm wheel and brake set. As that's the closest size that looks scalish. I've already done it and the work great with my X45 Turbine conversion. By the way the K30 basically sucks for any FW Jet. Not because of the overall performance, but because the very high idle RPM which equals too high of a residual thrust quotient. So your landing approach speeds suffer (too fast approach speeds), as when all taxi speed too fast with no throttle input so have to ride the brakes while you head out to the runway. The X-45 cost a little more but give you un bridled performance at 10lbs of thrust, and the residual idle thrust is the lowest in the industry and allows great slow speed control with no issues. The engine has fast spool up and down performance and no programming needed through you radio un like the kingtech ECU system.

    Leave a comment:


  • ms200a
    replied
    Click image for larger version

Name:	IMG_4499.JPG
Views:	3395
Size:	79.6 KB
ID:	211463Click image for larger version

Name:	IMG_4498.JPG
Views:	3387
Size:	112.2 KB
ID:	211464Click image for larger version

Name:	IMG_4497.jpg
Views:	3458
Size:	63.9 KB
ID:	211465 using foam tac i secured the ply pipe to the structure.

    Leave a comment:


  • ms200a
    replied
    Click image for larger version

Name:	IMG_4494.JPG
Views:	3366
Size:	110.9 KB
ID:	211461 Next I used foil tape from hardware store to line inside of ply wood tube

    Leave a comment:


  • Aussie1
    replied
    Nice conversion on the F18, one of my favorite jets! I converted a Avanti to X45 power and am really happy with it, especially the fuel economy, which will give about 10minutes on one litre of fuel. Hatcam is all I had in my video, but gives you a idea of the flight. https://m.youtube.com/watch?feature=...&v=-gwl0nuxLnY

    Leave a comment:


  • ms200a
    replied
    Click image for larger version  Name:	image_44527.jpg Views:	4 Size:	54.0 KB ID:	211455Click image for larger version  Name:	image_44525.jpg Views:	3 Size:	74.1 KB ID:	211456Click image for larger version  Name:	image_44528.jpg Views:	3 Size:	62.6 KB ID:	211457Click image for larger version  Name:	image_44529.jpg Views:	3 Size:	61.7 KB ID:	211458 I rolled up and CA glued the 1/64 ply to fit the fan tunnel, it is straight no taper and ovals out at back of the plane. I then used a sharpie to mark where to cut and trimmed it as pictured i also trimmed the rear to be the same length of nozzles when reinstalled.

    Leave a comment:


  • ms200a
    replied
    Click image for larger version  Name:	IMG_4476.jpg Views:	0 Size:	56.3 KB ID:	211451Click image for larger version  Name:	IMG_4478.jpg Views:	0 Size:	71.7 KB ID:	211452Click image for larger version  Name:	IMG_4477.jpg Views:	0 Size:	50.5 KB ID:	211453 on the top of the fuse i dug out some foam by the 2 boxes an foam tac glued the 3/8 square stock from the hardware store.

    Leave a comment:


  • ms200a
    replied
    ok let's see if i can load pics Click image for larger version  Name:	IMG_4471.jpg Views:	0 Size:	53.3 KB ID:	211446Click image for larger version  Name:	IMG_4469.jpg Views:	0 Size:	47.4 KB ID:	211447Click image for larger version  Name:	IMG_4468.jpg Views:	0 Size:	54.2 KB ID:	211448Click image for larger version  Name:	IMG_4470.jpg Views:	0 Size:	55.2 KB ID:	211449they are a little out of order but you'll get the idea. I cut the nozzles off, and then the speed brake and then used that as a template for the bottom cut.

    Leave a comment:


  • Patrnflyr
    replied
    Pics would help too

    Leave a comment:


  • bradcarey
    replied
    Im interested in converting the new F18 model as well. How did you mount the K30 and did you use a pipe? What was your flying weight? Thanks!
    ​​​​​​

    Leave a comment:


  • ms200a
    replied
    Click image for larger version

Name:	E4FCEF35-DCB9-454D-9405-DF528B3720B4.jpeg
Views:	3517
Size:	80.4 KB
ID:	211322Click image for larger version

Name:	FB7C91A2-FC5B-4866-9FE0-B8D48371BF0C.jpeg
Views:	3496
Size:	31.9 KB
ID:	211321Click image for larger version

Name:	197BB215-BBEB-4ABD-A22A-15EC7BD7AADA.jpeg
Views:	3528
Size:	41.4 KB
ID:	211320 Maiden F-18 K30 power 6 flights all code 1

    Leave a comment:


  • ms200a
    replied
    Update on K30 powered Mig 21. Increased fuel to 32oz 7+ min with approx 6oz reserve. Painted white and slowly adding black trim. Wings are still a bit hard to sight for bank angle. Still over roll in a turn and that gets exciting! Not much faster but Ohhh, that sound. The extended flight time is great no panic for landing when unplanned stuff is happening.
    F-4 is next.

    Leave a comment:

Working...
X