

All-New Freewing PJ50 Twin 70mm EDF Jet - Official Thread

Collapse
X
Collapse
First Prev Next Last
 
  • Time
  • Show
Clear All
new posts

  • Enzo_K
    replied
    This is a beautiful business jet based on the GS 550. I'm here to share my experience with it. Hope this could help with some of you out there still looking into buying one of these. Or those of you who already ordered one but haven't put it together.

    Click image for larger version  Name:	Screenshot 2022-03-23 at 17-35-43 Photo - Google Photos.png Views:	0 Size:	1.63 MB ID:	340699


    List of electronics onboard:
    RX: Spektrum AR8360T SAFE&AS3X receiver.
    Steering Gyro: Assan AG61 steering gyro.
    An additional Freewing LED control box. (For separate wing root landing light control.)

    Assemble:
    It will take you roughly 1.5-2 hours to put everything together. Unlike some previous Freewing/Flightline products. The PJ50 came with all the control linkages preinstalled. I only needed to do some minor adjustments to the elevator. Being such a large model, another person's help could come in handy.
    The fuselage, however, will need to be glued together. My advice is, after applying glue, leave it standing on its nose for over 24 hours.
    Click image for larger version  Name:	Screenshot 2022-03-23 at 17-38-36 飞翼 双70涵道 PJ-50T 私人飞机 涵道机 航模_哔哩哔哩_bilibili.png Views:	0 Size:	1.15 MB ID:	340700


    Minor modifications:
    1. I moved the control box afterward, to accommodate the AR8360T receiver. If you do this, it will be harder to reach the cable connected to the control box. I'm transporting this jet without disassembling it. So I don't have to worry about disconnecting cables every time. For easier disconnecting cables. I've recommended the manufacturer relocate the control box right underneath the wing. (I drive a 2015 Audi Q7. For those of you wonder if it gonna fit inside your car)
    2. The nose suspension feels too stiff on mine. I cut off 3-4 coils of the stock spring. And added another softer piece of the same length in it.
    3. Moved the Rudder link 2 holes inside on the servo arm. The recommended travel for the rudder is too much for my liking. And it is also dangerous during the landing phase. I will talk about this in the flying section of this post.
    Click image for larger version  Name:	Screenshot 2022-03-23 at 16-48-23 Photo - Google Photos.png Views:	0 Size:	1.41 MB ID:	340695Click image for larger version  Name:	Screenshot 2022-03-23 at 16-27-26 飞翼 双70涵道 PJ-50T 私人飞机 涵道机 航模_哔哩哔哩_bilibili.png Views:	0 Size:	759.3 KB ID:	340696Click image for larger version  Name:	Screenshot 2022-03-23 at 16-48-08 Photo - Google Photos.png Views:	0 Size:	279.4 KB ID:	340697

    Radio setting:
    Aileron: 100% L/R with manual travel. 23mm L/R. 20% expo
    Elevator: 100% up/down with manual travel. 24mm up/down. 20% expo
    Rudder: 115% L/R with the 3rd hole on the servo arm. 27mm L/R (So you have a decent taxi turning radius and not too much rudder). 30% expo
    Flap: Setup per manual. 15mm half, 29mm full.


    CG.
    The factory mark underneath the wing feels just right. I fly with an SMC 8100mah Lipo. Weights 910g.

    Flying:
    Cruise around: This jet is a really efficient flyer. It will fly around with about 50% throttle. Plenty of power. A 6000mah battery should last more than 4m30s for any style of flying.
    Taking off: The wing load is around 110g/dm^2. That means it gets up in the air pretty quick. Took about 80-100ft on our geotextile runway with full throttle and half flap.
    Aerobatics: The airframe will handle any mild aerobatics just fine. Loops, rolls, inverted.
    Landing: I've landed it smoothly in 10-15mph of crosswind (35-45 degrees down the runway). It handles the wind just fine. Also, half flap works better for landing. The full flap feels too draggy for me. U will need to carry a good amount of throttle if you wish to land smoothly with full flap. The strange part is, when landing with a higher AOA, this jet doesn't like rudder at all. Just a little rudder will swing/bank the wing around for you. So I lowered the rudder surface travel to 27mm. And dialed in 30% expo.
    Maiden flights:
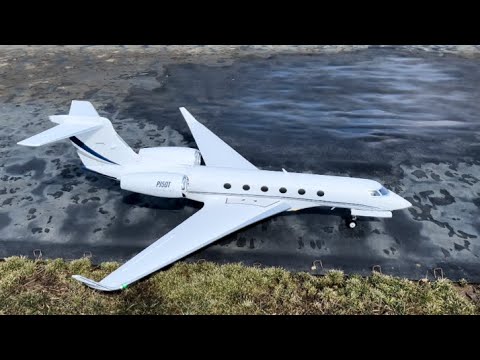

    Other things to watch out for:
    1.
    There is a piece of screw right next to your nose gear, steering servo, and nose light cables. Over time it could damage the wire. I wrap the screw with a piece of thick tape.
    2. The LED between two main wheels has exposed wires on mine. It could be a problem if you fly this jet in some confined Area. For example, our runway does not drain very well. And it gets all muddy after the rain. Those exposed wires are not gonna do well with some sodium and water. I wrapped the exposed wire with electrical tape. Then sealed it with some foam glue.
    Click image for larger version  Name:	Screenshot 2022-03-23 at 17-28-44 Photo - Google Photos.png Views:	0 Size:	1.18 MB ID:	340692Click image for larger version  Name:	Screenshot 2022-03-23 at 17-27-36 Photo - Google Photos.png Views:	0 Size:	1.43 MB ID:	340701
    Attached Files

    Leave a comment:


  • GliderGuy
    replied
    Franknitti, You should design sailplane trailers!

    Nice work.

    -GG

    Click image for larger version

Name:	6A778B9B-B09B-48E7-9C33-D1F098A013ED.jpeg
Views:	800
Size:	73.0 KB
ID:	340672

    Leave a comment:


  • BluesDragon
    replied
    Originally posted by James
    Man I'm a good hugger too...
    Right James?!?.. Everyone needs a good hug now and then! :hugging:

    Leave a comment:


  • franknitti
    replied
    Originally posted by MeyerVW

    When you fly can you get a photo of that contraption without the aircraft in it. Would love to see it so I can make one and build one for the AL37.
    Here's the one I made for my AL37, I'll take a photo of just the storage \ transport carrier this evening, I will PM to you.

    Leave a comment:


  • MeyerVW
    replied
    Originally posted by franknitti
    Storage and Transportation taken care of...
    When you fly can you get a photo of that contraption without the aircraft in it. Would love to see it so I can make one and build one for the AL37.

    Leave a comment:


  • franknitti
    replied
    Storage and Transportation taken care of...

    Leave a comment:


  • James
    replied
    Man I'm a good hugger too...

    Leave a comment:


  • xviper
    replied
    Originally posted by James
    hahaha, him and foamKrasher (who joined conveniently a month ago) are probably more Mikey68 accounts
    I don't about Mikey but both xWiper (banned now) and foamKrasher (from RCG) are one in the same. "Pitts" is NONE of the aforementioned. I think Pitts is just another older fellow who gets confused a fair bit. But like EvanD said, I'll cut him some slack (due to his "condition").

    Originally posted by Hugh Wiedman
    Looks like xWIPER forgot to Wipe Something since he's full of it! :poop: Perfect member for the other forums! If he had any balls, he wouldn't hide behind that avatar. :sob:
    Thanks for the back up, Hugh. There are many of that kind at RCG and most of them are ignored as they have some serious mental health issues. In my last career, I've seen them in real life and now I see them all over the internet. That's life.

    Leave a comment:


  • MeyerVW
    replied
    I ran into these two droids while on my travels. Pilots.

    Leave a comment:


  • MeyerVW
    replied
    She is smaller than the AL37. Now to get them both into the car at the same time.
    Attached Files

    Leave a comment:


  • MeyerVW
    replied
    Balanced, I put 2.25 oz of lead between the two seats in the cockpit. Battery all the way forward. I will use velcro to help keep it in place. Its ready to fly.

    Leave a comment:


  • GliderGuy
    replied
    Click image for larger version  Name:	1CF50BB0-CC19-4BDD-A9C5-A030640DCEAC.jpeg Views:	5 Size:	28.5 KB ID:	340442 FYI….
    After a couple of Tip-Overs being too aggressive on the rudder on roll out and/or crosswind gusts, here is where you need to apply some anti-scrape material.

    Take it forward vs just from the middle to the rear. Middle to the rear takes care of about 95% of the scrapes, but if she ever tips way up…it’ll scrape all the way forward.

    Might as well take care of the middle to forward area while you are at it.

    -GG

    Leave a comment:


  • xviper
    replied
    Originally posted by MeyerVW
    The battery is only 695g. If others are in the 800g weight that explains it.
    I think that's it. You're about 150g shy of the usual battery. I know that SMCs are light for their mah size, as are Spektrum smart LiPos. If you don't wish to buy new batteries, keep it as far forward as you, make a new strap location and add a bit of lead to the nose as far into the front compartment as possible. If you use a lump of lead placed up against the front bulkhead, beside the battery, it shouldn't take that much weight to do it. (150g of battery weight is spread throughout the battery. A single lead lump is concentrated. Stick it up there with a dab of hot glue. You can easily pull it off later if you get heavier batteries. Or velcro it to the front of the battery.)

    Leave a comment:


  • GliderGuy
    replied
    Originally posted by MeyerVW
    The battery is only 695g. If others are in the 800g weight that explains it.
    Admiral Pro 6000 =
    846g / 29.84oz

    Leave a comment:


  • MeyerVW
    replied
    The battery is only 695g. If others are in the 800g weight that explains it.

    Leave a comment:


  • GliderGuy
    replied
    Originally posted by MeyerVW
    Click image for larger version

Name:	20220320_111945.jpg
Views:	715
Size:	48.5 KB
ID:	340423 I really dont want to buy another battery. I am useing the molded marks.
    What is your battery weight. Just doesn’t look right.
    Shouldn’t need that. IMHO
    -GG

    Leave a comment:


  • Indyflytime
    replied
    I was going to do a repaint but the factory finish was great and it was White already, so I just made a few changes to make it "mine" and added a
    couple of decals, pilots and a few coats of minwax to put a gloss on. Just waiting on the weather to cooperate so I can Maiden.


    Click image for larger version

Name:	IMG_20220320_113940095.jpg
Views:	709
Size:	312.8 KB
ID:	340430Click image for larger version

Name:	DSCN0814.JPG
Views:	751
Size:	82.3 KB
ID:	340426Click image for larger version

Name:	DSCN0811.JPG
Views:	699
Size:	98.5 KB
ID:	340427Click image for larger version

Name:	DSCN0815.JPG
Views:	774
Size:	60.7 KB
ID:	340428
    Attached Files

    Leave a comment:


  • MeyerVW
    replied
    Click image for larger version

Name:	20220320_111945.jpg
Views:	715
Size:	48.5 KB
ID:	340423 I really dont want to buy another battery. I am useing the molded marks.

    Leave a comment:


  • GliderGuy
    replied
    Originally posted by MeyerVW
    6s 5000mah bettery all the way forward and the aircraft is a hair tail heavy still. Worst part is I cannot strap it down. What have you done to balace your aircraft out?
    The Admiral Pro 6000 mounted about 1/2 inch ahead of the MCBE puts it on the CG mark with wheels down and right side up.

    Sorry Ridgerunner, flying solo makes video taking too challenging. I don’t have a hat-mounted camera. The spin does take high-rate and she really hesitates going into the spin. But, if you keep full rudder, elevator and aileron in, she eventually will spin. Recovery is instantaneous when controls are put to neutral.

    -GG

    Leave a comment:


  • xviper
    replied
    Originally posted by MeyerVW
    6s 5000mah bettery all the way forward and the aircraft is a hair tail heavy still. Worst part is I cannot strap it down. What have you done to balace your aircraft out?
    I use both 5000mah and 6000mah. Both weigh in the ~800g range (ChinaHobbyLine 5.0 and HRB 6.0) Either of those fits in the standard location where the strap is. If you're having to push it all the way forward, you'll need to move the battery strap or make a new battery tray. Can't understand why yours is so tail heavy. Are you using the molded CG line?

    Leave a comment:

Working...