You must Sign-in or Register to post messages in the Hobby Squawk community
Registration is FREE and only takes a few moments

Register now

Announcement

Collapse
No announcement yet.

Russian T-35A

Collapse
X
Collapse
First Prev Next Last
 
  • Filter
  • Time
  • Show
Clear All
new posts

  • #21
    I received some major parts yesterday. here a couple progress pictures;

    Internals of the turrets and superstructure:

    Click image for larger version

Name:	T-35 19.jpeg
Views:	352
Size:	203.9 KB
ID:	334922

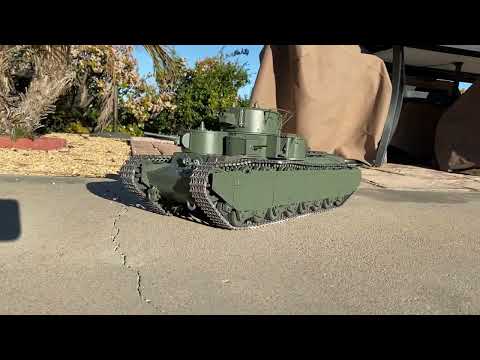
    Dry-fitted parts, just sitting in place:

    Click image for larger version

Name:	T-35 20.jpg
Views:	346
Size:	213.2 KB
ID:	334923
    Twenty six tanks, and not done yet!

    Comment


    • #22
      Headlights installed:

      Click image for larger version

Name:	T-35 21.jpg
Views:	335
Size:	149.9 KB
ID:	335011
      Twenty six tanks, and not done yet!

      Comment


      • #23
        Progress: Tertiary turret rotation and mg flash added to main gun flash and recoil, headlights. The mg turret animation is achieved with an "RC Geek Random Servo Motion Generator" (RCMG). Travel, frequency and speed can all be adjusted via potentiometers on the RCMG. Each board has two takeoffs which act independently. The secondary turret will be powered from this module. Two modules will be used, one for the front turrets, one for the rear ones. Power is obtained from the HL 6.1S board from the servo recoil circuit via a Y cable.

        Twenty six tanks, and not done yet!

        Comment


        • #24
          Exhausting...I installed a smoke unit I took from a 6.0 tank I use for battling - no need for smoke in that one! The T-35 has one exhaust pipe sticking out from the rear deck. I drilled a hole, put in a brass pipe, plugged one of the two tubes from the smoker, connected the other tube to the brass pipe,and away she goes! I use "Mega Smoke", made for model railroads, and I canted the smoke box so that the fluid runs down to the heater reliably.

          Twenty six tanks, and not done yet!

          Comment


          • #25
            Another step, this one tough.

            The HL board effects turret rotation with a motor & gearbox unit. This couldn't be incorporated into the T-35, for space and alignment concerns. The designer set it up for servo activation, but had not supplied any instructions how to do so.

            I took a low-profile servo, opened it up, removed the pc board, rewired the motor for DC operation as required by the HL board. I cut off the pin in the gear train that normally limits the travel. This gave me a continuous rotation motor & reduction gear that fit in the spot the designer provided. After two hours of cutting, grinding and sanding, the servo fit in the spot. Of course, after installing it I'd soldered the wires reversed so the turret ran backward. Remove the servo, swap the external wires and all is good.


            So far so good. (My mantra)
            Twenty six tanks, and not done yet!

            Comment


            • #26
              That thing is so cool and quite a project. Very impressive Work.
              RC tank parts and accessories I make
              www.RichardSJohnson.net/id28.html

              Comment


              • #27
                Bob is there a link or a video on how to convert a servo into a DC motor?
                I would like to learn to do that Thanks

                Comment


                • #28
                  No, but it's very easy. You just have to be careful to not let the gears and whatever fall on the floor....!

                  Unscrew the case. Some servo cases are in three parts, top middle and bottom, some two, top & bottom. Take off the bottom part, you'll see a pc board and the motor, with two wires connecting them. Cut the wires. Yank out the pc board, you won't be needing it. Solder the two wires you are going to use to power the motor onto the exposed motor terminals.

                  Now look at the top end. Take off the cap or otherwise to get to the gear area. Servos have a gear reduction train, multiple gears going from the motor to the servo head where the servo arms go. One of those gears, different in each servo, will have a pin or boss that limits the servo travel by hitting a stop, whereupon the pc board stops the power. If you remove that protrusion, there'll be nothing to stop the motor from spinning. Put the servo back together, and you're good.

                  It's easier to do this on standard size servos of course, for our eyes and fingers sake, but it's the same for micros. I practiced on some old $2 micro servos first.

                  Servos run on the 5 or 6 volt power that a receiver supplies. In my case, the HL boards do the same.


                  Twenty six tanks, and not done yet!

                  Comment


                  • #29
                    Ok got it. I was wondering about the pots but I think the new servos don't have them. Or just doing away with the PC board and direct wiring to the motor bypasses all that.
                    I remember back in the day reversing servo's. I built a couple Bantam Midgets back then LOL.
                    Thanks Bob

                    Comment


                    • #30
                      Yea, if one was still going to control the servo from a standard receiver channel, you'd have to mess with the pc board. With direct dc, not so.
                      Twenty six tanks, and not done yet!

                      Comment


                      • #31
                        Another progress photo set. There are files for the ring fittings. The rails themselves are 1.75mm PETG filament, as recommended by the designer. Good choice of material, as it is flexible not brittle

                        Click image for larger version

Name:	T-35 24.jpg
Views:	231
Size:	121.8 KB
ID:	336692

                        Click image for larger version

Name:	T-35 25.jpg
Views:	220
Size:	127.7 KB
ID:	336693
                        Twenty six tanks, and not done yet!

                        Comment


                        • #32
                          Looking great!

                          Comment


                          • #33
                            Bob
                            With the detail of the 3D printing you there I'm assuming it was was resin printed?
                            It is looking great! I like strange stuff. I don't have a Tiger LOL.

                            Comment


                            • #34
                              Vaseline: Hahaha, I absolutely agree with you!. The only HL tank I never had was the Tiger 1 (although I do have a Tiger 2). Once this is done I'll be looking for the STL files for a T-26A - a mini tank with two separate mg turrets.

                              Click image for larger version

Name:	t26-twin-turret-moscow.jpg
Views:	251
Size:	113.7 KB
ID:	336717

                              Yes, most of the visible T-35 parts are done in resin. The hull however, buried underneath, is filament, not sure which.

                              So, another progress step. The side skirts are a critical part of the appearance, but they cover up a lot of the running gear. I want to be able to access the gear for repair, maintenance, etc. so I didn't want to glue them on. My solution is carpet tape - very strong, very thin, and one roll will last a lifetime. here they are stuck on:

                              Click image for larger version

Name:	T-35 26.jpg
Views:	223
Size:	215.2 KB
ID:	336719

                              Just waiting on the fenders that go over the tracks on top.
                              Attached Files
                              Twenty six tanks, and not done yet!

                              Comment


                              • #35
                                A busy day.

                                Here is a quick & dirty clip, testing the capabilities of the motors. Will they push this heavyweight? Will they turn it? OMG, will they spin it - like I would ever do that...😉

                                Twenty six tanks, and not done yet!

                                Comment


                                • #36
                                  Be honest, honey, does size really matter?

                                  ​

                                  Any other captions you can think of?
                                  Twenty six tanks, and not done yet!

                                  Comment


                                  • #37
                                    Looks mighty awesome

                                    Comment


                                    • #38
                                      Have you thought about using magnets to hold the side skirts on?
                                      RC tank parts and accessories I make
                                      www.RichardSJohnson.net/id28.html

                                      Comment


                                      • #39
                                        Originally posted by RichJohnson View Post
                                        Have you thought about using magnets to hold the side skirts on?
                                        Harder to align. The tape works great. maybe someday I'll get some micro screws., but not until I'm convinced everything is working well.
                                        Twenty six tanks, and not done yet!

                                        Comment


                                        • #40
                                          So our new battle rule for your tank to fight with the rest of us....we will have to shoot 12 hits for it to be out of action, lol.

                                          Comment

                                          Working...
                                          X