


Originally posted by Alpha
View Post
-
Jon Ellis said he is running 1375, so I’ll shoot for somewhere in that range. In theory, increasing airframe stiffness and dropping headspeeds should help separate whatever modes are aggravating the airframe. Hoping for success this time around! -
good looking 212, you've done a very nice job on it! It's big enough that you can start adding scale details which really make a difference in the look of it.
the devil is in the details! thanks for sharing!Roy MayoralComment
-
Thanks! I love how the airframe looks, and there is definitely some ideas churning for more details. Just need to get my resonance issue sorted, and then it will be full bore on details!Originally posted by Heli143 View Post
With the new plywood down and headspeed lowered, that just left one more thing; doubling up the linkages. It took some digging through the parts bin and threading some new pushrods, but all of the push/pull linkages have been doubled up. If all goes well, it will be tested out tomorrow!Comment
-
Completed a 6 minute test flight today, and everything has stayed intact so far! No strange vibrations to note. After my past few incidents, I kept the whole flight in ground effect so far. Downloaded the logs from the Brain and saw no significant vibrations from the data either. This weekend will be some more thorough testing proceeding into forward flight in the pattern.Comment
-
Glad to see you might have it figured out, get some video when you can.
I have some Trex 600 ESP mechanics coming next week for mine, I didn't go with the Chaos 600 FBL.pro mechanics, I thought they had wider frames than the Trex 600?
Did you have any problems with yours?Attached FilesComment
-
-
The frames are wider, but spacers are included with the kit to make it work. Initially, my kit was missing a few of these, but Motion was able to send me an extra spacer set within the week. The frames for the ESP should be an easier fit though! Will try to get some video soon. Also, I recommend looking at some of the replies to my thread over on scalerchelis: https://www.scalerchelis.com/phpBB2/...p?t=19587&f=17, it would seem I’m not the only one who has had resonance issues. You might consider adding another layer of 1/8” ply under the main mounting tray. The stiffer tray seems to have alleviated the issues in my case. Good luck on the build!Originally posted by DCORSAIR View PostComment
-
Thank you for the info. I am aware of these vibes that your talking about, I have built six 600 size Hughes 500D and E models, all had vibes, some I never solved, also built two 600 size Agusta 109 that never gave me any trouble, no vibes at all, built one AS- 350, it would vibrate a little on spool down only and none whats so ever when spooling up or flying, also did a Thunder Tiger AS-355 when they were available and it was also smooth as silk, so the only ones that gave me the most headaches were the Hughes 500 fuselages, so I am not looking forward to getting this one going and having to deal with all those vibes, maybe I will get lucky and no vibes.............Originally posted by F106DeltaDart View Post

Here are just a few I have built in the last five years or so. First pics shows my Thunder Tiger Raptor .50 converted to a Schweizer 300, Centruy Bell 47, Funkey Agusta 109, Thunder Tiger AS-355 and a Funkey AS-350, second pic shows a Roban Magnum PI Hughes 500D, Roban G-Jive Hughes 500E and a Funkey Sheriff Hughes 500E, 3rd pic is a Roban Hughes 500E Black Ops, and the last pic was my Funkey Jet Ranger, the rest I can't seem to find pictures.Attached FilesComment
-
-
Here is one of my Funkey MD Hughes 500 that was a nightmare to get the vibes out, this was my last flight with it and I finally accomplished it and then I sold it, the second video is the Roban Hughes 500E G-Jive, it was good right from the start, it just doesn't make sense why some fuselages have vibes and some don't.
Comment
-
Here is the G-Jive video and I hope you don't mind me posting these pics and videos here, I just realized this was your post about the Huey build.
Comment
-
No problem! Always enjoy seeing more scale helis! You have quite the impressive fleet. I just put the 2nd flight on the Huey after the rebuild. After I got used to how it feels, it flew quite nicely. Next flight will have the cowling and doors back on!Originally posted by DCORSAIR View Post
Comment
-
Thank you but I sold all those and got into EDF jets because I had a nice long runway right across the street from my house to fly the jets, got as little burned out on the scale helis, that was a lot of work and maintenance, I wish I would have kept them now because I am losing my runway, so I'm just getting back into scale helis again. Hope yours stays together this time, that is a nice Huey.Originally posted by F106DeltaDart View PostComment
-
That was definitely a good looking fleet!
And please everyone posts as many pics and videos as you'd like... scale fanatics love to look at pics and watch videos of helis
Roy MayoralComment
-
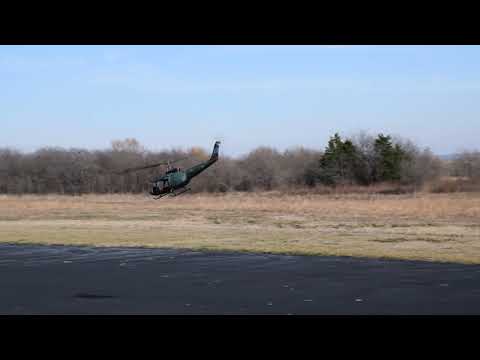
Finally got the UH-1N in the air this evening with the doors, cowlings, and full cockpit installed. I love how it looks and flys! Will be adding the crew in the back next, as well as attaching the crew doors, and adding the stab bar on the rotor head.
Comment
-
Wow, looks awesome and glad you got it going, what was the main issue with it anyway or did you find out it was a mounting issue causing the vibes??Originally posted by F106DeltaDart View Post
Glad you got that 800 size Medic 222 heli over on RCG, that was a great deal.Comment
-
Thanks! My best guess at this point, is that it was a resonance with the upper mounting tray. After switching to 1/4” ply, the tray was much more rigid, and the fuselage has no noticeable vibration. The 222 was a great deal for sure! It might be a while before I get to it though, starting to build up a long heli backlog. On the bench now, I have a 500 H-34 Choctaw, 600 OH-58A, 500 OH-58D Kiowa, 700 AH-1W Super Cobra, 600 size Bell 222 (4 blade 680 rotor demonstrator), 450 UH-1B, and a 450 A-109! I’ll be busy a while!Originally posted by DCORSAIR View PostComment
-
Do you have any braces from the top area of the frame over to the fuselage, this really seems to firm it up.Comment
-
I just had the stock bracing configuration, with the tray supported by the lift frame forward of the cabin, the aft cabin wall, and the epoxy seam around the edge. It's definitely possible that some reinforcements could be enough to shift the natural frequency. But by the time I figured out were the issue was, I had destroyed the stock tray beyond repair. May be worth doing in future models just for the peace of mind.Originally posted by TiredIronGRB View PostComment
-
Yeah, I see the thin plywood on mine as well where the blind nuts are located, I will do some reinforcements around those areas, I don't think I will do a complete new floor, just some bracing along the side of the side frames of the trex 600 and across the back then from the top of the mechanics down to the floor as well.Originally posted by F106DeltaDart View Post
My plans are not to keep this one anyway, I think I want all 700-800 size now that I have the Roban 800 AH-6 Little Bird, I want the 800 UH-1N and the 700 Cobra.
Comment
-
Hello sir, just about got my Bell 212 done, I have two little round silver spacers left over, do you remember where these go?, they were with the two long silver spacers for the elevator servo. Also noticed you had your secondary tail drive umbrella gear that drives the rear tail torque tube was on the bottom side of the rear torque tube umbrella gear, I have mine on top, just curious if this matters.Originally posted by F106DeltaDart View PostComment
-
I believe the spacers are for converting from the wider EFL or Pro versions of the Trex 600. If you used the ESP, you shouldn't need them. As for the umbrella gear, I moved to the bottom side after converting the one-way bearing for CCW rotation. Moving that umbrella gear keeps the tail rotating in the correct (and most efficient) direction when main gear rotation is reversed.Originally posted by DCORSAIR View PostComment


Comment