


Thanks for pointing out my mistake. I don't want to call anyone the wrong name. I have only really met everyone twice. My apologies to Rubicon.
-
Don't just fly--WREAK HAVOC!!! -
I made more progress today on the Pershing. I made a IR LED tube out of plastic and mounted it behind the Mantel. There is 10cm in front of the LED bulb so it should be legal for battle. The tube is about 14 cm overall and I had to do quite a bit of surgery to make it all fit and allow the muzzle to go up and down without breaking off the LED tube. I sacrificed one mounting screw for the axis pivot holder for the gun. Still seems sturdy enough. I also finished up making all the lead wires for the IR apple and the IR LED bulb. Just waiting for my Clark tk50 board to show up to finish off the internals. I also need to bind the S bus Lemon receiver to my transmitter. Lemon are new to me so I will see how it goes.Don't just fly--WREAK HAVOC!!!Comment
-
Good progress! Hope the TK50 arrives soon for you to get this tank ready for our next battle day. You will probably have enough time since the LA battle day will be on May 14 instead of May 7.SoCal RC Tank Club Facebook Group
Largest active RC Tank club in Southern California
Gathering 1-2x monthly/All Ages & Experience levels welcomeComment
-
Made more progress now that my Clark board and recoil unit showed up.Don't just fly--WREAK HAVOC!!!Comment
-
Almost done. I will video the recoil once I put the tank all back togetherDon't just fly--WREAK HAVOC!!!Comment
-
In case anyone is hunting, looks like Toucan/eBay got a load of Pershings in US stock (Cranbury NJ): 7.0's with various grades from all plastic to all metal running gear, from ~$150 to $300.The more screws it takes to reassemble a tank, the more likely it is you left something out!Comment
-
HL Pershing are good running tanks with lots of possibilities to make even better. Good time to jump on these because they have been fairly unavailable for some time.Originally posted by SoCalBobS View PostComment
-
I bought the static version all plastic and upgraded the MFU to a Clark board and added recoil. I left the plastic gears and did two battle days, but suffered from the left track always wanting to derail. I ordered metal gears and noticed the plastic ones which did have a hairline crack on the plastic gear on the shaft itself were really loose in the the tank. I also think, but didn't measure it that the shafts on the plastic gears were slightly shorter. Anyway, all metal now and the tank runs great.Don't just fly--WREAK HAVOC!!!Comment
-
Yo
Just a comment….. HL Pershing was one of my first tanks…. And it’s one my fastest…. Has metal upgrades and has never had any problems….. get one while you canComment
-
I actually just ordered one as I had already ordered the proper length Pershing barrel and some of the sealed HL CNC gearboxes for it a while back.Comment
-
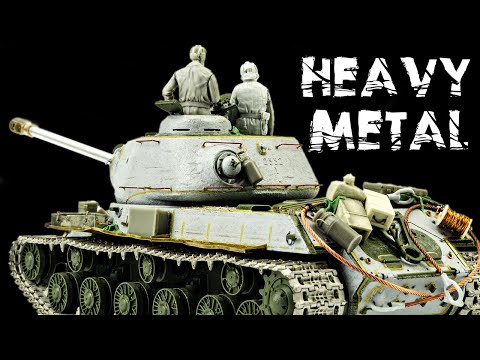
I have been following the Youtuber Night Shift and decided to use some of his techniques to detail my Pershing. I did modify his materials by using Bondo paste instead which seems to be the same as Tamiya putty only way cheaper.
Attached FilesDon't just fly--WREAK HAVOC!!!Comment
-
-
Looking forward to seeing this progress!
ClayComment
-
quit...Looks great! Adds a lo of detail. Following.Comment
-
Got a lot doneI decided I wanted a World War II Pershing so I am going for the 3rd Amor division Cologne. Heat gun proved to work really nice as long as you don't pinch the plastic with anything like your fingers. Blunt objects like the side of the bench or my screw driver handle worked the best. You do have to hold it into position while it cools otherwise it goes back into the original shape to a degree. I removed most of the stowage too.
Don't just fly--WREAK HAVOC!!!Comment
-
Looking great! I like the cast texture.Comment
-
Decided the rear fender needs more COW BELL, I mean damage. The Cologne Pershing's rear fender was definitely bent Also, after going to 5 hardware stores I found the K &S 1/16 brass tubing for the tarp cover bracket. I will detail how I made that a little later.Attached FilesDon't just fly--WREAK HAVOC!!!Comment
-
-
Looking good!
Did you do paint detail on the tracks? They seem to have a great natural rusty dusty coloring. Can't wait to see how that turret turns out.
ClayComment
-
They are painted, and in an earlier post, but I didn't show the color used. I used Model Master light earth that a fellow tanker from the club gave me. I do think it is the perfect color and I just washed the tracks in soapy water and let dry before painting. Paint in models has become a major issue as Tamiya and Model Master are almost non existent to some degree since Covid. Tamiya has been having issue for years and Model Master got bought by Rustoleum and then dropped. Meaning they killed the line. Another corporate merger that makes no sense. I have been reluctant to try other brands, but now have order some AK.
Don't just fly--WREAK HAVOC!!!
Another corporate merger that makes no sense. I have been reluctant to try other brands, but now have order some AK.
Don't just fly--WREAK HAVOC!!!Comment
-
Finished my mantlet canvas snap fittingsDon't just fly--WREAK HAVOC!!!Comment
-
Great detailing!Comment


Comment