


Originally posted by Zippersnapper
View Post
-
Plastic or metal? If plastic, see post #55. You're right though, they're a booger!The more screws it takes to reassemble a tank, the more likely it is you left something out! -
MetalComment
-
I use spur cutters to grip one sides “fin” and then wiggle and gently pull it out. Haven’t messed one up yet🤞🤞.Originally posted by Zippersnapper View Post
Comment
-
Good idea. I used a pic tool, mini screwdriver, mini needle nose pliers, but not a spru cutter....The damn things wouldnt budge.Comment
-
I am glad you transferred the signal over to the FlyskyOriginally posted by SoCalBobS View Post . I will probably do that too the moment I receive my Flysky.
SoCal RC Tank Club Facebook Group
. I will probably do that too the moment I receive my Flysky.
SoCal RC Tank Club Facebook Group
Largest active RC Tank club in Southern California
Gathering 1-2x monthly/All Ages & Experience levels welcomeComment
-
To bump the thread.. I recorded my M36, just a real short clip to see how it would look in black and white. After all, we all know the world was in black and white back in the 1940's! Just look at all the films, right?
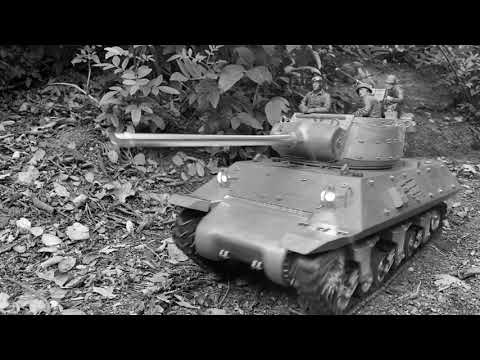
Actually, I did this because I haven't gotten around to painting mine. It's bare metal for now, but paints are enroute. Along with Clark TK50 and a Lego DEI IR receiver. $400 for the tank, $90 for the FrSky transmitter, $200 for the Clark board, $35 for the IR. Makes a plastic Heng Long at $160 RTR seem more reasonable. Ah well, money is just fun you haven't had yet.
By the way, you all know there are three prices for all the hobby stuff we buy; the actual price, the price we tell our spouse, and the price we pay when she finds out the first price. The more screws it takes to reassemble a tank, the more likely it is you left something out!
Comment
-
-
A couple of updates on my M-36:
This new tank was frequently having its track on the right side come off the sprocket. I'd tried different tensions without result. Then I did what I'd done on another tank; I put a washer on the shaft of the sprocket to make it stick out more. Success! The tank negotiated my test trail a number of times, and did spins on concrete with no failures. One has to flatten one side of the washer to match the flat portion of the drive shaft, once that's done, it's good.
Second, I installed my Clark TK50. Everything works EXCEPT one thing. I've heard that so often with Clarks. The elevation servo circuit makes the servo run randomly and spastically. Ah well.
Edit: Kenny DAK RC just told me the servo elevation circuit isn't enabled by default. So, gotta find and learn about a remote programmer.The more screws it takes to reassemble a tank, the more likely it is you left something out!Comment
-
Correct, it will not work correctly without setting it to PWM instead of ESC control.Comment
-
-
Let's see now, after you shared this tip, I've applied it to a Panzer IV idler, a Sherman with Mato duckbill tracks, a T-34, a T-90, and this M-36. An assortment pack of washers for $6.99 on Amazon was a wise investment for the next 200 tanks!Originally posted by Rubicon99 View Post
The more screws it takes to reassemble a tank, the more likely it is you left something out!Comment
-
I do the same with all my tanks when I build them. I look at the sprocket and idler paths to ensure they line up correctly. This is especially important when you change out gearboxes or add an adjustable idler. I just had to shorten the gearbox shafts on my Pershing build by about 5mm and add two "#6" brass washers to the idler so that everything lines up. I keep both brass and steel as sometimes the washers have a different thickness although you can just flat sand the washer to make it thinner.Comment
-
👍👍Originally posted by SoCalBobS View Post
Funny part about the washer tip. There are many folks out there that will never try it because it is too simple and cheap to possibly every work. “It just can’t work because well it can’t” is something I have heard over and over.
Comment
-
I have my M-36 apart for painting, finally. It appears there are bearings on all wheels, including the return rollers. Guess they made some improvements on it's Sherman chassis.The more screws it takes to reassemble a tank, the more likely it is you left something out!Comment
-
Mato M36 fresh out of the paint shop. My first Tamiya protocol tank. No wear & tear, no weathering yet. I will say that the all-metal weight gives it a presence on rough ground, not floating over it like plastic. (Don't get me wrong I like both kinds!) The road wheel bearings are a nice feature, makes for a smooth ride.
The more screws it takes to reassemble a tank, the more likely it is you left something out!Comment
-
Something I encountered while setting this tank up; I ordered some high power IR emitter bulbs from LegoDEI. Although his website shows the purple bulbs, when I got them they were clear. When I installed one, its range was no more than HL or Mato's. I replaced it with a "purple" one, which worked as expected. I contacted Lego. Apparently the new bulbs need a resistor in circuit and are supposedly more powerful than the purple ones. Unfortunately, I have no idea what resistor to use, so it' purple for now.The more screws it takes to reassemble a tank, the more likely it is you left something out!Comment
-
Those clear LEDs are a bit off to much and have major “shotgunning” issues. They have to be installed much deeper then the purple ones.Originally posted by SoCalBobS View PostComment
-
Break out your multimeter and compare the two's resistance.Originally posted by SoCalBobS View PostComment
-
Try a 330r. Kevin from RCTANKSAUSTRALIA told me to use those in my 88 gunDon't just fly--WREAK HAVOC!!!Comment
-
Assuming a 6mm id brass tube, how much deeper in do they need to be?Originally posted by Rubicon99 View PostComment


Comment