You must Sign-in or Register to post messages in the Hobby Squawk community
Registration is FREE and only takes a few moments

Register now

Announcement

Collapse
No announcement yet.

Official 3DP Thread

Collapse
X
Collapse
First Prev Next Last
 
  • Filter
  • Time
  • Show
Clear All
new posts

  • fhhuber
    replied
    The area of concern, in my opinion, would be covered by the heat shrink.

    I'll be needing to cut the heat shrink off of mine and inspect. But I expect they are OK because I have been running 65 deg print bed 205 deg nozzle on prints exceeding 24 hours. (high detail lithophanes)

    Leave a comment:


  • Skyboom
    replied
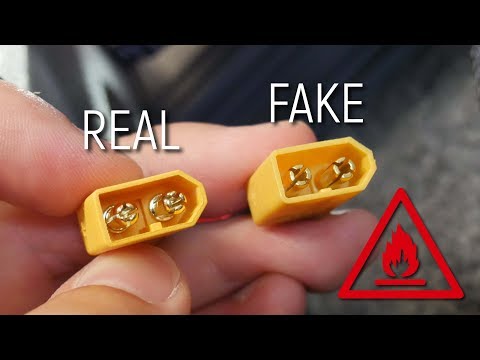
    Do these XT60's look ok? I sure wouldn't want a fire. Havn't a chance to do a test print yet. Was going to work on it tomorrow. I'll check the solder joints then.

    Leave a comment:


  • rifleman_btx
    replied
    I totally agree, thats one i wouldn't trust at all.

    Leave a comment:


  • fhhuber
    replied
    Originally posted by rifleman_btx View Post
    Keep an eye out for this!
    Even the "OK" (by his grading) soldered ones actually have marginal to poor solder joints.

    Leave a comment:


  • rifleman_btx
    replied
    Keep an eye out for this!

    Leave a comment:


  • Skyboom
    replied
    Nice prints! Oh my God what a job putting the Ender 3 together. Had to use YouTube for most of the build. Now I have to figure out how to work it. lol.

    Leave a comment:


  • Dirty Dee
    replied
    A few minor changes and I think I might have something usable :Cool:

    Leave a comment:


  • rifleman_btx
    replied
    LOL thats how i feel about my stuff as well hahaha

    Leave a comment:


  • Elbee
    replied
    Originally posted by rifleman_btx View Post
    Im thinking better firmware might be it, as they are both running .4mm nozzles.
    That is my thought. Each time a upgrade to the latest firmware, the prints just get better and I know I'm not doing anything differently. LOLI'm just not that smart. Best, LB

    Leave a comment:


  • rifleman_btx
    replied
    Im thinking better firmware might be it, as they are both running .4mm nozzles.

    Leave a comment:


  • Elbee
    replied
    Originally posted by rifleman_btx View Post
    LB, Funny you should ask, had to put that on hold because the Cessna went in and i have to reprint and replace a bunch of parts for it. And then i think im gonna go for the 64" Edge 540, then the PBY. After those are ironed out, i have the F86 myself. Man these printers given me the bug LOLon a side note the prints coming off the new printer seem alot more fuller than the ones off the anet. Seems to be an even brighter white
    RMBTX, A difference in nozzle size or even firmware? Sounds like it's a good thing no matter. LOL Best, LB

    Leave a comment:


  • rifleman_btx
    replied
    LB, Funny you should ask, had to put that on hold because the Cessna went in and i have to reprint and replace a bunch of parts for it. And then i think im gonna go for the 64" Edge 540, then the PBY. After those are ironed out, i have the F86 myself. Man these printers given me the bug LOL

    on a side note the prints coming off the new printer seem alot more fuller than the ones off the anet. Seems to be an even brighter white

    Leave a comment:


  • Elbee
    replied
    Originally posted by rifleman_btx View Post
    LB, I did pick up the F86 as well so cant wait to see how yours works out
    RMBTX, I know I am delinquent in the work there with my F-4 build. So far all parts are good, though again, these are PLA. I hope I do not regret that. Like you, I had some super thin walls and thought I'd back those areas with CA and .6 fiberglass cloth. I will need to research all the component parts as I have none: EDF, motor, retracts etcetera. How's the PBY coming? Best, LB

    Leave a comment:


  • rifleman_btx
    replied
    Yes indeed, what is nice about my unit is the control box is a separate unit to the machine itself. But even still with a 310x310 x410 build area it will need a very large box plus the 24v system vs my old one that was only 12v

    Leave a comment:


  • fhhuber
    replied
    My plan for an enclosure is to use coroplast for the main walls and top. Just enough frame to hold the lightweight stuff together and allow hinging a section of plexi as the door.
    Very cheap materials except the door.

    And I found you can 3D print the hinges and door latch.
    A hinge to easily remove the door of the Anycubic 4MAX or DIY closed chamber.There are two STL-files, one with the needed spacer (4MAX) already attached (incl) and one with the spacer separated (sep).A closed door is not always better for printing and an opened door can be easily damaged. With these hinges you can remove and install the door in one second.The hinges are more then strong enough for their purpose. They are a little bigger in size then the original ones but they fit perfectly. The original screws can be used.A little smoothing/post-processing of the hinges can be necessary.Distance holes is 25 mm in both directions, thickness spacer is 4.5 mm.Happy hinging :)Ps. Apologies for the photo quality, photographing is not my greatest talent and black on black is hard to capture.

    This latch is printed in 4 parts and I have prepared Gcode for all the files but I have included the IPTs and STLs if you want to make modifications. The pin goes into the hole on the bar after you put in the main chassis. The smaller chassis can be positioned across the gap between the door, gate, etc and the wall, fence, etc in line with the main chassis to allow the latch to work. I have included an assembly picture to make putting it together easier. If you have any questions please do contact me.


    Don't forget the enclosure DOES need air exchange with the room or air in from the room and ducted to exhaust outdoors. Its pretty easy to make an oven. The Kenner EZ bake just uses a 100 watt light bulb to bake cookies and small cakes. There's more watts of heat production in an Ender 3 than that.

    Leave a comment:


  • rifleman_btx
    replied
    LB, I did pick up the F86 as well so cant wait to see how yours works out

    Leave a comment:


  • rifleman_btx
    replied
    I need to do that but now i need a really big box!LOL

    Leave a comment:


  • Dirty Dee
    replied
    I do. Here is a picture. Basically, it keeps out any drafts and helps increase the ambient temperature in the "chamber" to the mid/high-80s.

    When I print with ABS, the cooling fan is disabled, but this does have a bit of a drawback. For any small sections, the sections can get a bit "melty" looking due to no cooling. To address this, I usually print parts in pairs or more. This allows a bit of time for the layer to cool before the next layer is extruded.

    Leave a comment:


  • Woodcock
    replied
    Originally posted by Dirty Dee View Post

    I'm using ABS. Havent bought any PLA in over a year. Acetone welding doesnt work on PLA
    Hey Dee, did you have to box in your printer using the ABS?

    Woody

    Leave a comment:


  • rifleman_btx
    replied
    Very cool! Once i get all these projects done im gonna look at doing that kind of thing as well

    Leave a comment:

Working...
X