

Official Freewing T-33 Shooting Star 80mm EDF Thread

Collapse
X
Collapse
First Prev Next Last
 
  • Time
  • Show
Clear All
new posts

  • Radar-Guy
    replied
    Originally posted by Gilatrout
    1. In the above pic, you show a lower portion for each cockpit panel. The supplied files only includes one. The only difference appears to be that the center portion is longer on one than the other. If so, then no problem I'll just print a second and trim the part.

    2. do you have or can you recommend a background image for the instruments?

    3. Finally, the pilot busts look awesome. Where did you get them? Are they also of your own design?

    4. Are you using a PLA printer?
    1. Both are printed from the same file. I started fitting the panels to the foam cockpit (front panel first) and trimmed that part in question. Doing this, I realised that the front cockpit needs a new coaming. I will work on that today.

    2. I used an image from this site: http://aviation.watergeek.eu/t33-panel.html

    3. The pilot bust are really awesome, not my design. Here is the source: https://www.thingiverse.com/thing:3806310
    Scaled to size

    4. All parts were printed using ASA. According to the specs, it‘s getting soft at around 110 deg C.

    Leave a comment:


  • Radar-Guy
    replied
    Originally posted by Corsair nut
    Also...for anybody that's curious about the aft fuse/tail pipe reduction I did...Justin La and I did a fly off head to head test of 100% stock vs mine with reduced tail pipe...mine took off faster...had a faster cruize and faster top speed. Not by a ton...but the conclusion is that for a 15 minute mod...it certainly didnt hurt performance. 0 loss in vertical perdormance over stock. In fact it might have been sightly better. And I was using a 5 year old zippy 5800 30c pack. Basically Justins reaction was... "I guess I know what I'm doing to my T-33 tonight.."
    I‘m very interested in this mod, but don‘t like to cut my freshly painted fuselage. What is the outlet diameter on your model? I would like to model a 3DP reduction piece for the tail pipe.

    Leave a comment:


  • Gilatrout
    replied
    Originally posted by Radar-Guy
    Here are 3DP files for better looking seats, based on the Martin Baker MK GU5 as used in later Luftwaffen T-33s. Parts printed with ASA Filament. Warning: This is a kit Please refer to the pictures for assembly.

    Click image for larger version Name:	Seat 2.jpg Views:	0 Size:	42.0 KB ID:	237360Click image for larger version Name:	Seat 1.jpg Views:	0 Size:	36.9 KB ID:	237361Click image for larger version Name:	Cockpit Parts.jpg Views:	0 Size:	56.3 KB ID:	237362
    I've been printing happily and I have a few questions.

    In the above pic, you show a lower portion for each cockpit panel. The supplied files only includes one. The only difference appears to be that the center portion is longer on one than the other. If so, then no problem I'll just print a second and trim the part.

    Second, do you have or can you recommend a background image for the instruments?

    Finally, the pilot busts look awesome. Where did you get them? Are they also of your own design? Are you using a PLA printer?

    Many thanks

    Leave a comment:


  • Corsair nut
    replied
    Also...for anybody that's curious about the aft fuse/tail pipe reduction I did...Justin La and I did a fly off head to head test of 100% stock vs mine with reduced tail pipe...mine took off faster...had a faster cruize and faster top speed. Not by a ton...but the conclusion is that for a 15 minute mod...it certainly didnt hurt performance. 0 loss in vertical perdormance over stock. In fact it might have been sightly better. And I was using a 5 year old zippy 5800 30c pack. Basically Justins reaction was... "I guess I know what I'm doing to my T-33 tonight.."

    Leave a comment:


  • Corsair nut
    replied
    Those speed brakes are awesome!!! Well done!

    I had my t33 out on friday in some 15 to 20mph winds amd it took it like a champ. Reeallly enjoying the t33. I like it so much.id buy another for sure if this crashed. (And i dont say that about many models!)
    Attached Files

    Leave a comment:


  • Icarus the 2nd
    replied
    Click image for larger version

Name:	20200223_174035.jpg
Views:	1328
Size:	44.8 KB
ID:	237824Click image for larger version

Name:	20200223_174006.jpg
Views:	1346
Size:	39.5 KB
ID:	237826Click image for larger version

Name:	20200223_174133.jpg
Views:	1327
Size:	40.1 KB
ID:	237827Click image for larger version

Name:	20200223_174121.jpg
Views:	1290
Size:	45.8 KB
ID:	237828Click image for larger version

Name:	20200223_173944.jpg
Views:	1325
Size:	45.7 KB
ID:	237829Click image for larger version  Name:	IMG_20200204_220032.jpg Views:	0 Size:	84.6 KB ID:	237822Click image for larger version  Name:	IMG_20200204_220055.jpg Views:	0 Size:	75.7 KB ID:	237823
    Attached Files

    Leave a comment:


  • Icarus the 2nd
    replied
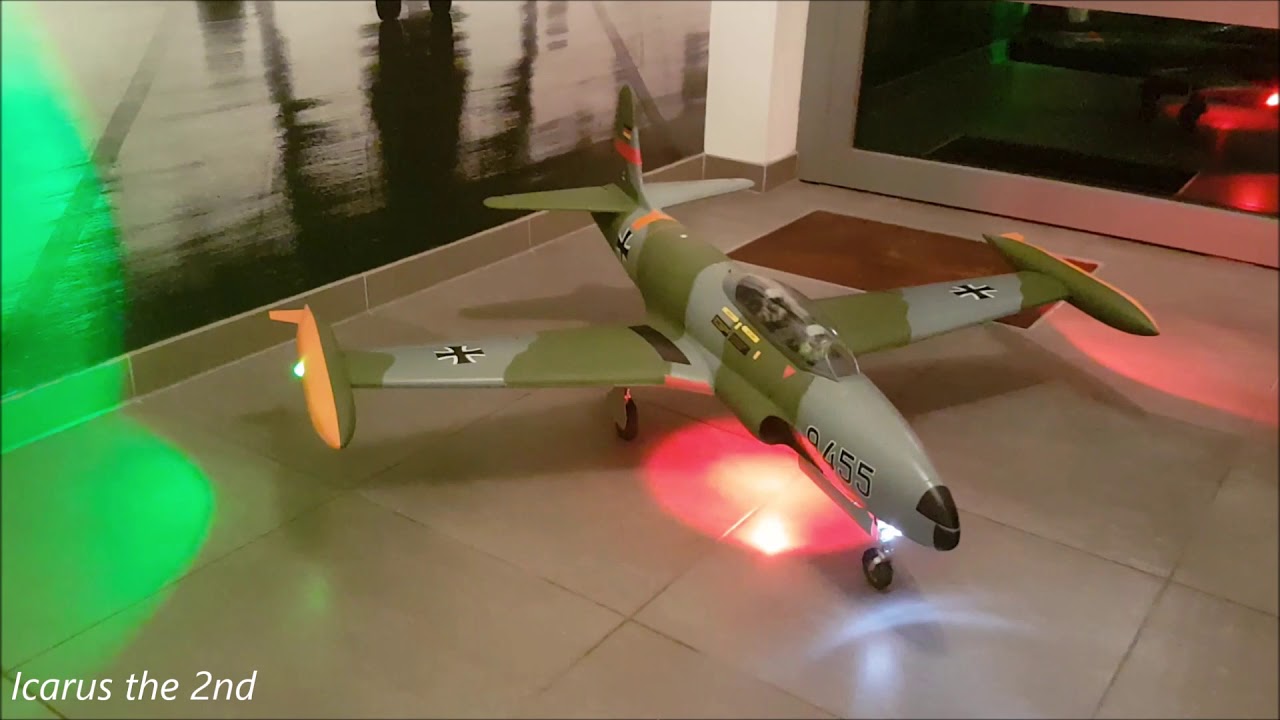
    I added some leds to my T-33. A solid green & red on the wingtips, a white beacon on top and a red beacon below.
    I used some clear lenses/mounts where these high power 1w leds fit in perfectly, as you can see it gave good results and I could install them without showing or damaging the foam.
    Leave a comment:


  • Icarus the 2nd
    replied
    Originally posted by Radar-Guy

    Two pushrods, made from the „servo wire catcher“ that comes with kit. Z-bend on one end, quick link connector on servo.

    It‘s still in my mind! I‘ve started applying my DIY decals yesterday, making further mods to the sheets during the process. You‘ll get it soon!

    Click image for larger version Name:	D28D3766-0E6B-4FF1-8C18-1EDC9B069E0E.jpeg Views:	0 Size:	17.4 KB ID:	237811Click image for larger version Name:	1D896A0F-310A-4AC6-8129-D870BE7A6ACC.jpeg Views:	0 Size:	13.9 KB ID:	237812Click image for larger version Name:	E6635EFD-042B-4C75-8D5F-767E9A920E52.jpeg Views:	0 Size:	23.5 KB ID:	237813
    very nice! your 'real' german T-33 is a true work of art! can't wait to see the final result

    Leave a comment:


  • Elbee
    commented on 's reply
    Frank, Dittos on the great work here. And thank you for your efforts/results. Best, Steve

  • Radar-Guy
    replied
    Originally posted by Gilatrout
    ...
    Can you describe how the pushrod is made?

    I would also be indebted to you if a certain high res decal document were posted😁
    ...
    Two pushrods, made from the „servo wire catcher“ that comes with kit. Z-bend on one end, quick link connector on servo.

    It‘s still in my mind! I‘ve started applying my DIY decals yesterday, making further mods to the sheets during the process. You‘ll get it soon!

    Click image for larger version  Name:	D28D3766-0E6B-4FF1-8C18-1EDC9B069E0E.jpeg Views:	0 Size:	17.4 KB ID:	237811Click image for larger version  Name:	1D896A0F-310A-4AC6-8129-D870BE7A6ACC.jpeg Views:	0 Size:	13.9 KB ID:	237812Click image for larger version  Name:	E6635EFD-042B-4C75-8D5F-767E9A920E52.jpeg Views:	0 Size:	23.5 KB ID:	237813

    Leave a comment:


  • Gilatrout
    replied
    Originally posted by Radar-Guy
    More 3DP stuff...
    Here are parts for the speed brake, loosely based on Brent's design. The servo mount is designed for a Corona (!) DS-939 MG servo. I had to remove a bit of foam from the fuselage to give room for the servo. It should be easy to move the servo closer to the "brake boards", if desired. You may notice a "step" at the aft end of the boards. That's caused by an issue with my printer, it's not in the model.

    Frank

    Click image for larger version

Name:	Speed Brake.jpg
Views:	1873
Size:	121.6 KB
ID:	237764Click image for larger version

Name:	IMG_3540.jpg
Views:	1838
Size:	58.5 KB
ID:	237765Click image for larger version

Name:	IMG_3541.jpg
Views:	1814
Size:	65.1 KB
ID:	237766 ​ ​ ​
    Many thanks.

    Can you describe how the pushrod is made?

    I would also be indebted to you if a certain high res decal document were posted😁

    In all seriousness, truly thank you for sharing this work

    Leave a comment:


  • Radar-Guy
    replied
    More 3DP stuff...
    Here are parts for the speed brake, loosely based on Brent's design. The servo mount is designed for a Corona (!) DS-939 MG servo. I had to remove a bit of foam from the fuselage to give room for the servo. It should be easy to move the servo closer to the "brake boards", if desired. You may notice a "step" at the aft end of the boards. That's caused by an issue with my printer, it's not in the model.

    Frank

    Click image for larger version

Name:	Speed Brake.jpg
Views:	1873
Size:	121.6 KB
ID:	237764Click image for larger version

Name:	IMG_3540.jpg
Views:	1838
Size:	58.5 KB
ID:	237765Click image for larger version

Name:	IMG_3541.jpg
Views:	1814
Size:	65.1 KB
ID:	237766 ​ ​ ​

    Leave a comment:


  • Jackcannon
    replied
    Originally posted by Radar-Guy
    Thanks, Gentlemen!

    Jackcannon Well, I‘m in Germany. Please look for a local print service

    Flying Dutchman Go to post #850, it‘s the attached „Lower Front Panel“ file
    Will do. Thanks radar guy

    Leave a comment:


  • Cws
    replied
    I have several flights on my T 33 now I believe it is the best edf I have owned. I have found using full flaps on landing will result in a slow touch down and short roll out.
    the Admiral stabilized rx600 receiver in this airplane has made it possible for me to get back to flying edf planes at 79. Thank you Motion RC.

    Leave a comment:


  • FredGB
    replied
    Thanks Evan D and Oxotnik i appreciate it

    Fred

    Leave a comment:


  • Evan D
    replied
    The people had problems with the older blue box. The MCBe in this has been very reliable. But as Ox says there’s no real reason for it in this plane since there are no lights an landing gear synchronization isn’t needed.

    Leave a comment:


  • Oxotnik
    replied
    Originally posted by FredGB
    Hi all, I am most likely to fly my T33 (German scheme) next weekend and was wondering if i should wire the servos directly to the receiver instead of into the blue box and then the receiver as i have heard of others ending up losing their planes due to the box.The plane worked fine on the bench and all of the control surfaces landing gear etc worked fine when plugged into the blue box and so i was just wondering others thoughts on this as it is my first plane from MRC and first Jet after flying warbirds for some time .

    Thanks again

    Fred
    The blue box isn’t needed, unless you don’t have enough channels available in you radio system. Personally, I have pulled the blue box and the wing-interface connectors from my T-33.

    RE: First Jet...
    I think that you’ll find the T-33 very easy to fly. Most of us have all had really easy maidens. Coming from prop planes, just remember that you can’t cheat airspeed with blips from the throttle. There’s some latency from the time that you advance the throttle until you see a response. She’s also a bit of a floater. So, your first landing or so, may be long.

    Good luck on your maiden. I hope you enjoy your T-33 as much as the rest of us enjoy ours.

    Leave a comment:


  • FredGB
    replied
    Hi all, I am most likely to fly my T33 (German scheme) next weekend and was wondering if i should wire the servos directly to the receiver instead of into the blue box and then the receiver as i have heard of others ending up losing their planes due to the box.The plane worked fine on the bench and all of the control surfaces landing gear etc worked fine when plugged into the blue box and so i was just wondering others thoughts on this as it is my first plane from MRC and first Jet after flying warbirds for some time .

    Thanks again

    Fred

    Leave a comment:


  • Flying Dutchman
    replied
    Originally posted by Radar-Guy
    Thanks, Gentlemen!

    Flying Dutchman Go to post #850, it‘s the attached „Lower Front Panel“ file


    Oops, I managed to miss that one in my earlier downloads of your files.
    Many thanks!

    Leave a comment:


  • Radar-Guy
    replied
    Thanks, Gentlemen!

    Jackcannon Well, I‘m in Germany. Please look for a local print service

    Flying Dutchman Go to post #850, it‘s the attached „Lower Front Panel“ file

    Leave a comment:

Working...