


Hello everyone, I recently purchased the Tongde M24 Chaffee, and I wanted to see what everyone was doing for modifications. I'm a member of two other RC websites, and no one had a thread about the 1/16th M24. I searched online, and I happened to find some photos from Rubicon99's thread at Hobby Squawk. Then I found the thread that SoCalBobs started, and I looked through all the pages of the thread. So, I decided to join H.S. because of the people interested in 1/16th scale RC Tanks. And so, here's the beginning of my build thread.
-
-
The only thing I did with my M24 was to charge the battery, and then I completely stripped it down with the exception of the tracks, suspension, sprockets, and road wheels. I'm from RI, and there isn't an RC tank group and there isn't anyone to do IR battles with. Most of my RC tanks are airsoft, except for the Cool Bank M5, and M8 GMC, and of course, the M24.
I was surprised to find out that the M24's battery had to be charged while in the tank. Yes, the M24 is small, but so are the C.B. M5, and M8, and both of them have an external battery compartment.
After reading SoCalBobs's M24 thread, and reading that he was thinking to remove the smoker to relocate the battery, I decided that would be my 1st, and most difficult mod. I'm an airsoft RC tanker, and I usually don't use the smoke option, so deleting the smoker was a no brainer!!! LOLLLLL!!!!!!!
I carefully decided where to cut the upper hull to make an easily removable cover to remove the battery. I used my DeWalt scroll saw to make the cut out. I drilled a couple of 1/32" holes to insert the scroll saw blade. Then I clamped a piece of 1/4" plywood onto the scroll saw table because the upper hull would hang over the edge to the table.
A picture is worth a thousand words, so here come the photos!!!
Here's the plywood on my scroll saw table.
Here's the scroll saw blade going through the hull so I can make the cutout.
The first cut is across the hull on the pencil line, and down the side, and across the rear edge, and up the other side. Anyone whose ever cut this type of plastic, or ever styrene, knows the friction from the blade causes the removed plastic tends to fuse the cut, but it usually is easily separated afterward. The same fusing phenomenon also happens if an abrasive cutting disc is used. It takes a bit of getting used to, but it's not as bad as it sounds.
This image shows the fused plastic in the cut.
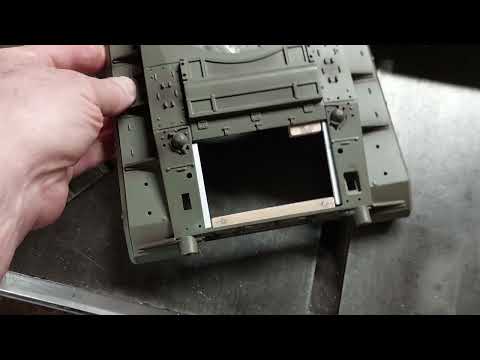
Next, we have the new battery opening cut, and then comes a bit of filing the edges, and so on.
-
It's amazing how small the blade is I used to cut out this opening. This image shows the blade passing through one of the holes a lifting handle will be glued into.
Comment
-
The last thing I did yesterday was to cut a couple strips of 1/16" thick styrene sheet to glue to the upper hull at the sides of the opening the new cover would sit on.
Here's a short video,
Comment
-
I'll post more progress photos tomorrow of the new and finished battery cover.
Comment
-
Great idea and workmanship! Do you recall the blade size?
The more screws it takes to reassemble a tank, the more likely it is you left something out!Comment
-
-
Good morning Bob, BTW, it was basically your idea, I liked it and I ran with it. Thank you for taking an interest in my build thread, I really appreciate it!!!Originally posted by SoCalBobS View Post
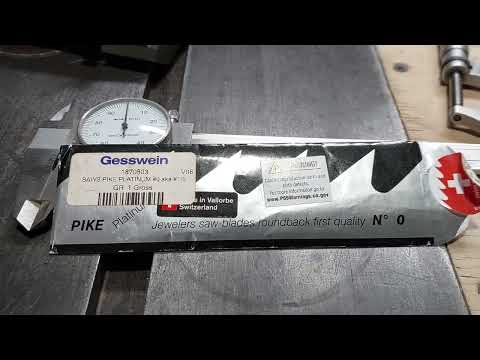
Here's an image of the metal cutting scroll saw blades I use. They are almost .012" thick x .022 wide. Watch the short video for more information.
Roger
Comment
-
Thank you very much, Rubicon 99, I really appreciate your interest in my build thread. More to follow!!!Originally posted by Rubicon99 View Post
RogerComment
-
Next, I measured the angle on the rear of the upper hull, so I could make a block to support the rear edge of the new battery hatch.
It's a 13 degree incline.
Next, I set the miter saw at 13 degrees, and I cut an inch long piece of 2 x 4, and then I ripped off a 1/4" piece on the band saw.
Then I laid out where I would drill two 1/8" holes an 1/8" deep using a spade drill so I had a flat bottom holes. After drilling the holes, I ripped off a 1/4" wide piece, glued the magnets in so they were flush with the surface of the wood block.
Comment
-
I wasn't able to attach a couple of tabs to the front of the hatch, so I made another small block of wood with another magnet that was mounted next to the turret traverse motor. Here's the wood blocks and magnets that will hold the hatch on, and allow easy access to the battery. The thin steel pieces can be seen glued onto the bottom of the hatch.
Here's a short video that says it all!!!
Comment
-
I'm planning to remove the fender skirts next, and then I'll be removing the chunky drivers windshield mount.

More progress soon to be completed!!!
Comment
-
Brilliant idea and execution so farSoCal RC Tank Club Facebook Group
Largest active RC Tank club in Southern California
Gathering 1-2x monthly/All Ages & Experience levels welcomeComment
-
Thank you very much for your interest in my M24 build thread, I really appreciate it!!! Actually, SoCalBobs had the idea so the battery could be removed and charged, and at the same time, insert a fresh battery to continue the battle. I liked the idea and I'm crazy enough to chop up a new M24 to make it happen.Originally posted by Tang - RC.Senshado View Post
Comment
-
OK, so I went through some screen shots, and here are some good images of what I'll call windshield delete M24's!!!!! First, here's two great images of the windshield folded down, and one has only the brackets remaining.
OK, now just 3 mounting blocks. Yes, I said there were 4, but I was wrong!!! LOL!!!
Last image, the Norwegians moved the Ma Deuce up front; it looks outta place!!!
Comment
-
I performed plastic surgery again today. The M24 lives, but the fender skirts and the nasty windshield mount have gone to the plastic scrap heap!!! LOLLLLLLL!!!!!!!
Comment
-
Before plastic surgery.
Comment
-
After plastic surgery!!!
Comment
-
Windshield mount ground away!!!
Comment
-
The hollowed out groove is slightly over 1/16" wide. So, instead of filling it in with bondo and having a weak spot in front of the drivers hatch, I glued in a strip of styrene on the outside, and a strip over the hole underneath. It will be a strong repair.
I'll wait for the glue to dry, and I'll grind off the excess on the top of the upper hull. A bit of sanding and a skim coat of bondo, and mare sanding, and it's ready for primer & paint!!!
Comment


Comment