Freewing 90mm F-22 Raptor - Official Thread

Collapse
X
Collapse
First Prev Next Last
 
  • Time
  • Show
Clear All
new posts

  • Suko
    replied
    Thank you sir.

    Leave a comment:


  • Aros
    replied
    Originally posted by Suko
    Not sure if anyone from MotionRC is on this thread, but I'd like to point out that the 3D printed F-22 nose gear brace you have hosted on your site is designed by me, not Rifleman_btx. I wasn't even aware it was on the MRC support page until a club buddy of mine pointed it out to me today at the field.

    I'm not sure how it happened (perhaps because he shared the link on HobbySquawk?), but the design is mine. If you download the file, the readme even says "Designed by ShadowVFX", which is my Thingiverse alias.

    Anyways, just thought I'd bring that to your attention. You can continue using the brace on your support page. But, I would appreciate it if the credits could get updated to the correct person. Thanks.
    My apologies Suko, I must have inadvertently grabbed the posted public link and credited the poster of said link. I have updated the credit accordingly.

    Leave a comment:


  • Suko
    replied
    Not sure if anyone from MotionRC is on this thread, but I'd like to point out that the 3D printed F-22 nose gear brace you have hosted on your site is designed by me, not Rifleman_btx. I wasn't even aware it was on the MRC support page until a club buddy of mine pointed it out to me today at the field.

    I'm not sure how it happened (perhaps because he shared the link on HobbySquawk?), but the design is mine. If you download the file, the readme even says "Designed by ShadowVFX", which is my Thingiverse alias.

    Anyways, just thought I'd bring that to your attention. You can continue using the brace on your support page. But, I would appreciate it if the credits could get updated to the correct person. Thanks.
    Attached Files

    Leave a comment:


  • Gmack908
    replied
    Click image for larger version

Name:	F7862D58-B164-4664-8C3D-656D20C4A5D6.jpeg
Views:	899
Size:	176.5 KB
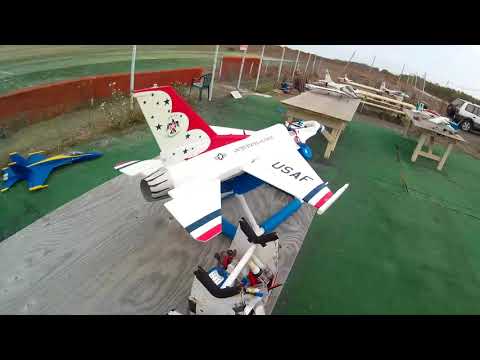
ID:	308708 6 flights on off rough grass at club field with 8s f-22 and flying great! Biggest thing I can recommend is to make sure you loctite all the grub screws on your retracts. Keep having mine loosen up.

    Leave a comment:


  • rifleman_btx
    replied
    Yes sir, and for me that would be absolutely perfect!

    Leave a comment:


  • gooniac33
    replied
    Originally posted by rifleman_btx
    And 90mm f16
    The F-16 is where you will notice the biggest jump in performance and efficiency! With the F-22 it will mainly be in efficiency but the speed will jump up a tad from the stock outrunner.

    Leave a comment:


  • rifleman_btx
    replied
    And 90mm f16

    Leave a comment:


  • rifleman_btx
    replied
    Yeah, I'm hoping for a little more boost and also easier on the packs, I was happy with the performance where it was, but thought a little extra would be about perfect for me

    Leave a comment:


  • gooniac33
    replied
    Originally posted by rifleman_btx
    I just swapped the motors in this and my f22, also got the HP version of the f16 today built it in about 20 minutes, I may add the flaparon option to it later if I deem I need or want it. I'm looking forward to seeing what gains I get with this new motor sets in the f22, I have 2 more updates to do, my f86 and flexjet.
    Curious to see what you think. Mine was already hopped up with a Gooniac set up so when I tried the 9 blade it as a down grade. However it was really quiet and efficient with the new inrunner. Its for sure better than the stock outrunner! Much easier on packs!

    Leave a comment:


  • Evan D
    replied
    "this and the F-22"... You are in the F-22 thread.

    Which HP F-16? 90mm or 70?

    Leave a comment:


  • rifleman_btx
    replied
    I just swapped the motors in this and my f100, also got the HP version of the f16 today built it in about 20 minutes, I may add the flaparon option to it later if I deem I need or want it. I'm looking forward to seeing what gains I get with this new motor sets in the f22, I have 2 more updates to do, my f86 and flexjet.

    Leave a comment:


  • Av8er278
    replied
    Click image for larger version

Name:	52488C18-029D-4533-8A6A-D3377A3AEB15.jpeg
Views:	665
Size:	44.6 KB
ID:	307907Click image for larger version  Name:	0233A0E2-1D57-4D99-A23C-9E9CEA5DE2B0.jpeg Views:	0 Size:	44.3 KB ID:	307906
    Originally posted by gooniac33

    check out the video and make sure to always plug in the burner to the battery on the negative side of the connection. the adapters I make have reverse voltage protection so I will still send you one. if plugged in wrong it will save your battery but some other circuits may not like it! So be sure to follow the negative side of the series connection...
    Thanks I watched your video and I’m pretty sure I’m doing it right. I changed my plug to a XT-90 plug with different type of Y harness.

    Leave a comment:


  • gooniac33
    replied
    Originally posted by Av8er278
    check out the video and make sure to always plug in the burner to the battery on the negative side of the connection. the adapters I make have reverse voltage protection so I will still send you one. if plugged in wrong it will save your battery but some other circuits may not like it! So be sure to follow the negative side of the series connection...

    Leave a comment:


  • Av8er278
    replied
    Originally posted by gooniac33
    Sorry I have been away from the site for a while and am just catching up on the thread now. There is nothing wrong with removing a little materiel to get the burner to fit. so long as there are no rough edges or foam sticking out into the airstream you will be fine.

    I hope you got the emails that I sent. take a look at this video that shows the proper way to do this with the (2) 4s packs. If you want I can send you the battery balance adapter with the notch in it for the 4s pack. I think I may have forgotten to make the notch for the 4s balance lead... I make them all myself and over time stuff kinda blends together and I can forget. Even without the notch it will fit though... I have reverse voltage protection wired into the connector but it is still good to NOT plug it in the wrong way! See below... and if need be let me know how to get in contact with you via phone. we can work it all out.


    Thanks Ray I got it going now. I used a hot wire to cut out foam. And I had a four cell balance plug and just copied yours. It works great now. Also put aluminum tape inside not sure I needed it but put it in.


    Leave a comment:


  • gooniac33
    replied
    Originally posted by Av8er278
    Ok got my afterburner in with a little cutting looks good. Only problem now is it came with the balance plug for 6s battery I’m using two 4s batteries. Do I copy the same with positive pin four in from left?
    Sorry I have been away from the site for a while and am just catching up on the thread now. There is nothing wrong with removing a little materiel to get the burner to fit. so long as there are no rough edges or foam sticking out into the airstream you will be fine.

    I hope you got the emails that I sent. take a look at this video that shows the proper way to do this with the (2) 4s packs. If you want I can send you the battery balance adapter with the notch in it for the 4s pack. I think I may have forgotten to make the notch for the 4s balance lead... I make them all myself and over time stuff kinda blends together and I can forget. Even without the notch it will fit though... I have reverse voltage protection wired into the connector but it is still good to NOT plug it in the wrong way! See below... and if need be let me know how to get in contact with you via phone. we can work it all out.


    Leave a comment:


  • Gmack908
    replied
    Originally posted by Av8er278
    Thanks Gmack908 I had a four cell balance plug so I just resoldered it on an copied the same pattern. And it works now. Wow you got lots of wires all over the place hehehe
    Haha I know. Believe it or not they are all zip tied and organized. I have so much telemetry sensors on here and a real pitot so there are air hoses as well. Hard to get it all in there.

    Leave a comment:


  • Av8er278
    replied
    Thanks Gmack908 I had a four cell balance plug so I just resoldered it on an copied the same pattern. And it works now. Wow you got lots of wires all over the place hehehe

    Leave a comment:


  • Gmack908
    replied
    Originally posted by Av8er278
    Here is what I have
    You can push it out and move it. You only need two wires. Should look like this if attaching to one 4s battery.
    Attached Files

    Leave a comment:


  • Av8er278
    replied
    Here is what I have
    Attached Files

    Leave a comment:


  • Av8er278
    replied
    Ok got my afterburner in with a little cutting looks good. Only problem now is it came with the balance plug for 6s battery I’m using two 4s batteries. Do I copy the same with positive pin four in from left?
    Attached Files

    Leave a comment:

Working...
