New Avios Mig 17 ?

Collapse
X
Collapse
First Prev Next Last
 
  • Time
  • Show
Clear All
new posts

  • Hawker_Hurricane
    replied
    Originally posted by Capt G
    Two migs, two maidens today, three flights each. Both flew well and needed a bit of right trim and about 3mm up elevator. CG good with battery almost full forward. Lands best with full flaps and speedbrakes out.
    excellent!! any video by any chance?

    Leave a comment:


  • RanGee
    replied
    Originally posted by Capt G
    Two migs, two maidens today, three flights each. Both flew well and needed a bit of right trim and about 3mm up elevator. CG good with battery almost full forward. Lands best with full flaps and speedbrakes out.
    Awesome pictures Capt G!

    Leave a comment:


  • Hardway
    replied
    Congrats! Welcome to the Squawk G

    Leave a comment:


  • Capt G
    replied
    Two migs, two maidens today, three flights each. Both flew well and needed a bit of right trim and about 3mm up elevator. CG good with battery almost full forward. Lands best with full flaps and speedbrakes out.

    Leave a comment:


  • Hawker_Hurricane
    replied
    Originally posted by RanGee

    Posting for Tengarng as he's on vacation with limited internet access:
    "Hello Hawker_Hurricane,

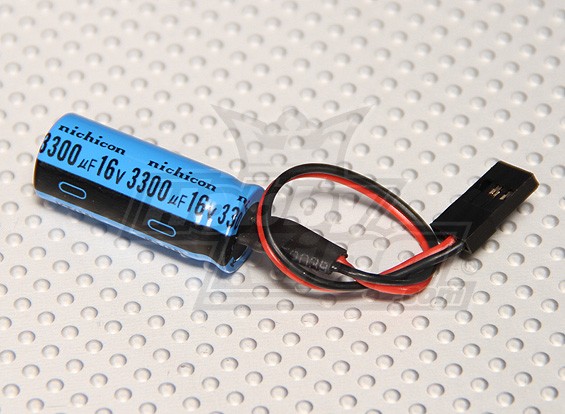
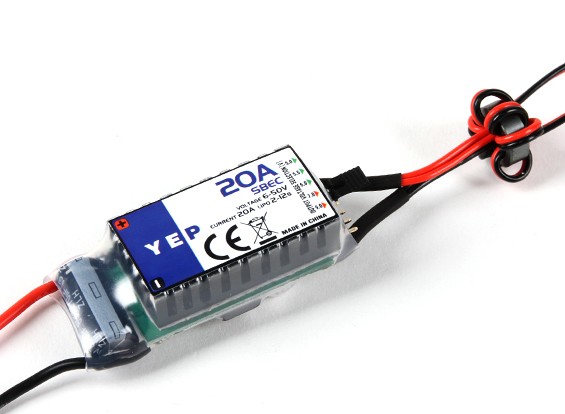
    The idea is to have both ESC's operating at the same time in case the main bec of the esc overheats the external bec which is sourced by a 2s lipo pack which can be lightweight and small in capacity is used due to low voltage drop and therefore smaller heat dissipation which means less likely hood of failure.


    You don't have to cut the red wire of the esc, which gives power to the integrated BEC, just leave everything as is

    same time put the capacitor on a spare port of your RX, you can also use a Y harness to any other port that is already occupied as the capacitor has no real function to it except to stabilize the output voltages of the BEC's going against each other in case of significant voltage differences.

    you can buy the capacitor here:


    If you plan on using an aftermarket ESC, make sure to match the internal BEC and the external BEC to the same voltage output.

    if you plan on using the stock ESC with 5.5V output then i recommend you get the external BEC from hobbyking


    because it has a 5.5V select output which brings the voltage gap between both BEC's closer

    You will be fine nevertheless with a cap on the spare port to balance any potential differences."

    He also wanted to let you know that of you have any questions, you can call him; PM me for his number.
    Thank you Rangee (tengarang) I hope everything is ok with tengarang, he has not been very active, but appreciate you letting me know hes on vacation. Strange why his avtar says banned.
    I hope that is not the case as he has been providing a lot of value in his posts to the HS community. I enjoy reading his posts and watching his videos.

    the components tengarang suggested has been ordered, and will message you if I need to reach him

    Leave a comment:


  • RanGee
    replied
    Originally posted by themudduck

    RanGee, thank you very much!! This evening I packed my MIG into the truck for the EDF event I'm going to tomorrow, and bent the original foam skid in half just putting the jet into the truck~!! So I am printing the skid now, 1.5 hours from now I will have a plastic skid.

    Hopefully I'll have a few comments after flying tomorrow. My jet turned out fine, there was a significant amount of fiddling to get the controls adjusted, especially the inner gear doors, but everything is set. The flaps on mine won't close all the way, they're slightly warped, I guess this seems to be a thing. And one flap servo is slightly jumpy. But its really not a big deal and I think this jet is fan-tastic!.
    You bet!
    I'm doing elevator servo covers now, will upload to thingiverse later tonight.

    Click image for larger version

Name:	Capture11.PNG
Views:	1072
Size:	615.8 KB
ID:	209703

    Leave a comment:


  • themudduck
    replied
    Originally posted by RanGee
    Just uploaded the Mig gear doors to thingiverse however it takes 24 hours before it gets published.
    https://www.thingiverse.com/thing:3800059
    RanGee, thank you very much!! This evening I packed my MIG into the truck for the EDF event I'm going to tomorrow, and bent the original foam skid in half just putting the jet into the truck~!! So I am printing the skid now, 1.5 hours from now I will have a plastic skid.

    Hopefully I'll have a few comments after flying tomorrow. My jet turned out fine, there was a significant amount of fiddling to get the controls adjusted, especially the inner gear doors, but everything is set. The flaps on mine won't close all the way, they're slightly warped, I guess this seems to be a thing. And one flap servo is slightly jumpy. But its really not a big deal and I think this jet is fan-tastic!.

    Leave a comment:


  • RanGee
    replied
    Originally posted by Hawker_Hurricane

    I find that to be true, and looking at your video and tengarangs video it looked like he got over 4 mins of mixed throttle just how I like to fly mine.

    @ Tengarng do you mind elaborating how your setup of how the BEC is connected in your setup? I like the idea of extra insurance, but not 100% clear how you went about it, since have a few of those 2s packs floating around and could be put to good use.
    Posting for Tengarng as he's on vacation with limited internet access:
    "Hello Hawker_Hurricane,

    The idea is to have both ESC's operating at the same time in case the main bec of the esc overheats the external bec which is sourced by a 2s lipo pack which can be lightweight and small in capacity is used due to low voltage drop and therefore smaller heat dissipation which means less likely hood of failure.


    You don't have to cut the red wire of the esc, which gives power to the integrated BEC, just leave everything as is

    same time put the capacitor on a spare port of your RX, you can also use a Y harness to any other port that is already occupied as the capacitor has no real function to it except to stabilize the output voltages of the BEC's going against each other in case of significant voltage differences.

    you can buy the capacitor here:


    If you plan on using an aftermarket ESC, make sure to match the internal BEC and the external BEC to the same voltage output.

    if you plan on using the stock ESC with 5.5V output then i recommend you get the external BEC from hobbyking


    because it has a 5.5V select output which brings the voltage gap between both BEC's closer

    You will be fine nevertheless with a cap on the spare port to balance any potential differences."

    He also wanted to let you know that of you have any questions, you can call him; PM me for his number.

    Leave a comment:


  • gooniac33
    replied
    Originally posted by Quickstop

    Speed brakes are pure drag while flaps are extra lift with drag. I would only put them on separate channels, sometimes you won’t want the extra drag and putting them together, you have no choice.
    the flaps are far too flimsy for my liking at this point. that could also be another reason why the plane is rolling one way or the other and requiring trim. So I am going to see if I can stiffen them or maybe make them out of a different material. I only have brakes wired to work at the moment but plan to tie them together...

    Leave a comment:


  • RanGee
    replied
    Just uploaded the Mig gear doors to thingiverse however it takes 24 hours before it gets published.

    Leave a comment:


  • Hawker_Hurricane
    replied
    Originally posted by RanGee

    The Mig's stock power system is very efficient, you should be okay with 4-5 minutes of mixed throttle. I flow mine (mixed throttle) for 4 1/2 minutes and landed with 43%
    I find that to be true, and looking at your video and tengarangs video it looked like he got over 4 mins of mixed throttle just how I like to fly mine.

    @ Tengarng do you mind elaborating how your setup of how the BEC is connected in your setup? I like the idea of extra insurance, but not 100% clear how you went about it, since have a few of those 2s packs floating around and could be put to good use.

    Leave a comment:


  • gooniac33
    replied
    Click image for larger version

Name:	C1BE5392-C9AF-4A90-8BDE-A910998C7DC4.jpeg
Views:	1428
Size:	89.8 KB
ID:	209647Click image for larger version

Name:	09374E1D-3A0E-4F77-99F4-5711D045D111.jpeg
Views:	1439
Size:	107.9 KB
ID:	209644Click image for larger version

Name:	649F647D-A464-4D94-8321-9C131B18830D.jpeg
Views:	1411
Size:	129.2 KB
ID:	209651 Well I made some really good progress on mine last night. Got the linkages all lined up as they should be and noticed that the rudder halves were going in separate directions. This could be what is causing the rolling on some of the planes. Be sure to check this stuff before tou get it flying. Yes you can trim it out but the plane will still handle funky this way. I had to bend mine but it was easy to do. I also had to remove a couple servos to get them centered properly since the linkages were not enough. Either way it got done. I also did my first coats of clear and really like how it came out! Will do a lil more work today which will include securing esc/wires, installing ec5 plug and ztw UBEC. Will hopefully have it ready for maiden this sunday... here are pix of what I did...

    Attached Files

    Leave a comment:


  • xviper
    replied
    Originally posted by Quickstop

    Speed brakes are pure drag while flaps are extra lift with drag. I would only put them on separate channels, sometimes you won’t want the extra drag and putting them together, you have no choice.
    That's makes sense. I have a fairly good idea of when to use 1/2 flaps and full flaps, but when would you want to use the airbrakes (from this model's point of view and not necessarily from the real plane's point of view)?

    Leave a comment:


  • Quickstop
    replied
    Originally posted by xviper
    I see some people set up the airbrakes differently. Some have them tied to the flaps, while others have them separate and operated by its own switch. What's the pros and cons of each? Also, at what point would you activate the airbrakes?
    Speed brakes are pure drag while flaps are extra lift with drag. I would only put them on separate channels, sometimes you won’t want the extra drag and putting them together, you have no choice.

    Leave a comment:


  • xviper
    replied
    I see some people set up the airbrakes differently. Some have them tied to the flaps, while others have them separate and operated by its own switch. What's the pros and cons of each? Also, at what point would you activate the airbrakes?

    Leave a comment:


  • Capt G
    replied
    here's the tail skid:
    https://www.thingiverse.com/thing:3798753

    Leave a comment:


  • xviper
    replied
    Mine arrived this morning and I've just finished with the unpacking, examining all the parts and testing of all the servos. I'm happy to report that all servos tested positive on a servo tester for several cycles. The only flaws (though very slight) were minor warpage in the flaps (or wings) as pictured below. Not a real big deal as I've seen far worse and this will be easily massaged straight. Also, noted was the wooden hold down for the ESC came loose, resulting in the ESC flopping around during shipping and pulling the 3 wires to the motor out. Reconnected, test for proper rotation, repositioned the ESC, glued the wood piece back down, a little hot glue along the edges of the ESC to keep it from moving. Will build when the rains come this weekend.
    So far, this model appears to be just as good (initial quality) as any of the Freewing and FMS planes I have. If it goes together and flies as well as other private owners have indicated, I think HobbyKing has another winner. They even seem to have gotten the release process right this time (still thinking about the C-130 fiasco). After the many "losers" that have passed through my hanger (of all makes), I'm hoping it will join the fleet of "winners" from HK - BushMule, C-130 ("V2"), Albatross.

    Click image for larger version

Name:	IMG_3435.JPG
Views:	1166
Size:	118.1 KB
ID:	209605

    Leave a comment:


  • gooniac33
    replied
    Ok now that I have gotten the rest from all the flying and other duties... the Mig will be completed and run up tonight!! its mostly done but I need to get the final prep done for the maiden this weekend. Servo adjustment, gear doors and clear coat... Really looking forward to this bird! I have seen them fly already but its always best when you get to fly your own...

    Leave a comment:


  • t01ga
    replied
    Good to go!

    Leave a comment:


  • themudduck
    replied
    Originally posted by Capt G
    Assembly completed. Some minor issues easy to fix but they could have saved me about an hour of fiddling with the inner gear doors by putting one line of instructions in the manual. Added pilot from crashed Mig 21. I decided the flimsy foam tail skid might last about one flight so a friend 3D printed me up a new one. The lightburner kit was an easy install and looks great. The hardest part was routing the wire. Balanced on the indicated CG with the battery all the way fwd plus 2.5oz wt. Maiden maybe Fri?
    Second the motion, could you please share the STL file for the tail skid. Thank you!!

    Leave a comment:

Working...