


A better flight. Thank you for the tips and I will start putting them to use.
-
Great advice from GG and RR. From what I am reading (and from seeing the video) I think that the main reason for the accident is that MeyerVW simply mistook the model to be closer to the runway than it actually was. Depth Perception while you are flying is a really important skill that requires practice to develop. I've noticed that many RC pilots make this mistake - you may think the model is close when its actually farther away, but it can also be farther away than you think. One of the older members at my field will often warn me (while he is watching me fly) that my plane is much farther out than it actually is (it is not) - but when he is flying his own planes he thinks they are MUCH closer than they actually are! He has been flying for decades but he has a hard time with this. Its not simply about good eyesight (which is very important of course).
I like the shadow trick that GG mentioned - its not always visible when you want it to be, but while you are flying you should watch for it and use that to train yourself to understand exactly how far away your plane is. When you see the shadow, ask yourself: did the plane seem closer than it was, or farther away? If you practice checking the shadow while you are flying you can get a better understanding of your depth perception. At my field we have some trees around the perimeter and I often watch for the shadow to move over the treetops, that tells me exactly how far away the plane is. As GG said, watching for the shadow to appear over the threshold can be helpful while landing - and can help train your depth perception so that you will have better results when you can't see the shadow!Leave a comment:
-
Another tip (from another glider pilot) - practice flying with power off. Get to know and understand its power off flying characteristics. This is also how I trim the CG on planes both powered and unpowered. Power off, (with the elevator parallel to the horizontal stabilizer), it should settle into a nice steady glide at a speed above best L/D with no tendencies to porpoise - if it does porpoise, then the CG is too far aft. Once the CG is set, then I set the elevator trim for various throttle cruise speeds.
Bottom line: Power pilots could learn a LOT BY getting in some quality soaring time. Dead stick landings do not frighten glider pilots - its just another day at the office!Leave a comment:
-
Got it…Thanks MVW.
A tip: The position of your elevator control stick is one good indicator of your airspeed on approach. If you are holding a lot of back stick, you are SLOW.
But another good airspeed indicator on approach is……
Bump the stick back just a bit then return to where you just were. If she immediately responds and hops up with no lag….you have plenty of speed. HOWEVER, if she slowly hops up…lags in response…or doesn’t want to move up at all, YOU ARE TOO SLOW.
And, if she jumps up rapidly and climbs a lot, you are too fast.
Your approach will look a bit of a roller coaster (not much), but you will know what your airspeed is by how she responses to the stick wiggle.
Tip #2…For determining your position over the runway end, watch for the shadow to appear ON the runway. Works when there is sunshine.
-GG
Aside: The shadows of full scale aircraft are much easier to see (as they contrast and move on the ground) around airports when you are low and in the traffic pattern near an airport. Your eye will easily see a moving shadow on the ground when your eye may not see the aircraft in the air.
Many times I have spotted an aircraft’s shadow before I have seen the aircraft. If that shadow is near your shadow or on an intercept path…better figure it out FAST!!!Leave a comment:
-
I think you are right on this. I had and have no signs of any issues with the radio and receiver. I do thin I have an issue with gauging my distance and I definitelycannot tell my airspeed when its comming right at me. It could be 10 or 100 mph. I was able to get the aircraft together and fly today. I tested a bunch of things last night and found no problems within the aircraft or radio systems. I also struggle with the wind out there. It goes from calm to windy in a second and without warning. Its amost always a cross wind. So maybe a combo and most pilot error. To slow for the position of the aircraft. I was not over the end of the runway like I thought. Wind contributed to an already slow aircraft and bam. Two flights today and no issues. The main damage was the vertical stab and 1 engine nacel. So not bad for that.Originally posted by xviper View PostLeave a comment:
-
I've done that before myself and it wasn't anything mechanical or electrical. It was me NOT being able to gauge the distance from the end of the runway and miscalculating the final approach path - too low, too slow, too far from the end of the runway.Originally posted by GliderGuy View Post
In his video, it's hard to tell, with all the wind noise, if he even powered down at that point. Can't really hear any change in the sound right up to the point it hit the bush.Leave a comment:
-
Short flight to no-power crash….what was the cause? Glad it was repaired and wasn’t worse.
-GGLeave a comment:
-
She got banged up on that one. I think its all fixed and will fly tomorrow.
Leave a comment:
-
Thank you MVW...The other wing on the old bird is also full of cracks. I'm keeping the old bird for spare parts (other than wings...LOL) to help keep the new bird going, as needed.
Much appreciated.
-GGLeave a comment:
-
Reporting on results…..
In some prior posts, I have presented the methodology and reasons for adding carbon rod reinforcement glued to the inside of the wing’s wiring channel…glued to the topside skin. Thought you would be interested in the results so far after several hundred flights….aerobatics included...on the current/newest AL-37.
One small stress compression feature has developed in an area on the left wing that is not supported by the added internal square carbon rod.
The wing condition is solid evidence that the extra stiffening of the top wing skin from the motor mounts to the root IS WORKING WELL!
The right wing is still without stress features. Both wings have been painted with water base UV protective paint, in case you notice an odd look to the skin in the photos.
NOTE: The photo with the small compression feature shows the approximate location of the internal carbon rod marked in black for visualization purposes.
See prior posts for the 'HOW TO DO IT" for adding the internal bracing.
-GG
LEFT WING IN A PRIOR BIRD WITHOUT INTERNAL BRACING....
Note: Attempts to repair the cracks didn't work and the paint didn't match.
This bird was finally retired to a spare parts status. Cracks got too ugly.
RIGHT WING…CURRENT BIRD WITH INTERNAL BRACING AND MANY, MANY FLIGHTS
LEFT WING….CURRENT BIRD WITH INTERNAL BRACING. The wing has one tiny compression stress feature.
The sketched-in black diagonal line is the approximate location of the internal carbon rod brace.
Attached FilesLeave a comment:
-
-
-
I did not have issues with them. They stuck too well. However if you do use a clear coat the minwax water based polycrylic. I have used it and it is foam safe. Water based polycrylic.. You can use the satin and it looks good. I used the gloss and it looks good too.Leave a comment:
-
-
Has anyone had trouble with the decals. I'm putting them on and all the doors do not want to stick. I'm thinking about hitting them with a clear spray but not sure if the surface is flat or satin. Also what paint would not destroy the foam or paint or decals.Leave a comment:
-
Has anyone swapped out the outrunner motors for the inrunner motors. The originals had a black wire and the new inrunners have a white wire, I'm assuming they are the same..........right?Leave a comment:
-
Worth repeating from the MiG forum…
I will share how I repair EDF fan small nicks caused by FOD. No guarantees that fan blade breakage will be prevented by using this technique. Use at your own risk.
I use a UV activated glue pen.
1) Clean the nick with isopropyl alcohol
2) Apply a tiny drop of the UV glue into the nick
3) Cure with UV light…gets rock hard!!
4) Carefully sand smooth and to shape without removing blade material
The AL37 is prone to ingesting FOD kicked up by the nose wheel. I have successfully fixed several nicks without upsetting the balance of the fan and getting vibrations.
I glue fine grade sandpaper to a popsicle stick so I can reach into the front of the fan more easily. Take your time.
This is the one I use…not cheap, but good stuff. There are many brands available, however.
https://www.amazon.com/dp/B00UAH19FS...ing=UTF8&psc=1
-GG
Caution: The UV curing process is exothermic. If you get uncured glue on your skin and UV light hits the glue, it isn’t pleasant. HOT is the word!Leave a comment:
-
Nice work! Hey as long as she landed in one piece that's what I call a perfect landing!Leave a comment:
-
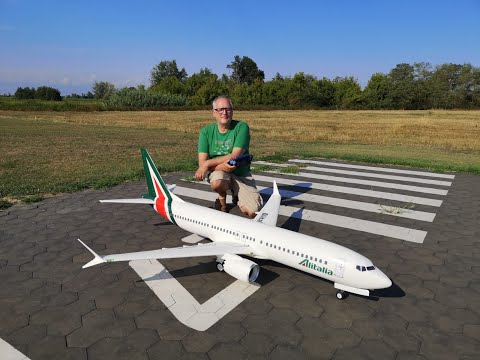
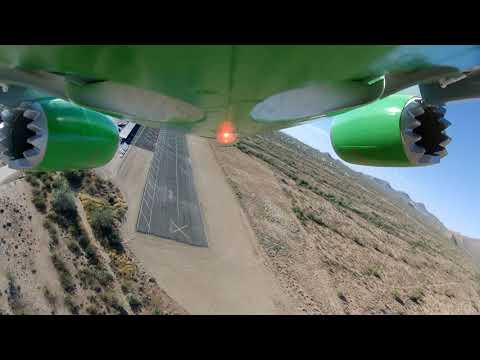
Just another useless footage of my AL37 in Alitalia scheme... damn, now Alitalia has closed, I need to repaint in new ITA Airlines scheme 😀
Leave a comment:

Leave a comment: