You must Sign-in or Register to post messages in the Hobby Squawk community
Registration is FREE and only takes a few moments

Register now

Announcement

Collapse
No announcement yet.

Official Freewing Twin 70mm AL37 Airliner Thread

Collapse
X
Collapse
First Prev Next Last
 
  • Filter
  • Time
  • Show
Clear All
new posts

  • vem2014
    replied
    Originally posted by GliderGuy View Post
    Click image for larger version Name:	454E8268-1088-46C6-A02E-B992B3952D24.jpeg Views:	0 Size:	151.8 KB ID:	325153

    The base white color is as shown in the photo…a slight cream. You may customize with any other color by removing or over painting the base color.

    You were shipped the ONLY color option.

    “White” is a color which can have many interpretations.

    -GG
    My plane seems to be much more cream than this color of the botte. This is the problem.
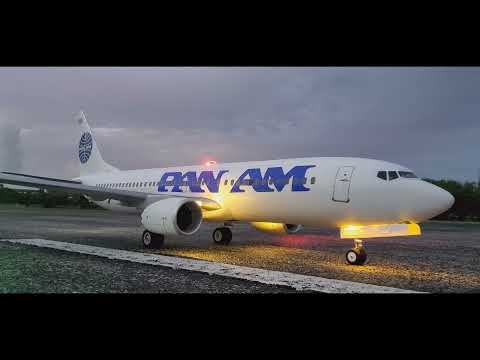
    im not unhappy with the plane but I have planned to do a white plane with wizz airlines graphic. But if my plane is cream its not good.
    i doni know if its a factory problem or what...
    i tell you if you have check my picture

    Leave a comment:


  • MikeT
    replied
    Originally posted by vem2014 View Post
    Ok thank you but if you check my picture you can see the color, for my opinion its much cream than the color in your pic...i dont know
    There are all off white. You can always return it if that unhappy.

    Mike

    Leave a comment:


  • vem2014
    replied
    Ok thank you but if you check my picture you can see the color, for my opinion its much cream than the color in your pic...i dont know

    Leave a comment:


  • GliderGuy
    replied
    Click image for larger version  Name:	454E8268-1088-46C6-A02E-B992B3952D24.jpeg Views:	0 Size:	151.8 KB ID:	325153
    Originally posted by vem2014 View Post
    Hi dear yes i know that there is one color but have you check my picture? The color its similar cream
    I dont know why its not white
    The base white color is as shown in the photo…a slight cream. You may customize with any other color by removing or over painting the base color.

    You were shipped the ONLY color option.

    “White” is a color which can have many interpretations.

    -GG

    Leave a comment:


  • vem2014
    replied
    Hi dear yes i know that there is one color but have you check my picture? The color its similar cream
    I dont know why its not white

    Leave a comment:


  • GliderGuy
    replied
    Originally posted by vem2014 View Post
    Hi friends today i have received my al37. Im really disappointed about it. I have ordered base white color but i have received really cream color, the full plane parts, its a lot different from white color.
    maybe i need to reship it and change ?
    Motion’s definition of BASE WHITE is defined on their website (excerpt below).

    Version Info: This <base white> version of the AL37 Airliner does NOT come with the decals pre-applied; however, the full decal set is included in the box. This version is intended for customers who wish to customize their airliner graphics.

    They shipped you correctly. The bird ships only one color and that color ships either with or without decals applied.

    Read other posts if you cannot work with the painted bird about how to remove the base paint. Others have posted how to remove paint from EPO foam.

    -GG

    Leave a comment:


  • vem2014
    replied
    Image 20210921-130328 hosted in ImgBB

    Leave a comment:


  • vem2014
    replied
    Hi friends today i have received my al37. Im really disappointed about it. I have ordered base white color but i have received really cream color, the full plane parts, its a lot different from white color.
    maybe i need to reship it and change ?

    Leave a comment:


  • MeyerVW
    replied
    Had a nice flight with a bit of a hard landing from the wind. But all is good.

    Leave a comment:


  • MeyerVW
    replied
    delete

    Leave a comment:


  • MeyerVW
    replied
    A bit windy and changing winds but had a nice flight yesterday. Probably do 1 or 2 more and then time to paint it up. Can some one give me a link to find how to prep the aircraft for paint?

    Leave a comment:


  • GliderGuy
    replied
    Hi Vem2014 - You'll love the bird. Here are a few tips and answers to your questions. Apologizes for the length, but there are a lot of things I’ve learned in many, many flights with the AL37.

    Note: In the below...the TOP WING SKIN is the cracked wing skin in the photo in your post above. Keep this in mind when you flip the wing upside down. Once the wing is flipped upside down, the TOP wing skin will be the skin that is touching your workbench.

    First...I have many more flight hours on the newest AL37 since my earlier post which you quoted above. The top skin on this "new" bird remains in great shape, so the internal carbon bracing REALLY works well. And...I've done a lot of acrobatics with this new bird.

    First some additional tips:
    1. The grub screws on the main gear tend to work loose. To fix this, I removed the grub screws and lifted the main shafts/pins a bit and put FoamTac on the shafts and also on the grub screws...then re-inserted everything and tightened. The mains have stayed tight ever since.
    2. Search the forums on "RF Chokes", or "Chokes" and read the posts. I lost several HIGH CURRENT ESC birds due to radio glitching prior to using these. But, MOST IMPORTANTLY, I haven't lost a bird due to radio glitches since I began using them. See photo #2 below (looking down into the area at the rear of the battery tray). I also use an extra <smaller> choke on the throttle wire going forward to the receiver (near the green ring choke). My friend and HAM radio guru thinks the need for chokes is due to the high current ESC noise and suggested I start using the chokes. I even put one on the elevator servo drive wires back in the tail for good measure. There are many options offered for sale on Amazon, but here is one such link. https://www.amazon.com/Cedmon-Pieces...885243&sr=8-15
    3. I added a washer under each of the rear of the FRONT landing gear servo mounting tabs to slightly pitch the nose wheel shaft forward. Otherwise, the nose gear landing light will impact the foam behind it...and the impact may even crack the landing light's fasteners. Just needs a bit more clearance from the foam at the rear of the nose gear cut-out box. You may even want to add some hot glue or FoamTac glue to the nose gear landing light attachment areas to re-enforce it.
    4. I fly on the factory CG...requires about 1 mm or 2 mm of up elevator trim. But, she spins, snap rolls, recovers quickly with this CG location.
    5. I use Admiral Pro 6000 mAh and fly at 50% power after take-off which is plenty...with spurts of full power for acrobatics and/or high-speed passes. Some folks have flown with two batteries wired in parallel to get extra time. The batteries, connectors and BEC get pretty warm from driving the 2 70 mm fans and all the servos and lights, so a cool down is a good idea between flights. To that end, I made an external fan from a 24-volt DC PC case fan and old 6S battery + on/off switch which I use to blow air over everything after a flight to cool things down quickly. After I land, I set the fan under the bird to blow air up onto the ESCs while I am changing the battery...then hold it over the BEC for a bit to cool it down. This cooling fan isn't needed unless you intend to minimize down time between flights.
      1. If you run down batteries on the ground, the ESCs must be provided some forced cooling air flow or they may overheat.
    6. Check out my post #2062 above about the battery connectors. The original ones last pretty well, but the split-barrel ones will last longer. There are YouTube videos which provide tips on how to solder 10 AWG wire...kinda tricky and you need a HOT soldering gun....not a soldering iron. The power connector supplied to the ESC will eventually degrade and fail.
    7. Inspect your fans periodically...the nose gear can throw rocks into the fans. They can get chipped.
    8. Take off with 1/2 flaps and land with full flaps with a bit of power into ground effect (1 foot or so high)...then reduce to zero power for landing. She lands easily.
    9. A bit of expo on the ailerons may be a good idea...especially in gusty wind conditions. Experiment with 30% expo or less.
    10. Expect to apply back stick in turns...this is normal for the factory CG.
    11. I only use rudder doing acrobatics and taxiing and take-off/roll out.
    12. Expect her to wiggle in gusts...some have used a gyro to counter this.
    13. Fly with winglets on or off....either is fine. NEVER fly with just one winglet (like if one is being repaired). One winglet only produces a LOT of roll.
    14. Order a spare set of winglets...the plastic mounting tabs will eventually fail from ground operation shaking/vibrating.
    15. Home Depot paint match...see photo #1 below
    Now to the TOP wing skin strengthening question....

    The wiring channel in the wing is fairly large, so you have room to work, but work FAST once the epoxy is mixed. Note: Do the addition of the carbon square tubing before you attach the motors.

    Materials needed:
    1. Square carbon tubing...about 1/4 inch on a side...but the size is really not critical. Just don't use tiny stuff....it will be required to resist wing stress.
    2. 5 min epoxy
    3. Some blunt tools to press down on the ends of the carbon tubing against the TOP wing skin while the epoxy cures
    4. A disposable tool/stick to paint epoxy onto the TOP wing skin of the wiring channel
    5. Isopropyl alcohol for tool and fingers clean-up
    When you trial (no epoxy) insert the carbon tubing, you will note that it will bump into the front of the wiring channel just past the motor mounts. So, that's as long as you can make the tubing. Basically, cut it so it fits as far into the wing as possible and ends just short of the wing root opening. You will also note that the wing channel is not flat. So, you will need to press down pretty hard on the ends of the carbon tubing to ensure contact with the TOP wing skin while the epoxy cures. Otherwise, the tips ends of the carbon tubing will stick up above the foam...not what you want. Note; Any VERY SLIGHT changes to the profile of the TOP wing skin this may cause has absolutely no effect on the flight characteristics.

    Because of the angle of the wiring channel, the outer tip of the carbon tubing will touch the front of the wiring channel, and the root end of the carbon tubing will touch the rear of the wiring channel. When you have it as you want it, turn the wing upside down on a flat surface, mix the epoxy, coat the "foam contact side" of the carbon tubing and TOP wing skin inside the wiring channel (TOP skin side only) with epoxy, insert the tubing as far in as you can (the outer tip will be just past the motor mount) and press down hard on the tubing tips (root and outer tips) until the epoxy sets. Give it plenty of time to set because you don't want the carbon to come loose from the TOP wing skin foam of the inside wiring channel. Once the epoxy sets...you are finished.

    Again, after many flights, the TOP wing skin with the carbon added inside the wiring channel may show a few SLIGHT compression wrinkles...but these don't grow or get worse. A non-carbon added wing...the wrinkles keep growing and get worse over time.

    -GG

    History = Bird #1 retired due to top wing skin cracking...looked ugly...2000+ flights. Bird #2 ran into a light pole when almost new...total loss. Bird #3 Still happily flying it.

    Photo #1 Paint Match from Home Depot

    Click image for larger version  Name:	Home Depot AL37 Paint.jpg Views:	0 Size:	144.1 KB ID:	324909

    Photo #2...RF Chokes / Place as close to the ESC as possible. Put some on the forward going wires of the ESC, too. You will need to remove the battery tray to do this.

    Click image for larger version  Name:	RF Chokes.jpg Views:	0 Size:	70.6 KB ID:	324905

    Leave a comment:


  • vem2014
    replied
    Originally posted by GliderGuy View Post
    Especially for those of you getting new birds (or anyone), if you will insert a small carbon rod or square or tube in the wiring channel that extends from the root of the wing and make it long enough to extend past the motor mount...and epoxy glue it to the top of the wiring channel, it will prevent this from happening...see photo. I retired this bird and got another one.

    After several hundred flights on the new one...not a single ripple or crease in the top skin. The addition of the internal carbon reinforcement REALLY works. If you do this reinforcement, your top wing skin will stay in like new condition.

    Click image for larger version Name:	AL37_Top_Skin.JPG Views:	0 Size:	74.0 KB ID:	301177

    This bird was retired after about 2,000 flights even though the cracks aren't of structural concern, since the main loads are handled by the main wing spar. But, they sure don't look pretty.

    -GG

    P.S. Yes...I did aerobatics with the bird. But I also do them with the new bird. The wing skin on the new bird is staying perfect...due to the carbon glued inside the wiring channel to the foam that forms the top wing skin.

    I did attempt to fix the cracks, but failed. They came back and just kept getting bigger. Paint didn’t match....LOL
    Hello friend im receiving my AL 37. Its here tuesday!
    can you explain me or if you have pictures on how to do this reinforcement?
    What materials and how to do the work.
    There is anything else to do when i build the plane?
    Many thanks!!!

    Leave a comment:


  • GliderGuy
    replied
    Ouch MVW! You will need to work carefully on the gear repair and add reinforcement….maybe even external carbon fiber sheeting ahead of and on the side of the gear mount. Alignment of the gear mount is tricky to prevent binding during retraction. You may need to cut some foam and plastic away on the rear side of the wheel well. Also, measure the alignment of the nacelle as the glue sets. It is easy to get the front too low. Then you have an AL37 with a wonky engine look as it flies by. Set the jet on its wheels and measure from the surface to the bottom of the nacelle. Compare both sides. Get the ground clearance the same on both sides.

    Leave a comment:


  • MeyerVW
    replied
    Did my maiden today. It did not go as planned. I had a slightly warped aileron on the right wing. Took off a bit odd and took some time to smooth it out in the air. Because of nervousness I forgot the timer. With that said the flight went pretty good until it did not. Over all the aircraft is ok and will be fixed. Minor damage for what happened. Great plane and built very strong. Need to figure out the throttle as it is hauling in the video but my stick was at half throttle. I did calibrate the throttle before take off. It was 100% my mistake and I accept that. Here is the video.

    Leave a comment:


  • scotstern
    replied
    Does anyone have an idea as to how to best apply the tail and rudder graphics to the AL37? I suspect that one could install the whole graphic and then cut the rudder but you could also find a way to mark the graphic and then cut it into two pieces. How have you done it? This seems to be no simple procedure.

    Leave a comment:


  • urrl
    replied

    Leave a comment:


  • MeyerVW
    replied
    I just bought one of these and I am very excited about it. ALways wanted an airliner. Had the eflight one back in the day but never flew it. This airliner looks pretty nice and seems to fly very well.

    Leave a comment:


  • Griffon Wings
    replied
    Sorry guy’s, super tired from work and tying in rush didn’t help , sorry sorry !!! Ciao to all .

    Leave a comment:


  • Griffon Wings
    replied
    Ohhhh his up !!! Glad you works out fir you Aros !! The AL-37 I considered like the yak 130 90mm , you want more then one . Intoxicating rc plane , i love it very much . Cheers 🥂

    Leave a comment:

Working...
X