


I am considering buying a Freewing 64mm A10 and I have a couple of questions.
I have a Freewing 80mm A10 that I must sell (for health and space reasons, I must go smaller).
Here are my questions about the 64mm A-10:
1. Is the quality of the 64mm as good as the quality of the 80mm?
2. I would like as long a flight times as possible. Is there room to install a 4000ma, or even bigger, battery? I don't mind "hogging" out foam to make a bigger battery fit.
Thank you,
BCRC
-
Also, I'm flying from rough grass, and the rollout is quite long. Landings are a thing of beauty with full flaps. The landing gear seems to be holding up to the punishment. I think most of the damage will come from the long rollout on takeoff, not the slow, uneventful landings.Leave a comment:
-
It's a great flier... Very forgiving. I love it. I did put a bigger strap on the battery. Using a roaring top 3700 45c and I get 3.5 minutes with 49% left after scale flying. Low scale passes is where this thing looks and sounds killer.Leave a comment:
-
Did you find the stock battery strap a bit on the short side as well? With the smallest rated battery in the specified range for this bird (4S 3000), the stock Freewing strap would barely reach around it enough to fasten, and I haven't yet put some Velcro on the battery tray to keep the battery from potentially sliding forward or back. I've already replaced the stock strap with one that's a bit longer.Originally posted by scootergenie View Post
I plan to maiden with the 3000 mAh battery, though I know I'll need to keep the flight fairly short. Maybe with some of this overtime I've been working the last few weeks, I'll go ahead and order a higher rated battery.Leave a comment:
-
Quick test of the view from the camera mount.Leave a comment:
-
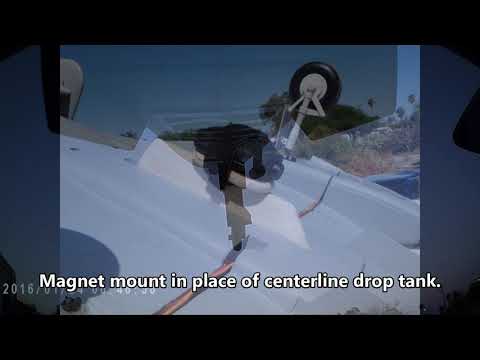
Camera mount constructed and test-fitted to the plane. The material is 1/4" thick balsa, glued double-thickness, with magnets mounted in the proper location to match the magnet mounting of the large centerline drop-tank. Once the glue was completely set, I sanded the wood to a similar profile to the tank pylon. The flat platform at the bottom is shaped to match my keychain camera, and should help keep the camera from rocking or shaking during flight. The magnets seem to have a good, strong hold, so it should stay put when I finally put the Hawg in the air.
I'm not sure if I'll paint the mount, but I haven't ruled it out. I'll need to pick up a bit of sanding sealer before I do, lest I waste numerous coats of paint, soaking in to the bare wood.Leave a comment:
-
another great flight today....Loving this thing. grass is no problem.:Cool:Leave a comment:
-
Yes, magnets are already mounted. I flew the maiden clean. 3 minutes on a roaring top 3700 45c...had 3.8 per cell. Not incredibly fast, but I forgot to calibrate the esc. That was also the first cycle of the new battery.Leave a comment:
-
I just noticed the big drop tank came with magnets already installed in the mounting pylon. I need to check if there are corresponding magnets in the bottom of the plane.Leave a comment:
-
Maiden went sweet today ! My jitters were unfounded...she flew super... Few clicks of aileron, and to my surprise, quite a few clicks of down elevator. Greased the landing, and the gear held up well. A very slight bend to the nose strut, and that was to be expected for the rough grass it flew from.
Leave a comment:
-
Mine is officially ready for it's maiden on next Sunday ! Our club runway is grass, so wish me luck. I have a 3700 Roaring top 4s 45c and it balances with the battery all the way fwd. Just have to install the battery strap, and she's ready to go.Leave a comment:
-
Asking again, since it seems the question might have been missed - some commented on reinforcing the nose wheel mounting. Any suggestions on the best way to do so? When I'm ready to fly, I'll be flying off our club's dirt runway, and it's not always the most gentle on gear.Leave a comment:
-
They are glued at that joint where the missile meets the pylon. Just wick some lighter fluid in the joint while working it back and forth. It will loosen the glue and allow them to separate.Leave a comment:
-
I ordered a set of these little neodymium magnets from Amazon. 216 total 3mm magnet cubes. I cut one of the dumb bombs for the A-10 from its pylon, and put two of these magnets each in the pylon and the bomb. Feels like they should hold pretty well. I'll post a photo or two later tonight. The tough part is going to be separating the Mavericks from their pylons, since the pylon meets the missile between two of the fins.
Leave a comment:
-
Thanks to Scootergenie for pointing me towards the Corps Elite figures.
Honestly, it really doesn't take much to look better than the stock pilot figure Freewing slapped in this bird. I'll put "Mr. Potato Head" aside, in case I ever build up anything of the right scale where he would look okay as the pilot figure, but Freewing would have been better off with no pilot figure, than with one twice the size of what it should be.
Personally, I think a lot of these planes, even if they come with a correct scale pilot figure, should be shipped with the cockpit disassembled, allowing the buyer to decide if they want to use the included pilot figure, if they want to customize the figure, or super-detail the cockpit before attaching the canopy. IF the buyer is happy with everything as-is, they can just glue the pilot in the seat and affix the canopy, and it saves the factory a couple of minor steps in the assembly process. If we can't handle that much extra assembly, we're probably not ready to buy the plane in the first place!Leave a comment:
-
Hoomi, ya still make me laugh. Your pilot looks sooo much better! I can't believe they would put a silly looking thing like that in the box. LOL. One thing for sure, Freewing has nothing on Dynam when it comes to pilot figures. LOLOriginally posted by Hoomi View Post
WoodcockLeave a comment:
-
I put it just forward of the wing, to one side of the fuselage. Made for much easier tucking of the wiring out of the way, and only needed two extensions for the nose gear steering and retract. I put her back together, and cruised her out and back on the dungeon floor, on her own power. I still need to attach the small details like the antennae and such, touch up some paint, but for all intents and purposes, she's in flyable condition right now.
I like how that pilot turned out. If my revision of the Maverick missiles turns out as well as the pilot, I'm going to be very happy with how this plane looks.
Leave a comment:
Leave a comment: