


Thanks! Wish you could have made it out.
-
Pat -
Hi,Originally posted by fhhuber View Post
Well, I'm not an expert on these things but if you shim (put some dowling) the struts, then you take a chance of bottoming out. Rather than treat the symptom it would be easier to solve the problem and insert heavier springs. Just my two cents...........which is probably what it's worth.Comment
-
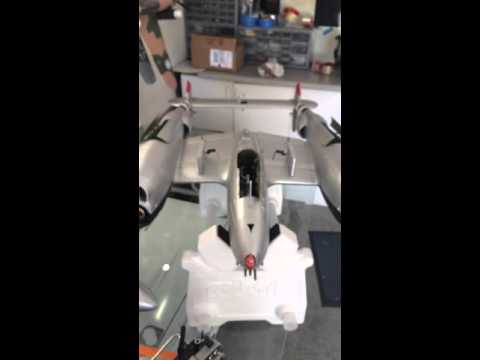
Well, I went out to the garage to detail the plane a bit more, and adjust some rates. I was disappointed to find the nose gear door servo is bad. It'll open the door, but not close it. I isolated it from the "blue box" and determined it is the servo, and not the sequencer.
I received the plane 3/25/16 so I'm still in warranty. I opened a ticket with Motion, so I'm sure they'll warranty it. Down side is, It probably the most buried servo in the plane. I'm assuming it's just glued in, so hopefully a little prying will get it out...
Video below. Sorry for the portrait format, just did it for Motion, as I know they like Proof of Life videos...
 I hate that motorcycle they make me ride. I'm here to tell you, there ain't nothing in the world I hate more than that elephant under my ass.
-Officer John Wintergreen-
ElectraGlide in Blue, 1973Comment
-
And a little over an hour later, the warranty servo is on the way!
Thanks Motion, this is why I buy all my planes here!!!I hate that motorcycle they make me ride. I'm here to tell you, there ain't nothing in the world I hate more than that elephant under my ass.
-Officer John Wintergreen-
ElectraGlide in Blue, 1973Comment
-
Motion is great. Not sure how many have noticed, but while weathering the plane today I noticed the bottom portion of the rudder fins are hard plastic just like the nose cone. Likely to prevent rash or damage from tail strikes during a bad landing.
So much thought and effort went into this plane and it shows. Fantastic job, Motion. Keep em comin.Comment
-
Especially that P47 Razorback with retracts, flaps and drop tanks............!!!!! :rolleyes:Originally posted by Arycon View PostComment
-
We got yer back. ;)Originally posted by FLTRI View Post
My YouTube RC videos:
https://www.youtube.com/@toddbredaComment
-
I went to Home Depot today to get some paint and asked for acrylic..........he told me that it was latex/acrylic and now I'm reading the label and it says satin/enamel.....is this wrong???Comment
-
Not sure. What brand did you buy? I buy Behr interior matte paint in sample cans. Has a sort of drab grey label with white flowers on it. I would take a photo but my phone photos are too large for the site. I will see if I can reduce the resolution and snap a photo of the jar. Highly recommended these for paint applications. Goes on very well and if you have them color match a piece of the plane you wont be able to distinguish where you have used it for touch ups.Originally posted by PlaneCrazy View Post
OK...trying to post pics. Photo of the sample bottle...again, from Home Depot. The other two are the labels for the olive drab and ventral grey colors on the Allied Green P-38. You may be able to give them the color code table underneath where it says "custom color match." The table says things like...CLRNT. BL. FL. KXL. TL. I think the numbers in those colums designate the computer color code. Not sure if they can match it that way for you. Hope this helps.
Awesome! Changing the resolution worked. Photos attached, guys. I included a pic of my plane, still a work in progress, but it has the color matched olive drab in various areas to dull the weathering. Hopefully it gives you an idea of how well the Behr paints work.Comment
-
Could someone please tell me the dimensions (length/width) of the portion of the wing that is removable? I want to make a wing bag for them prior to the plane arriving.
Thanks, MarkComment
-
Nice work there Arycon! She's sure lookin' the part!My YouTube RC videos:
https://www.youtube.com/@toddbredaComment
-
19.5" long for the wing panel itself, add another 5.5" to account for the wing spar that sticks out from it (not removable)Originally posted by Chalredline1 View Post
9" wide at the wing root
4.5" wide at the wing tipPatComment
-
Thanks Pat!
Comment
-
Love the weathering on your plane Arycon! What methods and materials did you use?Comment
-
I don't think they can do a paint match on the silver. However, for spray, the Rustoleum Aluminum (says Metallic Aluminum on the can front) is a perfect match, see picture one for a painted stab tip sitting on an unpainted wing. For brushing/spraying, another guy found the paint in the other 2 pictures. He found it at Hobby Lobby, a craft store chain...Pete MOriginally posted by mz34334 View PostAttached FilesComment
-
-
Thanks Pete M. It's a big help.
MikeComment
-

I posted this info in the Painting Tips and Tricks. The Silver mentioned hear is a great match and the Sergeants is a slightly darker, which is great for varying the color of individual panels. Anyone with paint color tips and matches, fell free to add to this thread, then we'll all have easy access to the info.
Grossman56Team Gross!Comment
-
I finally started assembly of mine ( stepped away from the Avenger build for the day) and man this has to be the best thought out ARF I've seen. My FMS was such a PITA to assemble and the nose wheel steering was a joke. I hooked up everything for testing and all work as advertised. Just attach the pod balance the props and decals and I'm done. Maiden Sunday if the weather holds.
Well done Motion and FlightLine.
Mike\"When Inverted Down Is Up And Up Is Expensive\"Comment
-
Thank you, sir. I cant take too much credit. You and Flightline did most of the real beauty work. Im just roughing the plane up a bit.Originally posted by Aros.MotionRC View Post
Thank you. Glad. You like it. The weathering is very simple, actually. It is pretty much nothing but chalk pastels. I bought a small box with about ten sticks for dunno...maybe $10 or so? Important to use chalk and not oil pastels. I just use a knife or exacto to shave the pastel into a tiny pile of powder. For the dorsal side I used a mixture of dark green, black and brown. Use a small brush the width of a pencil shaft (diameter wise) and mix the different powder piles into one. I make sure to ly newspaper under the plane cause the powder gets everywhere. Just dab the brush in powder and gently brush it against the panel lines and once the powder density lessens in the brush, gently blotch the overall surface of the panel. Less is more. You can easily add more as needed. The ventral side was done using white and a touch of black. Same technique.Originally posted by downwindleg View Post
Once the power goes on, seal it with matte clear in a spray can. Locks the powder to the model. The paint chips are done using a tiny detail brush for model painting. I use model master chrome silver, which has the best metal reflective quality. Again, less is more. Gently scrape the edge of panels and add dabs here and there.
That is it. Feel free to PM me if anyone has any questions.Comment
-
Back and ready for action...and the damn wind to calm down....new center section, nose art and new name as well...
used FMS gear for the mains and FW gear for the nose,along with a 2.5" Robart wheel..bought the 2.75 diamond tread ,but Im using the stock control arm,so the larger one wouldnt quite fit, even with trimming the inside of the well...and with the 2.5 I had to trim the rear wall of the well, as well as cut the spring by a little less than half to clear the rear of the well. Also had to tie the scissor to keep the gear from extending fully after lift off. Think if I had used the 2.25" wheel I wouldnt have had to do that.www.TSHobbies.com
Hobby Paint racks and acrylic display stands for collectibles.Comment


Comment