

The cockpit of the Spitfire is finished, all I have to do is glue the canopy back on. I was saying to myself, "What a difference detailing the cockpit makes" Same with the Corsair. Now I'm getting Dave to print up another RAF pilot, this time with the O2 mask on, but the goggles still up, for my BBD P51D. I designed a throttle quadrant that we've been playing around with for all the Mustangs in the Stable as well. I think I've drank from the cool aid of detailing. Was just watching a video on the P40B that survived Pearl Harbor and drinking in all the details of the cockpit. Yep, I'm addicted!!
Grossman56
(Dangerous Dan)
-
WOW, Dan. I 'm just getting ready to finish the cockpit and now you have put a complete stop to it. LOL
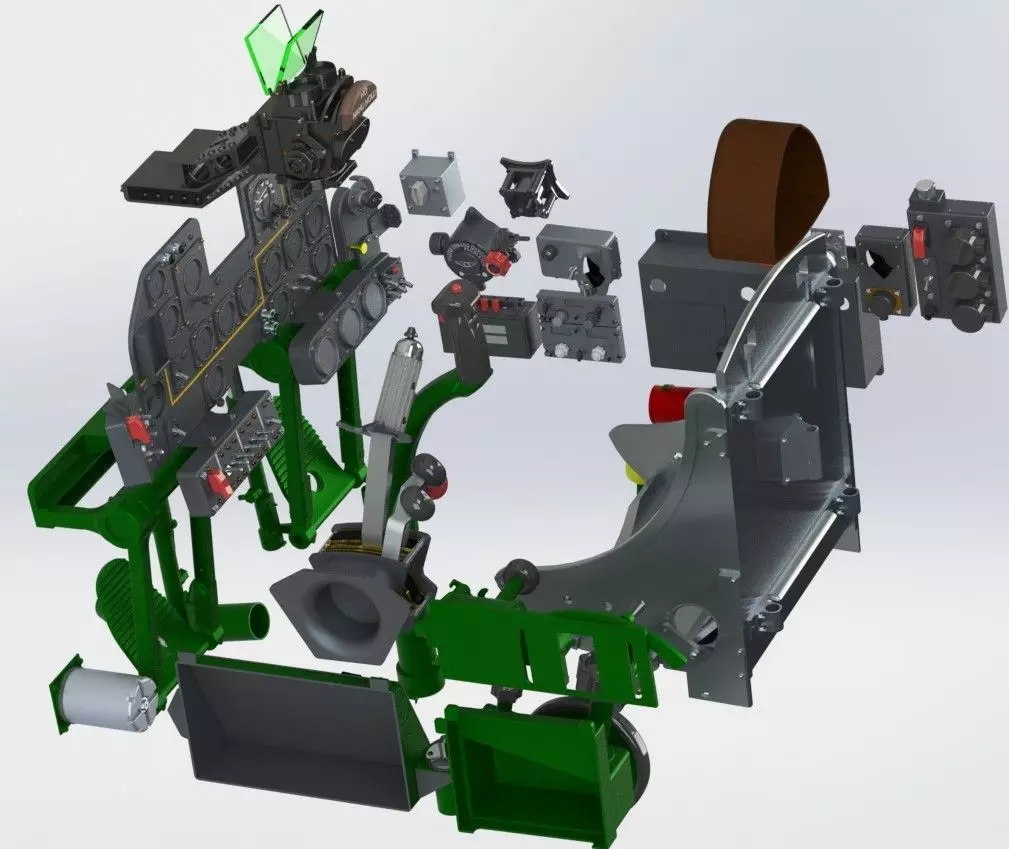
This 3D cockpit looks like a better scale version than the OEM. Price is ok and it can be scaled from 1/4 to any scale. I will probably order. Has Dave seen this and does he think it would fit into the cockpit space without too many mods.? The lower OEM cockpit would need to be lowered. I think there is enough room, will just have to measure and see. Thanks for pointing this site out. You're making me do more head scratching!
You do know I'd have to make the canopy in the open position to show-off all the detail. DETAILS, DETAILS, ARGHH
Best Regards, RexLeave a comment:
-
Hey Rex, here's something that may interest you:
Grossman56
(Dangerous Dan)Leave a comment:
-
Thanks, Grossman56.
I'd like to see FL introduce a new warbird too. SBD, Hellcat, Zero, P-47, anything at this point. Probably cost an arm and leg this year, but OH WELL!
The FMS p-47 is really nice, right up there in my FL Corsair quality. Price is reasonable,$379
Hope you get one, Dave and I are having some design work done for the P-47. Alum. or 3D spinner, Prop cuffs for a Curtiss prop. If all goes well we at least can print our own parts. I will know more on how the HS class is progressing on these designs later this month. In the meantime you can place your P-47 order. LOL
I received Callies Graphics and started applying. Can't believe how a different paint scheme has changed this plane.
Best Regards, Rex
Leave a comment:
-
Really coming along Rex!
I like the nose cone, looks very authentic!
Twisting my arm to get a P47! I was hoping for something from Flight Line, but with Alpha gone, it seems as if that the end of the 1600 mm single engine warbirds. Someone please correct me if I'm wrong!
Grossman56
(Dangerous Dan)Leave a comment:
-
If your talking about the tail light, I made it with clear epoxy from my wife's craft epoxy (epoxy can be found in Jo-Anns, craft stores) If it's the landing light. I made a half hole in the wing, placed some alum. tape over it and used a broom handle to press into the hole. Took some time to mold the tape so it formed to the hole. The light bulb is from a 1/16" plastic rod about 1/2" long pushed into the center with 1/16" protruding. The Lense is a 1" Googley Eye from Walmart. Dis-assembled and glued in the wing. a styrene .010" flange cover was cut out and glued. I hope this answers your question.
Best Regards, RexLeave a comment:
-
-
Today I made a little more progress on this project. I added the taillight lens, made with clear epoxy, I drilled a .043" dia. hole in the center, and it leaves an impression like a little light bulb. Added the landing light lens and flange cover, will need some paint touch-up after drying. then I took the alum spinner hub and placed it on the original prop and prop stud. It looks large but this is a smaller prop than the vs3 Corsair prop so it should look ok. HS class is using my vs3 prop to design the cuffs at school.
Best Regards, Rex
Attached FilesLeave a comment:
-
-
Rex,
An enclosure is a good idea.
Prusa has an new enclosure, but why spend that kind of money.
There are parts to print online to build what's called a Lack Enclosure.
Prusa came up with the idea about the time I bought my Mk3.
It is basically two IKEA Lack model end tables where you use the base of one and the printed parts and the entire other end table.
The second project I printed on my printer was the added parts required to build it.
You'd need some plexiglass sheet (Lowes) and some LED lights (Amazon) if you do what I did.
Doors in the front and lights above.
If you bought a Mini, there'd room inside the enclosure to store a roll or two of filament and your tools.
Let me know at that point and I'll find the article and/or send pics as needed.
Best, LB
Leave a comment:
-
Thanks, Elbee. I thought of machining a 2- piece hub to bolt the props as in the original but feel the weight would be excessive for a foam aircraft. I can live with the prop hub as designed. Finished the first alum. spinner today. I have a few ideas to lighten it more.
You would like a lathe and mill - so much can be built with them. I still want a prusa mini, I just haven't made that leap. What other tooling would I need after buying a prusa? Enclosures, drying, etc.? Like owning a lathe there is tooling to buy to really get all the benefits. I keep reading info and it's like another world too me.
Best Regards, RexLeave a comment:
-
Rex,
The simple answer is no......but.....
The centrifugal forces are fierce at the prop hub under load.
That on record, nothing beats a failure than a try.
Print wise, I think it can be done as long as the hub is simply eye candy and the mechanical structure (for lack of a better term) is solid.
I thought about trying something similar with the Corsair as the prop is rather large.
The loads even in twist would be great as the prop bites under force.
Your machining skills could come into play here, you could design a four way with center hub to fit the shaft.
The hub shape would be a 'skin' the looked correct but carried no real loads.
That was my approach only I was thinking about printing something in nylon instead of machining an aluminum part.
I do not have a lathe, but wish I did.
Using a combo of nylon print and fine machine screws, I might still give it a go one day.
The other issue would be the total mass of the hub, but it is close to the center of motion, hey I am not an engineer and cannot play one here.
Best, LBLeave a comment:
-
Elbee,
These cuffs are for the Curtiss Symmetrical prop. It looks a lot like the Hamilton prop so the VS3 FMS Corsair prop represents this the best. Dave sent me a cuff he developed but it didn't have a solid fitting inner filler to conform to the prop. The HS kids are working to make a 2piece cuff that can be glued to the base of the prop. I am making the alum spinner hub, also the HS kids are working on a 3d spinner hub. What we haven't approached yet is a Curtiss propellor hub for the prop blades. It is different than the Hamilton hub. I'm waiting to see how the HS kids get along with these designs and 11 STL printing B-26 parts that they are doing. I don't want to wear my welcome out, but their teacher thought it would be a good project for the class and I should hear something in the next week how they are doing. Plan to show the class later this spring the results they have made and printed for the Corsair, P-47 and B-26.
Do you feel a 3d printed hub would be strong enough to withstand the stress of a spinning propellor. It's a concern to me that it doesn't cause an accident to someone. Hesitant to have a HS class be put in that position.
Best Regards, RexLeave a comment:
-
Thank you Elbee. A labor of love but I'm thinking the alum. might be a little heavy. I have the HS class re-designing Davegee's 3-d prop hub, he had it done from someone else and the profile is off. If the high school kids do a good job, it will weigh a lot less and we will have a correct STL to print. Enjoying your B-25 up-dates. Ain't this a great Hobby!
Best Regards, RexLeave a comment:
-
-
After an afternoon of filing, turning, filing I have the basic shape. Will scale up my 3-view and make a template to use as a guide for final shaping. Started with a blank weight of 890 oz. Now down to 420 oz. Hope to lighten it more.
Best Regards, Rex
Leave a comment:
-
Started to make an alum. spinner hub today. I have drilled lightening holes and threaded the hub for the VS3 FMS Corsair prop. Threads are m10x1.5mm. As I don't have an attachment for taper turning, I'll turn some metal then a lot of file work. Hopefully this all works out and doesn't weigh a lot.
The High School industrial class are designing a cuff to fit around the prop to resemble the Curtiss prop.
Rex
Leave a comment:
-
For those wanting a Bubbletop. A guy on the other forum has modified his FL P-47. Something to think about
Best Regards, Rex
Leave a comment:
-
Grossman56,
Yeah, those little details bring it to life.
Today was one of those days, sittin, thinkin, not much getting done. I did get the cockpit side panels finished and decided to do a little test with a dirty wash on the underside of the right ele./stab. I wiped on a lite wash of dirty paint and wiped it off till I could barely see it. I figure these planes had some dirt, mud etc. from daily use. Take a close look and let me know if it is too much or not enough. The left elev./stab has not been touched. I can see a used looking plane over a pristine one.
Best Regards, Rex
Leave a comment:
-
Lookin' mighty fine Rex, the little details really make it don't they?
Grossman56
(Dangerous Dan)Leave a comment:


Leave a comment: