-
-
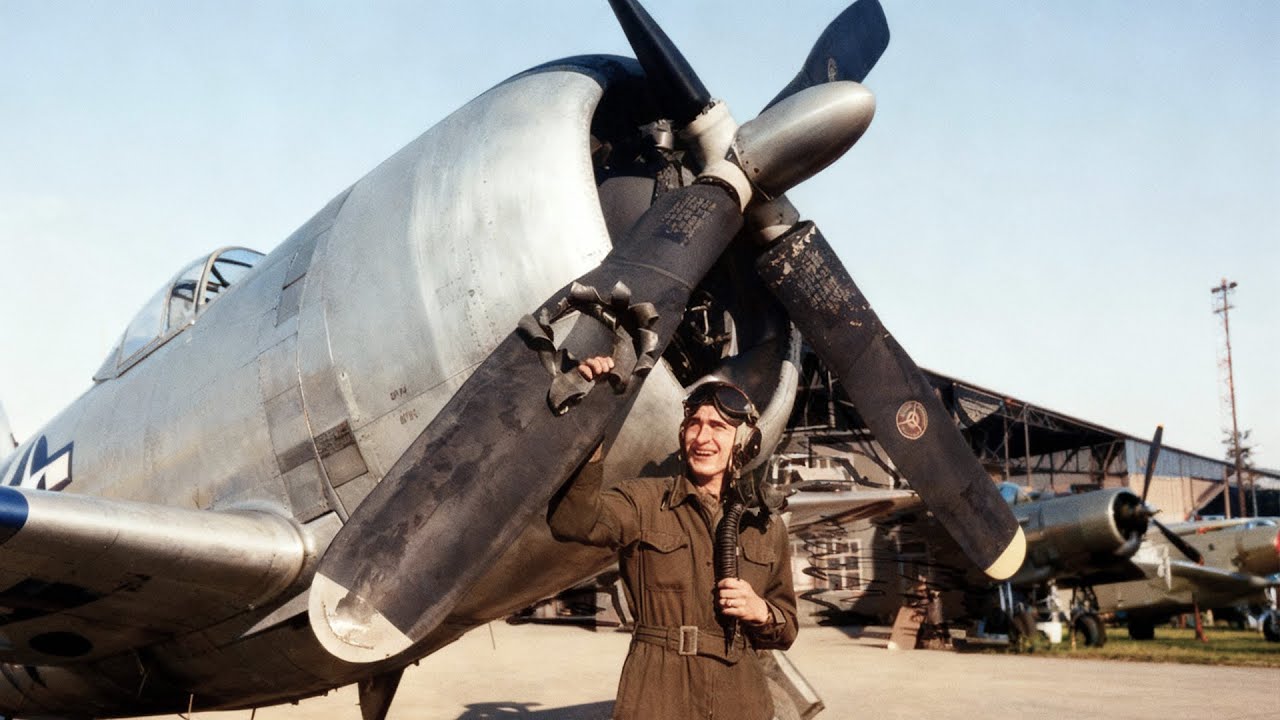
Today marks the 81st anniversary of the start of the ill-fated Operation Market Garden campaign in Holland. The plan was to take a series of important bridges culminating in taking Arnhem with a bridgehead to jump into Germany and end the war early, maybe by Christmas of 1944. The plan started falling apart for several reasons and the attack failed with a large loss of life. The movie "A Bridge Too Far" covers the ground attack fairly well, I think. I did get to visit Arnhem and the surrounding area on bicycle after taking a train from Amsterdam many years ago. It was a memorable day trip.
On the air side, one of the principal units involved was the famous 56th Fighter Group based out of Boxted, England. Their job was to suppress anti aircraft batteries supporting the parachute and glider invasion. They took tremendous losses that day, with 16 lost out of 39 aircraft dispatched.
My FMS 1500mm P-47D that I've flown for over 5 years is a replica of one of the planes that fought that day. It flew on D-Day and then was damaged over Holland but made it back to the base. But a gear broke off on landing and the airplane was a writeoff.
My "I Wanted Wings/Button Nose" flew this morning commemorating the event in WWII. I almost had a similar ending as the real one did when one of my main gear wouldn't come down. But eventually I recycled it a few times and it landed just fine. Worked fine on the ground. Go figure!
I'll attach a couple pics of the model after my flight.
Cheers
Davegee
Comment
-
hi Davegee, how did you get your Corsair prop in the p47 spinner? I’ve tried sanding/cutting the propeller down, and although it fits, it’s a little wobbly. Also, the screw doesn’t go all the way through, which makes it difficult to secure the propeller completely. I’m considering supergluing the propeller down at this point 😂 but I was wondering how you did it, as you got not one but three p47s. I like all your paint jobs as well, I’ve attempted to paint mine as gabreski’s very first razorback with the classic white cowling and identification bands on the back. I have yet to fly it due to weather, but I’m looking forward to it every day!
Comment
-
Hi Eagle15: This is a vexing part of making this mod. I ordered the prop hub, spinner, and larger aluminum prop hub that bolts in place of the original smaller stock FMS parts that have a much smaller prop. So, be sure you are using all the right parts to begin with. None of the original stock 1500mm P-47 FMS parts will work for this mod. They all need to be FMS Corsair V3 props and other parts from the 1700mm Corsair model. You can order all you need from FMS.
Assuming you have all those V3 Corsair FMS parts, you can now begin. I don't know why the propeller bases don't fit into the receptacles in the FMS V3 prop hubs. It's like they were made for two different designs! But every time I order new parts from FMS, the same mismatch happens. What I have done in this case (happens with all three of my P-47s) but I have to use a dremel tool and belt sander to reduce the diameter of the bases of the props that are supposed to fit in the hubs and then get screwed down. If you are careful, it can be done and the screws should tighten down so that they are secure. I've never had a problem with any of my props staying secure in their mounts using this procedure.
Let me know if you are using the larger parts for the V3 Corsair 1700mm prop. That is a key, But even if you are, you have to patiently sand down those propeller bases' diameters a bit so that they fit into the recesses and can be screwed tight. It is possible, and I have done it and have dozens of flights on all my P-47s with the bigger, more scale props.
Regarding your comment about possibly using superglue to keep the prop blades in place, I would be highly doubtful of that working. The power coming off of this motor and prop is tremendous! In my opinion, the only safe way to go forward is to be able to use those bolts and nuts to tighten it down securely so there is no way the prop can get loose. This could be a disaster if you just glued it down and then tried to fly it. IMHO, you need to get the fit, screws, and bolts figured out if you want to use the larger V3 prop system.
Good luck!
Davegee
Comment
-
Hi Eagle15: I found an older pic of a now defunct FMS 1600mm P-47D. This is in the scheme you were thinking about (Gabby Gabreski) but with a plane called Hairless Joe flown by Dave Schilling. Gabreski and Schilling were contemporaries so your model would look good customized for one of Gabreski's airplanes during WWII. Be aware that paint schemes were changing rapidly during this time in WWII, so you have to sorta pick a particular look in time and stick with it.
I posted this pic to show you the stock FMS prop, although when I was flying this plane a few years ago before it crashed, I was doing some 3D printed experimentation of the propeller hub. This one is not quite the right size or shape for this particular smaller stock prop, but I was able to get the final proper size and shape with the help of folks like Elbee. The development of the larger V3 prop started after this plane, and was ongoing for a year or more.
You might want to just fly your plane for awhile on the smaller stock propeller like I have done on all my jugs before stepping up to the FMS V3 props. It does fly fine on the stock prop and this would be valuable experience for you getting used to the intended stock prop before working on upgrading what we were discuassing earlier.
Cheers
Davegee
Comment
-
Hi Davegee,
Thanks for the info: I was using the original fms 1500 p47 parts the whole time! I ended up cutting and slightly sanding down the Corsair props to fit in there! No wonder it felt and looks wrong lol. Now I gotta order another whole set of propellers… dang it that’s another 20 dollars down the drain… worth it for a p47. anyway, thanks again for the info, this time hopefully the propellers will actually fit with some patient sanding! Thanks for the photos too, your thunderbolts look awesome. By the way, what did you use for your markings? I’m looking to get some decals,
to model Gabreski’s first or second HV-A with 6 kill markings, but have no idea how or where to get them from. I’ll attach some photos of my thunderbolt and prop for now. You can see how I cut down the propeller to fit the razorback part lol. It was rather wobbly so I thinking about using superglue to secure it down . .. Good thing I didn’t!
Cheers,
eagle15Attached FilesComment
-
-
Eagle15,
Best source I've found for custom markings and nomenclature is Callie Graphics here in the States.
If you have pictures, etc, she will custom design and print anything.
Looking forward to seeing your finished T-Bolt.
Post pictures, please, and welcome to Hobby Squawk, Sir, glad to have you onboard.
Best, LB"I am having an extraordinary ordinary life."~Lucky B*st*rd~
"Find satisfaction in the process rather than an outcome."~Anonymous~
AMA#116446Comment
-
I second LB’s recommendation. Callie would be very familiar with famous planes like Gabreski’s. Or, you can just come up with Something to give her a start, and she’ll fix you up!
Go over to FMS website and get the parts for the 1700mm V3 Corsair.
You’ll need the larger aluminum prop shaft (interchangeable with the stock one that comes with the kit.)
Four V3 Corsair propellers. If you can afford it, get two packs because it is very easy to scrape or break a prop that is much larger, though more scale.
V3 prop hub that you’ll use to mount the props after they are slimmed down a bit to fit. You can use the stubbier Ham Stand prop dome or I probably have an extra Curtiss printed dome you can have. Most P-47s had the electric props and pointy prop domes although some blocks had the HS stubbier, fatter prop domes.
I think you’ll be back on the right track with the above recommendations. Let me know how it goes or any questions.
Cheers
davegeeComment
-
Thank you both! I'll take both of your advice and also do my maiden with the stock propeller. I'll attach photos from my maiden whenever I get enough time and courage to do it!
Thanks again,
Eagle15Comment
-
Sounds like a good plan! I had a FMS P-47D back in 2019 and flew it solely on the stock propeller. Flew great! I didn't even think seriously about working on a larger more scale prop until just a couple of years ago. I traded notes with f4uaussie who is a frequent contributor to Hobby Squawk and we both came up with a flyable larger propeller for this aircraft. I'm sure there were others too, that did this.
I think you'll find the FMS jug to be a real pleasure to fly, just like the pilots of the real ones did. With its very wide wheel stance, it is very stable and tracks beautifully down the runway. Please keep us in the loop how finishing this plane goes and how the maiden goes whenever you do it down the road. Check in with Callie Graphics, she'll fix you up with great stickers to do your Gabreski P-47.
Cheers
DavegeeComment
-
Hey Dave and anyone else that's interested. ..hope U r well.. U may have watched already.. but. If not. It's about the development of the p47 paddle blade.. very cool.. and since the dumb Ozzy. Isn't sure how to put the link here... Just a pic.. sure U will find it.Comment
-
Ha ha my son walked past at last minute. He put the linkComment
-
Good video! Thanks for posting it. The paddle blade prop really enhanced the performance of the P-47 in WWII. Good thing we came up with it back then!
Cheers
Davegee
Comment
-
Davegee and All,
Today was a photo shoot in the driveway. Several of you are helping with ideas to prepare the P-47 for the Toledo Show. Ther are some routine maint., paint touch-up that I need to do but also looking to make it look as realistic as possible.
Comment
-
Davegee and All,
Today was a photo shoot in the driveway. Several of you are helping with ideas to prepare the P-47 for the Toledo Show. Ther are some routine maint., paint touch-up that I need to do but also looking to make it look as realistic as possible.
Comment
-
Hi Rex: thanks for the pics. I like that you put a brake line on the main gear struts going down to the brakes. That is good detail. You might want to add the shrinker bars that go from the top of the wheel well to near the axle of each main gear. I used two parts on each, one a wire rod, that slides into a slightly larger aluminum tube. When the oleo strut compresses during takeoff or landing, the wire rod will slide up and down inside the aluminum tube and hopefully not break anything off You can look at some of your pics and figure it out if you want to give it a go. Very few models will have details like these on P-47 entries!
For the cockpit, you have most of the stuff in place on the sidewalls. One thing that I would remove would be the totally non scale and non historical accurate K-14 gunsight that is shown on the model. I would remove that, and hopefully we can find you a period accurate N8 reflecting gunsight that was used at the time of this airplane's service.
You probably have them, but be sure to add the sway bars for the receptacles that go on the belly on either side of the drop tank. This airplane did not have any other underwing improvements, so just leave them bare, otherwise.
Regarding modiflying the sliding canopy, I would heartlily endorse doing that for your model I can help you along with that if you decide to do this scale detail. It will definitely open up the cockpit for viewing all the details that you would not see if the canopy was closed. I think this would earn you scale points.
I have printed up the pilot, and you can paint him up for scale detailing. To fit a full body pilot into the cockpit, you have to do a few things.
1) cut out the bottom of the floor for the cockpit.
2) add a 1/2"balsa frame around the bottom of the open area of floor that you cut out. Then glue a piece of plastic sheet, paint it the cockpit color, and the pilot should fit in there without surgery and should stay clear of any other parts of the model. You might have to move things around slightly, but this would be a good look over cutting the feet/legs off.
Other details like a bulletproof trapezoid shaped frame for the front windshield should not be too difficult to do and a good scale add-on.
We can discuss other things as you proceed with accessorizing and detailing your model for the Toledo show.
P.S. I did happen to find a source I need to replace the damaged B-17 electric motor. It wasn't on HK website anywhere, but happened to luck onto parts like the motors on some other website. So, there is hope.
Cheers
Merry Christmas!
Dave
Comment
-
Rex all that hard work (rubbing priming.. rubbing priming). Paid off. The finish is just awesome 👍.. I'm not as up to date. As U Dave and of course Steve... But always learning.. still few years b4 retirement so not enuf time .. my new club 12 months now. I'm told has a few warbird guys. One last week when I got my wings. Yippy.. the instructer was very keen on the 1600 spit. Got me to do a few maneuvers ,,and was happy to see the s turns,, going out to take off.....
Anyway. Want to organise a warbird day if possible.. our Anzac Day next April would b perfect... Wish I could see all of your(3 of U) warbirds for real.. I no U will post more as U get closer to Toledo. Bsafe. By 4 now
Comment
-
f4uausie,
When I was still working never had time to really spend. So, I bought scale kits at trade shows and hobby shops thru the years and finally have the time to build. them. I learned a lot over the years and these foam planes are a new venture but thanks to Davegee, Elbee and others I'm learning new ways to finish these planes
Our club is small but we started having monthly fly-ins with a club 30 miles from ours, Going on 4 years doing this and we go to other clubs small fly-ins and are having a blast. We live 11/2 hr drive from our National model aviation site so we go there a lot as a group just to fly. So organize a warbird meet, if only a few show you will all still have a great time and the next one will be bigger.
Merry X-Mas, RexComment
-
Hi Rex: I have enough printed parts to put together a fairly accurate RAF Mk II gunsight of the type that was used on Lucky and many other American P-47s earlier in the air war. I'll put it together and you are welcome to use it. What I did on mine was remove the inaccurate OEM gunsight and put a piece of black plastic or something to cover that area. You can then add the Mk II gunsight that will look Much better than the OEM one.
Regards,
Davegee
Comment
-
Looks Beautiful, Dave. Thanks. Almost have the broken Cub painted and back together for NEW YEAR Day fly. A quick repaired job but looks better in Cub Yellow. Then the P-47 gets put on the bench. I did make the retraction struts and if you look closely, you can see it in the photo with both strut covers on. Going to remove the upper strut spring and make an eye-bolt rod. Will look better. I will cut bottom and lower floorboard as you have done.
My stars and numbers seem a little glossy to me. Should I tone them down somehow? Maybe this was how they were then.
Best Regards, RexComment


 to me anyway.


Comment