


Originally posted by Beeg
View Post
-
Before I secure the 5-pin XH plug in place, is this about the right height? The Sun shield just clears the oval hatch hinge.
Leave a comment:
-
So if I get the one below will I be able to battle Heng Long system new and old ?Originally posted by Rubicon99 View Post
Sorry for all the questions not had an RC Tank before.
Leave a comment:
-
Remove the stock 3 pin plug and circuit board. Then enlarge the whole to fit the supplied 5 pin. Adjust the height of the iR receiver to be as flush with the hatch opening as possible and then secure the 5 pin in place. The stock wires for the IR receiver can all be removed from the tank.Originally posted by Beeg View Post
Leave a comment:
-
Opened my Sherman to do the LegoDEI sensor install.
Do I need the little board or can I just whack all that off along with the screw pillers and install a 5-pin XH plug?
Leave a comment:
-
Wow you did the install the REALLY HARD way, I did two tanks similarly during testing until I found and easier way. But I also understand the full aspect you were trying to achieve.Originally posted by RCjetdude View Post
I am surprised though that with all the extra wiring work you that you did not move the IR receiver location to the round commanders hatch. It could have sat flush with the MG ring and been a much lower silhouette. Glad it is working well for you and I am fairly certain you will be impressed with the improvement to the point of never looking back toward using the stock system again.
Note: I would recommend rethinking using the small circuit board to draw power for the LEDs. This was tried during testing and “might” have been the cause of two MFU failures that required complete replacements. It also caused the IR receivers to NOT perform as well due to the additional required power draw of the LEDs. Both issues have not occurred since a direct bypass of the small circuit board has been used. If you keep your install setup, I would recommend simply modifying the LED wires by extending them to directly plug into the MFU. To give them the needed length to work with the 360 turret is ~12”.
——————————————————————————
The easy way for folks looking to install one or more of these IR receivers: The three plug end of the provided wire is meant bypass the stock hatch plug (which should be removed completely) and be plugged directly into the tanks black control box(MFU). That is why the three plug female end does not fit the male hatch plug end slot. NO SOLDERING of wires to anything in the tank is necessary. See short photo install below.
Should people have a 360 rotation ring installed. The wire I recommended to be sent (~12”) should be long enough (for the majority of the HL tanks) to bypass the 360 rotation wire harness (if you have that option installed) and allow for a number full rotation before having to reverse the rotation process.
Below is a short down and dirty 3 photo step install process. For a few more detailed photos see my Instagram @ fsttanks and look for the first photo shown below.
Start photo of Instagram install pictorial. @fsttanks
Provided 3 pin (white plug) plugs directly into control MFU. Small optionally added JST2 plugs into the #3 slot to provide power to LEDs.
Remove small circuit board for stock three pin plug in turret, enlarge the whole to fit the 5 pin end of supplied wire and secure in place once final IR height is adjusted and set. See example below but note your IR receiver might need to sit slightly higher to clear turret hatches or obstruction.
Note: All of the existing stock wires for the stock IR receiver can be removed from the tank as there should be no need for them after install is complete.
Leave a comment:
-
So I have a IBU2U which I believe can only work with Heng Long IR up to V5.3 ? Will this new sensor work with the IBU2U and will it make it compatible with the V6.0 systemLeave a comment:
-
Got my new sensors yesterday and got them Installed on all three of our tanks. The Panzer was tricky because it is a little tighter in the turret but nothing too major. The three pin connectors they came with don't fit the connector in the tank but I had some floating around that did. I also had some two pin connectors that fit the ones provided with the sensors. My Abrams has the 360 turret mod so I did it first but couldn't plug the two pin into the 6.0 to power the LED's so I pulled power from the little board that the sensor plugs in to. Works great. The two pin connectors I have come with pigtails so I just drilled a couple holes, passed the pigtails down through the holes and used some gel CA to glue the connector in place. Then just soldered the pigtails to the appropriate pads on the little board. I used the harness that came with the sensors and folded it at about 1" increments to make a stem and soldered the three pin connector to the appropriate leads of the harness. I then wrapped the the LED power leads around the folds and finished it all off with a piece of adhesive lined heat shrink tubing. Locked it all in good. I made the stems longer than they could be for some tanks but the Abrams needs it up a little higher to clear what's on top of the turret so I just made them all the same. They work great the full length of my basement and will do some outside testing today.
Leave a comment:
-
This is exciting! My new tank and IR sensor are supposed to arrive early next week! Now I need to go get some armor weathering pigment and stuff.Leave a comment:
-
The receiver to work correctly with the 45 deg shade must be mounted with the IR receiving bulbs at the 12-3-6-9 o’clock positions. The modifications needed to achieve this are slightly more involved and could present quite a challenge for some. The 360 sunshade makes the mounting less complicated for these folks with very little down side of not being able to see the hit LEDs from as far away in bright lighting.Originally posted by Beeg View Post
I don’t personally care for the Tamiya hit angles as they are all wrong in my opinion and many others especially for modern tanks. But that is what most clubs by default use. Either Tamiya 45 angles or 360 is acceptable in club play.Leave a comment:
-
The 6.0 boards are pretty much all 2 pin a few 3s, and the smaller 2 pin Dupont connectors for the LEDs. and this here IR reciever needs a 5 pin and a Dupont connector to run the LED hit lights.Leave a comment:
-
Since I have yet to get my first 1/16 RC tank I have no idea of the usual parts typically used. Are the typical connectors JST-XH, 2.5mm? What does' a tanker usually need to keep on hand? 2, 3 and 5 pin, male and female? Extra pins?
Like these?
Leave a comment:
-
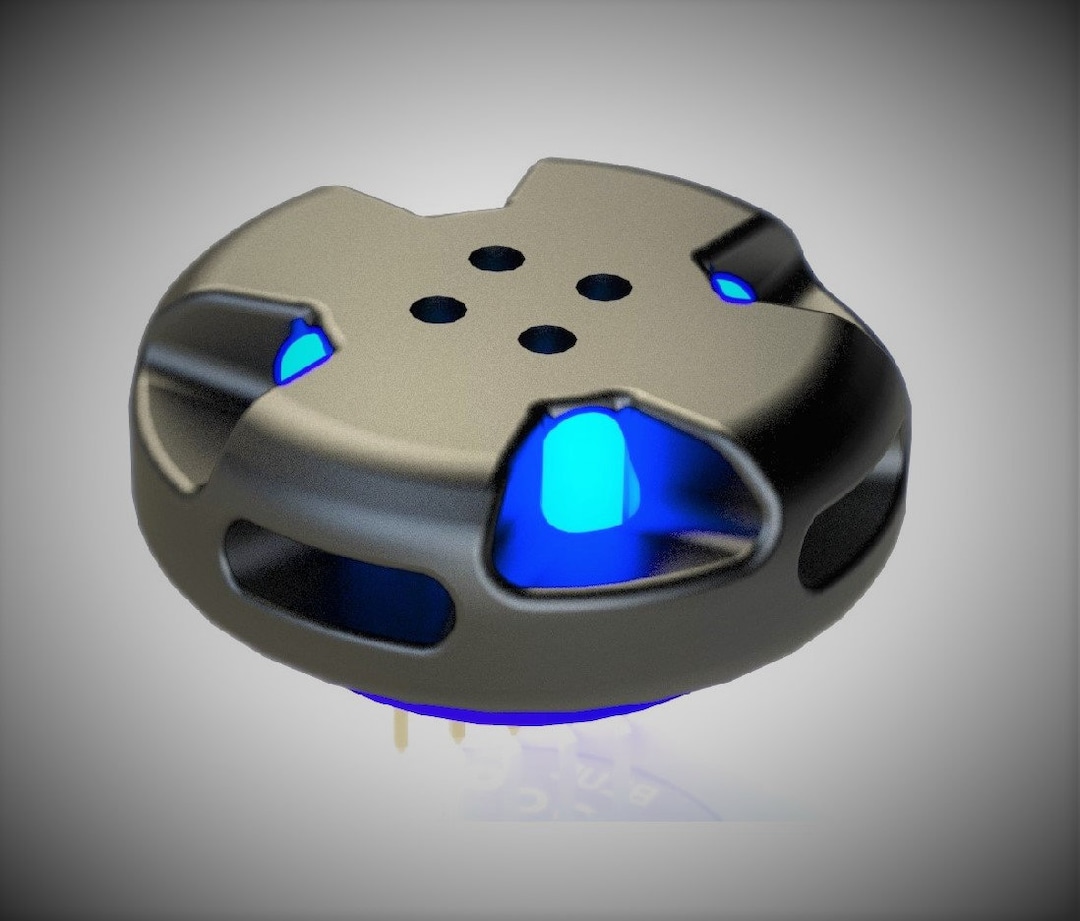
I was reading in the descriptions of the (2) types of sun shade types-
"Sunshade Customization:
- Circle: 360 Degree Reception - all around reception, no blind spots.
- Cross: Receiver will block hits at longer ranges at non-cardinal directions, emulating Tamiya apple behavior."
Is there anything more to this or is it pretty much as stated? From what it sounds like the Tamiya users should upgrade to this unit with 360 sun shade or is it not really that big of a deal? I ordered my unit with both types of sun shade and I guess you could place whichever type is most prevalent in the battle you're engaging in?Leave a comment:
-
PART 2: Installations?
Sorry folks..I was going to post step by step photos, but for some reason this site is "fighting me"!!!! After 90 minutes of trying it will not upload the photos correctly? Seem to want to place them were it wants vs where I need them to be. Never had this problem before????
For those that want to move forward anyways, the IR receivers are now available at: www.etsy.com/shop/LegoDEI make sure you order the ones specifically for the Heng Long tanks and the 360 sunshade.
At some point hopefully the photos can be posted in the correct order.
I will post an abridged version on my Instagram @ fsttanks (look for the photo below) and will also # it to MotionRC's Instagram as well. It will have a short narrative, but you will still be able to see the steps and get an idea of what is needed.
Leave a comment:
-
I need some for myself, my two boys and anyone else who I do battle with that doesn't have one to make it fair to me!
Leave a comment:

Leave a comment: