


Over the past couple of months I've started working on another scale Heli to join my AH-6 Little Bird, a 500 size AH-64A Apache Gunship. This is all based off of the old (discontinued) RC Aerodyne scale fuselage kit. This includes a custom main gear to fit inside the narrow fuselage, and frames that lower the tail boom to the scale location. I am also using the RC Aerodyne raised tail kit, that allows me to use a torque tube drive setup. In addition, I will be using the scale 4 blade head and offset tail rotor kits from CNC helicopter. I am also planning on a fully detailed cockpit.
One of the first mods to the airframe was to move the tail rotor fairing to the correct side. The kit included the tail rotor on the left side, while it is located on the right in the full scale version. To do this, I cut out the fairing with a Drexel cutoff wheel, and glued in a styrene backing. The gaps were filled with bondo and sanded to blend the surface. The fairing was then painstakingly reconstructed from styrene on the correct side.


The next thing was to add in a few missing panel lines. Thin panel line tape was applied to all of these missing lines:


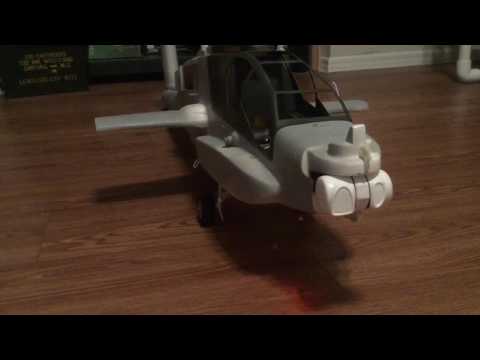
These were then painted over with thick auto body primer, and then the tape was removed to leave the panel lines. In addition, various handles were added across the airframe by bending thin steel rods. Here is the current configuration with test fitting the mechanics in the fuselage.

Next up will be more airframe detailing including more handles/antennas/sensors, and a start on the cockpit detail.
One of the first mods to the airframe was to move the tail rotor fairing to the correct side. The kit included the tail rotor on the left side, while it is located on the right in the full scale version. To do this, I cut out the fairing with a Drexel cutoff wheel, and glued in a styrene backing. The gaps were filled with bondo and sanded to blend the surface. The fairing was then painstakingly reconstructed from styrene on the correct side.
The next thing was to add in a few missing panel lines. Thin panel line tape was applied to all of these missing lines:
These were then painted over with thick auto body primer, and then the tape was removed to leave the panel lines. In addition, various handles were added across the airframe by bending thin steel rods. Here is the current configuration with test fitting the mechanics in the fuselage.
Next up will be more airframe detailing including more handles/antennas/sensors, and a start on the cockpit detail.


Comment