You must Sign-in or Register to post messages in the Hobby Squawk community
Registration is FREE and only takes a few moments

Register now

Announcement

Collapse
No announcement yet.

Official FlightLine RC 1600mm P-38 Lightning Thread

Collapse
X
Collapse
First Prev Next Last
 
  • Filter
  • Time
  • Show
Clear All
new posts

  • Finally got around to assembling my 1600mm FlightLine P-38.....excellent airframe....impressed with the plastics inserted sections and joinery. Had some confusion of what screws went where but got that figured out. I suffer from mild OCD so the rats nest of wiring gave me some level of fatigue stuffing it all in without clean lines and separation.....a few beers calmed me down and a good Dallas Stars win last night during assembly helped as well. I am not sure I like my power wires going right over my receiver antenna's (Spektrum 7610) coming into the battery bay....may get a solution for that placement later on. I also chose to deploy a little bit heaftier "Y" cable for my ESC throttle leads. Could not get the grub screws out of the wheel axle collars....so I simply worked them off with pliers and deployed new collars for my DU-BRO 2.75" Diamond tread tires for the mains and moved one of the stock mains to my nose. I did have to use a prop reamer to increase the axle size of those DU-BRO 2.75" inch wheels. The ball joint clevises are easily snapped in by hand ...very nice. Setting up the wiring looked to be a fairly arduous task....but thanks to Bajora's build video posted on MotionRC website - helped me pick my way through it. I am enjoying the LED's strobing on the bottom set and leading wing edge landing light cycling with the landing gear. All servos and retracts are functioning and ready for maiden without any issue. My Olive paint shows none of the manufacture "gatoring" that others have posted....although the foam cells are visable...it's much less than other FMS newer foamy airframes in my hangar. The battery bay looks big enough to deploy two 4s 3000mAh LiPo - I purchased sets of the 4s 2500mAh LiPo as my standard though. The pilot figure as noted earlier in this thread is very nice....I was thinking about setting in a new AOI pilot...but see no need to!! Was concerned at first about the screw on propeller blades....however after assembling them seem to be nice and stiff - solidly mounting. The control surface hinges are excellent and set this model apart as an ARF. My airframes inner wing also has a few MM drop from the outer mid section where the removable wing joinery meets.....I see no issue for panic as it's negligible and will pose no issue in flight. For the first time I used hot glue on the back of my spinner back plates to balance the prop assemblies.....easiest I have ever done....it should hold just fine. This was a pleasure assembly with no surprises......The only items I have left from one evenings assembly is to select the decals.

    I ordered the 162 SKIDOO decals from Callie.....since I also fly the wee little micro EasySky 525mm P-38 Skidoo.

    In comparison to some of my other 1400mm and 1600mm warbirds.....this airframe seems heavier and much more robust....looking forward to flying this airframe.

    Thanks to FlightLine - MotionRC and the PreSales Pilot crews who vanguarded loads of information for us all......this airframe is top notch from a bench prospective and I am confident my smile will soon be as big as all of yours who have logged airtime on this bird!!

    TwistedGrin

    Comment


    • Originally posted by TSHobbies View Post
      Back and ready for action...and the damn wind to calm down....new center section, nose art and new name as well...
      used FMS gear for the mains and FW gear for the nose,along with a 2.5" Robart wheel..bought the 2.75 diamond tread ,but Im using the stock control arm,so the larger one wouldnt quite fit, even with trimming the inside of the well...and with the 2.5 I had to trim the rear wall of the well, as well as cut the spring by a little less than half to clear the rear of the well. Also had to tie the scissor to keep the gear from extending fully after lift off. Think if I had used the 2.25" wheel I wouldnt have had to do that.

      Good to see you back together.
      TiredIron Aviation
      Tired Iron Military Vehicles

      Comment


      • Hi Gang, can someone please tell me how to connect to Bajora's build video- I saw his wonderful flight video and awsome pictures, but not the build.

        Comment


        • This is the complete and comprehensive assembly and build guide for the FlightLineRC 1600mm P-38L Lightning. For more information including detailed specifi...


          This one?


          Mike
          \"When Inverted Down Is Up And Up Is Expensive\"

          Comment


          • Got the replacement parts to fix mine (well, minus the antenna & guns which will arrive next week), as well as what I needed to finish the FPV rig. Finished setting up the head tracking, got it all working ;) I'll take some shots & video this evening to update the FPV build thread (http://www.hobbysquawk.com/forum/rc-...c-p-38-fpv-rig) and I'll do a re-maiden as well as some flights with the FPV this weekend!

            Comment


            • Thanks Mike, already seen that one. Maybe it was just a misquote from Twistedsmile. He refered to" Bajora's build video" posted on Motion RC website. Just thought it might be helpful to have a verbal explanation of the wiring hookup instead of the generic nonverbal version. Thanks anyway

              Comment


              • No problem I'm unaware of any other videos. The wiring looks intimidating but is straight forward. Take you time you'll be fine. I did zip tie mine going into the center section. There's plenty of room to neatly tuck everything in there.

                Mike
                \"When Inverted Down Is Up And Up Is Expensive\"

                Comment


                • Well, this may or may not be a flash...............but............in trying to remove the collar to take off the stock wheels, the 1.5mm allen wrench stripped like so many have indicated here but............I tried on a subsequent wheel with a 1/16" allen wrench and it snugged in and worked without stripping........just sayin'

                  Comment


                  • I finished upgrading the struts and adding oleo suspension. I am not sure I am happy with the nose gear. It has raised the nose at least 1/2". I am concerned about the impact to the AoA. Not sure if I should retap the shock and lower it or just go and fly and see how it handles on take off and landing.

                    Comment


                    • Originally posted by PlaneCrazy View Post
                      Well, this may or may not be a flash...............but............in trying to remove the collar to take off the stock wheels, the 1.5mm allen wrench stripped like so many have indicated here but............I tried on a subsequent wheel with a 1/16" allen wrench and it snugged in and worked without stripping........just sayin'
                      You didn't see the several hints about using a Bic lighter to heat the collar first?

                      Comment


                      • Originally posted by xviper2 View Post
                        You didn't see the several hints about using a Bic lighter to heat the collar first?
                        I did but why do that when you know what tool to use.

                        Comment


                        • after having to drill mine out, I ordered the new part from Motion to replace it..when I got it in, and went to put the hex screw in,the hole was barely big enough ,I really had to crank on it to get it to go in..so Im not so sure that its the facory using Loctite ..think its because the hole was made too small.
                          www.TSHobbies.com
                          Hobby Paint racks and acrylic display stands for collectibles.

                          Comment


                          • Originally posted by PlaneCrazy View Post

                            I did but why do that when you know what tool to use.
                            Well, it would have saved you one stripped screw. Besides, it is well known that Loctited threads need heat to break loose. In this case, a Bic lighter IS the tool to use. But it's OK, it's your screw, your choice. Just trying to save countless others the same grief.

                            Comment


                            • Originally posted by TSHobbies View Post
                              after having to drill mine out, I ordered the new part from Motion to replace it..when I got it in, and went to put the hex screw in,the hole was barely big enough ,I really had to crank on it to get it to go in..so Im not so sure that its the facory using Loctite ..think its because the hole was made too small.
                              Loctite not only covers the screw threads but also the screw hole threads. There's likely residual Loctite in the hole.

                              Comment


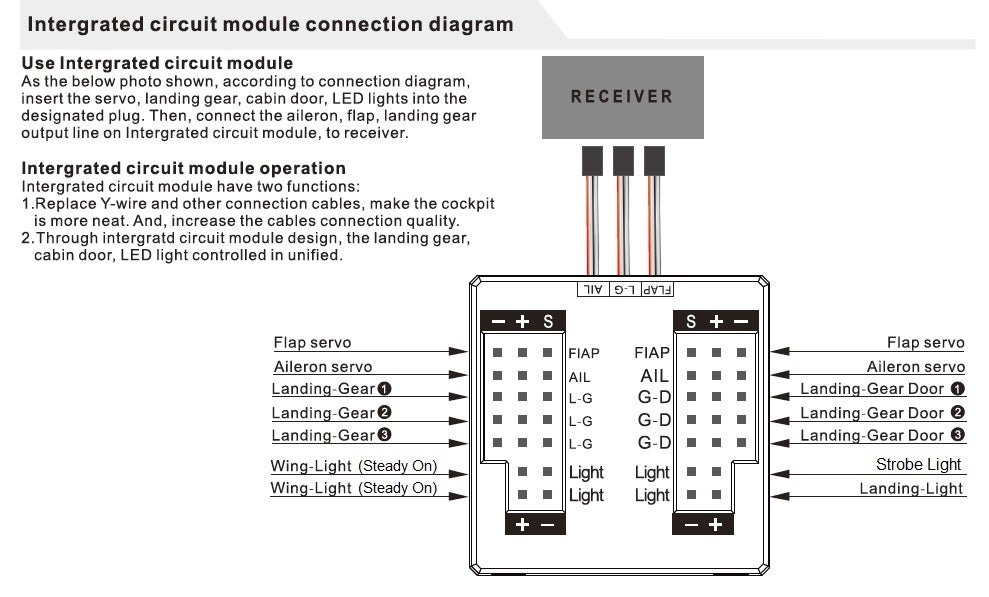
                              • Bumping this post again to help out the new builders. This will show you the proper plugging sequence for lights.


                                Originally posted by crxmanpat View Post
                                Here's a revised label for the blue box. This will do the following:

                                Make the Landing Light turn on and off with gear up and down.
                                Make the wingtip lights stay on steady,
                                Make the formation lights (under the belly) strobe.

                                If you want the formation lights steady but the wingtips to strobe, you'll need to Y the wingtip light leads together.

                                You're welcome. :)

                                Pat

                                Comment


                                • Originally posted by xviper2 View Post
                                  Loctite not only covers the screw threads but also the screw hole threads. There's likely residual Loctite in the hole.
                                  The replacement parts dont come with the screws in them. so they havent been given Loctite
                                  www.TSHobbies.com
                                  Hobby Paint racks and acrylic display stands for collectibles.

                                  Comment


                                  • Woo Hoo! Just did my maiden. Went great. Video I will post late tonight. Going to take advantage of the weather now.
                                    Lon

                                    EFlite F-16 80mm, EFite DRACO, EFlite Night Radian, E-Flite P51 1.5m
                                    Freewing A-10 80mm, F-86 80mm, F-15 90mm, Avanti. FMS DHC-2 Beaver, Fliteline P-38L ,HSD HME-262, HSD F86.

                                    Comment


                                    • Lon,
                                      Nice, that 2nd place gift cert went to an appropriate good cause.
                                      Warbird Charlie
                                      HSD Skyraider FlightLine OV-10 FMS 1400: P-40B, P-51, F4U, F6F, T-28, P-40E, Pitts, 1700 F4U & F7F, FOX glider Freewing A-6, T-33, P-51 Dynam ME-262, Waco TF Giant P-47; ESM F7F-3 LX PBJ-1 EFL CZ T-28, C-150, 1500 P-51 & FW-190

                                      Comment


                                      • Originally posted by TSHobbies View Post

                                        The replacement parts dont come with the screws in them. so they havent been given Loctite
                                        OK, ya got me.

                                        Comment


                                        • I tried heating the collar up this AM and man those things are really on there and won't budge. Plan B fly it as is order new struts for the Robart wheels.

                                          Mike
                                          \"When Inverted Down Is Up And Up Is Expensive\"

                                          Comment

                                          Working...
                                          X