


To inspire pilots who love the Starfighter:
-
-
You're killing me Smalls!
I just need to decide if I want silver or the yellow scheme...Comment
-
Hi Pilots, I see that Pre-Order customers are beginning to take delivery of their Freewing 90mm F-104 Starfighters. Thank you again for supporting us with this latest aircraft. Weʻre working on an in depth build video in the coming couple of weeks, but in the meantime, here are my primary tips, tricks, and things to look out for with your new aircraft:
ASSEMBLY. Assembly is straightforward for anyone who has assembled a modern era 90mm Freewing EDF. Most of the assembly involves plugging in servo connections and screwing on flying surfaces. After visual inspection and testing all the servos with a servo tester, here is my preferred order of operations:
- WING TANKS.
- Before screwing on the wing tanks, use the screw to tap the plastic mount on the wing tip.
- Plug in the wing tanksʻ LED wire, matching polarity appropriately.
- Align the wing tank to the wing tip, tucking extra LED wire slack into the hollow wing tank as you go to ensure the wing tank sits snugly and flush against the wing tipʻs plastic mount.
- Insert the two screws through the wing tank and tighten. Because you already tapped the plastic mount, the screws should thread right in and give you a positive lock. Do not overtighten.
- Insert the main wing spar, and slide each wing onto it partially.
- Identify the labeled connections for AILeron, FLAP, and LED between the fuselage and the wing root. If you need to, gently pry open the main gear door to access the wires and push them out of the wing root hole so you can ensure the connections are solid. As always, verify polarity.
- Push each wing firmly up against the fuselage, aligning the two wing root posts. Insert the threaded machine screws into the wing root postsʻ brass inserts and tighten.
- VERTICAL STABILIZER.
- Make your connections for ELEvator and RUDDer.
- Identify in the forward bulkhead of the main fuselage, which wires are for the ELEvator and RUDDer.
- Carefully tug on the wires from the front as you align the vertical stabilizer in the rear. Don’t pull your connections out, but do your best to seat the vertical stabilizer base onto the plastic fuselage mount without the servo wires sticking up. You will notice a shallow channel that was molded into the fuselage. Be careful that the wires do not stick up into the higher stepped area. This will prevent the vertical stabilizer from fully seating flush onto the fuselage.
- Once aligned perpendicular to the horizontal plane of the main wings, fasten the vertical stabilizer with the four shallow countersunk screws provided.
- HORIZONTAL STABILIZER.
- Insert the horizontal stabilizer into the vertical stabilizerʻs plastic mount, then insert the included carbon rod down through the entire assembly.
- Check for alignment and then fasten the horizontal stabilizer with the four included shallow countersunk crews.
- Finally, attach the ELEvator control horn. I used the third hole from the inside on the servo horn.
- ATTACHING THE FORWARD FUSELAGE
- It seems like a lot of wires coming out of the main fuselage bulkhead, but itʻs manageable.
- To begin, dry fit the forward fuselage and main fuselage together, leaving a couple inches of space for you to work.
- Identify the longer wires for AILeron 1, AILeron 2, RUDDer 1, RUDDer 2 (steering), one for ELEvator, and Gyro On/Off. These long wires are routed up to the gyro in the nose. Some of these connections are already made, such as the steering, because that is preinstalled in the forward section as it arrives from the factory. Pay attention to polarity. The gyro is labeled, so, when in doubt, read.
- This gyro has two slots for Ailerons, Rudder, and Elevator. Because we only have one Elevator servo, youʻll have one slot open after everything else is connected.
- This gyro also features independent Gain control for each flying surface group. I found the Elevator and Rudderʻs Gain pots to be set well out of the box. HOWEVER, I found that the Aileronʻs Gain pot was set too sensitive for my liking, and would sometimes result in a runaway wing wobble during high speed turns, so I RECOMMEND REDUCING THE AILERON GAIN BY TEN TO FIFTEEN DEGREES. Start there, and move it down or up based on your preference.
- Once the gyroʻs connections have been made, tuck all those wires behind the plastic panel. Now your forward battery bay is neat and tidy.
- Epoxy the forward fuselage onto the main fuselage. This is the only glue joint required on the aircraft. Before making the joint, plan on where the glue will go, and how you will brace the parts together while the epoxy sets to ensure they remain aligned and do not sag during the curing process.
- Note how the canopy piece sits flush against the upper half of the rear fuselage bulkhead. Do not put any epoxy there. I recommend using a small sheet of wax paper between the canopy and the forward fuselage. This allows you to check for proper alignment, without risking any glue touching the canopy.
- Prepare the surfaces to be joined by poking small holes into them. Some pilots prefer to use hot glue as a semi-permanent fixative so they can “pop off” the forward fuselage in the event of a crash for easy replacement of the forward section. With the F-104ʻs long nose and the force exerted on this area during landing, use hot glue at your own risk.
- Mix up your epoxy and glue the two fuselage sections together. Wick enough in where it fills in the panel line gap between the two fuselage sections. I held the model vertically with its flat nose on the ground. Attach the canopy to ensure proper alignment. When satisfied and the epoxy has begun to “kick”, remove the canopy and check inside for any epoxy seepage which might arrest your wiring.
- ATTACH THE NOSE CONE AND VENTRAL FIN(s).
- Attach the magnetic nose cone and included pitot tube to complete the external assembly of your F-104. Almost there! I recommend using a semi-permanent contact glue for the pitot tube. Something that could be pried out if ever there was a need to replace the pitot. The pitot is a semi-maleable plastic. I found that I had to rotate it a specific way and bend it to align straight.
- The ventral fin can be press fit; in fact Iʻve yet to glue any of mine. Hot glue would suffice here as a semi-permanent bond. If you choose to depict the Italian variant with two opposing fins, those are included in the box as well, and are affixed with included screws. Personally, I pried off those plastic mounts and retouched the paint as needed.
- BACK TO THE WIRING…
- Unscrew the green circuit board so you can access it more easily.
- The green circuit board is labeled. Make the appropriate connections for your servos, IN THIS ORDER.
- RETRACTS and DOORS.
- Note that the nose GEAR retract and nose DOOR are already plugged in. Start there, by plugging in the two main GEAR retracts and two main DOOR servos into the channels alongside those two nose connections. You should have three adjacent GEAR connections, and three adjacent DOOR connections.
- Plug in your two flaps into the circuit board. On my preproduction model, the circuit board mistakenly labeled the flap ports as “Ailerons”.
- Plug in your two airbrakes into the circuit board.
- Plug in your LED afterburner wire into the circuit board. This is a standard three wire servo connector coming out of the spine of the main fuselage. It is not a thin two wire red/black connector like the other LEDs.
- Plug in your Throttle, and your UBEC (into the Batt slot on your receiver).
- Make the appropriate connections to your receiver. You should have at least seven channels to start with: AILERON, ELEVATOR, THROTTLE, RUDDER, FLAP, GEAR, GYRO. Adding the AIRBRAKES as an eighth channel is recommended after youʻre comfortable landing the plane. Airbrakes are not required for landing. I highly recommend landing with minimal flap and moderate throttle management first. Airbrakes and full flap will quickly decelerate this aircraft, which may surprise some pilots not expecting having to then land at 60% throttle.
- For pilots wanting to use Airbrakes on a seven channel receiver, your only option is to disconnect the Gyro on/off switch. I highly recommend against this. Even after a gyro is tuned to a pilotʻs preference and technically an on/off switch isnʻt needed anymore, I personally always want the option to disable the gyro mid-flight for whatever reason. The F-104 is rated on our website as an Advanced level aircraft;weʻre assuming pilots at this level can make their own responsible decisions on whether to disconnect the Gyroʻs on/off switch. For the record, I and Freewing recommend an 8+ channel radio and receiver, as is expressly stated as Required on our website.
- Tuck the receiver and servo wires into the hollow space along the spine of the main fuselage.
- As a precaution, unclip the control rods from all control surfaces.
- Create a model in your radio. I always recommend programming in Throttle Lock!
- Bind your model to your radio. Check for throw direction, reverse as needed, then reconnect the control rods to all control surfaces.
- Deploy the landing gear.
- CONNECTING THE LIGHTS.
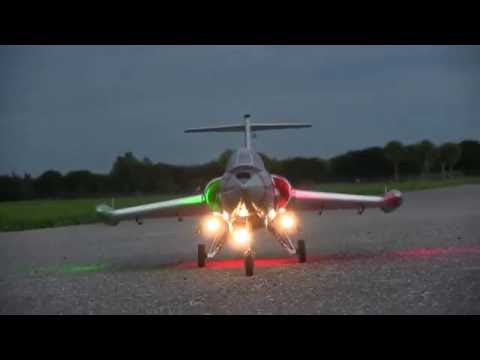
- Note that the nose landing light is already plugged into the circuit board as it arrives from the factory. Note the LEDʻs polarity positioning is opposite from the servo connectionsʻ polarity. The two ports next to that first port are high voltage ports, for the two main gear landing lights. Donʻt plug in any LED into these ports, because you risk blowing a lower voltage LED. Instead, proceed by the process of elimination, plugging each remaining LED wire into the open port on the opposite side of the circuit board, and work your way back towards the main LED ports. If you plug in one of the main gear landing lights into that low voltage port, then move that light to the high voltage port. Plugging a landing light into a low voltage port wonʻt damage it. Continue this process until you have all the landing lights hooked up and all the red/green low voltage formation lights hooked up. Sebart chose to use flashing low voltage LEDs on this aircraft. I protested but lost.
- Screw the green circuit board back onto the plywood plate. TIP: I ended up moving the circuit board aft, and fastening the two forward facing holes of the circuit board into the two rearward facing holes on the plywood plate. This gains an additional ~30mm of space to push the battery aft.
- CONTROL SURFACES.
- Index the flap with the molded wing root. Index the aileron to the flap.
- Center the rudder and nose steering. Adjust the steering rod via the easily accessible screw.
- The neutral position of the elevator should have the top surface of the elevator flush with the top surface of the horizontal stabilizer. The stab is airfoiled, so it will not be perfectly flush. Essentially, draw an invisible line from the stabʻs leading edge to trailing edge of the hinge. Continue this line aft. The bottom surface of the elevatorʻs trailing edge sits right at this datum line. Thatʻs a good starting point. Trim from there.
- THROWS.
- See the manual for official throws. I copied the model setup over from both my 70mm F-104 and another from my 90mm F-15 and flew there. In flight testing, pilots preferred a range of throw for the elevator. I prefer as much as possible for nose high landings, so I left mine at 100% on my radio. Xplaneguy, AceMiGKiller, and other pilots not on the forums settled in around 80% elevator in their evaluation flights on my aircraft. When in doubt, start with the lower figure.
- Turn down your steering to 50%-60% rate. With the F-16ʻs landing gear, the F-104 will tip at moderate taxi speeds.
- CG.
- I push the officially recommended Admiral 6s 5000mAh 50c all the way aft in the battery compartment. Iʻll need to check what CG point that corresponds to. With any 6s 5000 battery, I would say start by pushing it all the way aft. This model does not have a lot of wiggle room for battery. You couldnʻt push it 30mm forward even if you wanted to, because then the canopy wouldnʻt close.
- Takeoff flaps. While not required, 20 degrees of flaps for takeoff does shorten the rollout.
- QUIRKS AND TIPS.
- Between the main gear doors there is a carbon rod seated into plastic mounts. A cosmetic plastic piece covers this rod, and the ESCʻs wires are zip tied onto this carbon rod. The temptation is to grip this area to carry the model. But it is NOT load bearing! In fact, the plastic cover came unglued at the aft connection point. I ended up regluing those carbon rods with epoxy, and clear taped the plastic cover to the carbon rod. In the long run, get used to picking up the model with two hands from the wings. I miss being able to grip it in the main wheel wells with one hand, like the Stinger 90 or MiG-21.
- The LED afterburner turns on when about ~50% throttle or above, not lower.
- Flap Mix. I mixed 10% of UP flap to correspond with flaps. Sometimes I use a 15% UP mix. Iʻve tested up to 25% UP mix, which is still controllable on landing. Overall though, as much as it may not seem like it would, Iʻve found that this 90mm F-104 lands nicely and predictably with little or no flap at all. Most of the landings on video so far have been without flap, to show the controllability of the model at slow speed.
- Regarding landing, the 90mm F-104 lands stably, but it is not as floaty as the lighter wing loaded 70mm F-104. Where most pilots got in trouble was their runway alignment and overestimating how much they could safely steer once on the ground. Plan ahead and remind yourself that you wonʻt be able to turn too sharly for at least 3-5 seconds depending on your landing speed, otherwise youʻll risk tipping the model and scraping the tip tanks.
- The speed brakes can stick sometimes in a semi-closed position when varying the throttle on the ground. It has not affected flight.
- The battery strap is in a position where it cannot achieve more than an inch of Velcro “bond”. As always I recommend adding Velcro to the bottom of a battery for added security.
- The black in the canopy is susceptible to the greenhouse effect, seemingly more than others aircraft. Consider slicing a small hole under the pilotʻs seat to aid in keeping it cool.
- Like all the Freewing 90mm Super Scale series jets, set your timer for 2:30 for the maiden flight. I fly for 4 minutes or more with throttle management on this 90mm F-104. It cruises at 50%, so donʻt be afraid to take off, at 100% get the gear and flaps up, then reduce to 50%-60% after your initial turn. Flying the first flight at cruise isnʻt a bad thing. Itʻs the landing that counts!
- This write up was much longer than I expected. Merry Christmas!
Live Q&A every Tuesday and Friday at 9pm EST on my Twitch Livestream
Live chat with me and other RC Nuts on my Discord
Camp my Instagram @Alpha.MakesComment
-
Alpha, Thanks for extensive list of tips, tricks and things. I will be following it closely as I assemble and set up my silver USAF Starfighter. :)Comment
-
Here is a photo of what Alpha is referring to on the Wing Wiring, simply remove the small piece of tape and pull some slack into the wires to facilitate the wire connections. I left the Nose piece off while putting on the wings, I found it easier to manipulate the wires otherwise you will be flipping it over to find the wires you need to add slack to and then you will need to pull this slack out once the wing is fully seated.Comment
-
I neglected to mention those plastic clips pre-installed inside the main gear bay. These clips consolidate the wiring into a single clean pathway once the wings are secured. Pull the extra slack up from the inside the fuselage. The result is an organized main gear bay with all the wiring held away from all moving parts.Live Q&A every Tuesday and Friday at 9pm EST on my Twitch Livestream
Live chat with me and other RC Nuts on my Discord
Camp my Instagram @Alpha.MakesComment
-
When you get ready to glue on the front end, move all your wires out of the way so you have no issues with them getting in between. You may see a slight gap when the Canopy is attached but when you stand it up on end like Alpha said with a piece of wax paper in between it will close the gap. Leave it this way until whatever glue you are using sets up. I am using Beacon FoamTac for all joints where glue is called for and also putting a dab on the screws to keep them from backing out. NO BLUE LOCTITE it will eat the plastic. https://www.motionrc.com/collections/specialty-gluesComment
-
A buddy just picked up the Black& Yellow version of this plane and brought it out to the field today (still in the box).
Man this plane is a beauty! The Black & Yellow on the foam looks great, cannot wait to get mine!
I cannot get over how small the wings are!
I'm looking forward to seeing it fly.Comment
-
I always remember the F-104 from a seance in the movie The right Stuff where Chuck Yager tried to see just how high it would go.Comment
-
One of my latest flights.Comment
-
URRL,
Whose wheel braking system are you using?Warbird Charlie
HSD Skyraider FlightLine OV-10 FMS 1400: P-40B, P-51, F4U, F6F, T-28, P-40E, Pitts, 1700 F4U & F7F, FOX glider Freewing A-6, T-33, P-51 Dynam ME-262, Waco TF Giant P-47; ESM F7F-3 LX PBJ-1 EFL CZ T-28, C-150, 1500 P-51 & FW-190Comment
-
Brakes:

Keep in mind the voltage limits are 7.2 to 14.8v
I use a 2S 800mAh battery
Comment
-
Audio was imported into the ESS Air sound system from this video:Comment
-
urrl, that's an awesome video. The F-15 engine run-up and take-off at the beginning sounded amazing. The on-board videos are really well done. I still can't believe how beautifully the 104 flies with those short wings. The slow flyby of the Mig was just as impressive as the high speed pass. And, the helicopter intercept was a great target of opportunity. :) And, it's always great to see what the owls are up to. :) Good show.Comment
-
URRL,
That was a great video up until the point of the model F-86 pilot encroaching into the airspace of the Sheriff helicopter.
It is reckless actions like that in our hobby that brings the heat down on all of us. Actions like that as seen by newer uninformed pilots who think it is cool and ok to do just helps to perpetuate the negative perceptions that the news media persists with.
Enough said,Warbird Charlie
HSD Skyraider FlightLine OV-10 FMS 1400: P-40B, P-51, F4U, F6F, T-28, P-40E, Pitts, 1700 F4U & F7F, FOX glider Freewing A-6, T-33, P-51 Dynam ME-262, Waco TF Giant P-47; ESM F7F-3 LX PBJ-1 EFL CZ T-28, C-150, 1500 P-51 & FW-190Comment
-
I'm with you Charlie, that's just plain dumb and I hope that it was more of an optical illusion than the actual truth. I had a similar situation where someone in a Piper Cub decided to make low passes over our flying field. We got the hell out of the way and landed immediately after he had done his first pass.
The guy had no business doing what he did, but that doesn't give me an excuse to put his life in danger.
Grossman56Team Gross!Comment
-
The helicopter was many miles away and I was well within the borders designated by the park. Nevertheless you do have a point; there are some like yourselves who are so easily fooled when it comes to distance perception and might ignorantly misjudge and imitate what they think are some of the things I do, so perhaps I will make some sort of disclaimer next time.Comment
-
Don't forget that you have the advantage of having been there and seeing it first hand, we did not. Also, when your claiming to 'intercept' and then back it up with a video that apparantly shows you 'intercepting', it doesn't do your case any good. I'm not berating you, but just trying to point out how it can be easily misinterpreted is all.
Grossman56Team Gross!Comment
-
Alpha, can I assume you meant "10% UP Elevator" in the above?Originally posted by Alpha.MotionRC View PostComment


Comment