


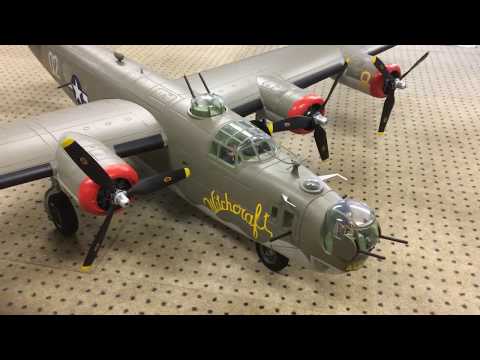
| Hi Guys, Got mine yesterday, the green one, "Witchcraft". Starting to assemble and decide in what order to put on the decals. Have not figured out how to tell the inner engine leads from the outer engine leads so that one battery has the inners and the other the outers. Does it make any difference if you connect one black and red to difference motors, or how can you tell which motor the leads are coming from in the wings? Trial and error? This is a beautiful plane and very well done! Looks like they started to use nose gears doors but did not do it? Seem to be places for hinges. Can not find a flaw in the paint anywhere. The screws for the vertical stabs and horizontal seem a bit small, but there are nubs to help with the job. I am going to put a dab of "Foam-Tac" just for good measure. Help with the engine leads would be greatly appreciated. Merry Christmas and Happy New Year to all. Frank Arbaugh |
-
-
TI...........nice job on that dragon. :Cool:
WoodyComment
-
So who is going to try it on 3s? Mine won't be here till next week.Don't just fly--WREAK HAVOC!!!Comment
-
I will definitely do it... but it may be a loooong time before I can get it out. Its winter where I am and I want to have a runway. But we will see. All I need is one warm Sunday!Originally posted by quitcherbitchen View Post
Or... maybe I'll try it indoors.Marc flies FW & FL: AL37, MiG-29, T45,F4, A4, A10, F104 70 and 90, P38, Dauntless SBD, Corsair, B17, B24, B26 & P61, Lipp.P19, ME262, Komets, Vampire, SeaVixen, FMS Tigercat, FOX Glider & Radian XL.
Rabid Models foamies, including my 8' B17 & 9' B36... and my Mud Ducks! www.rabidmodels.comComment
-
Since we're looking at paint jobs, I thought I'd drag out my old copy of the Mighty Eighth (40+years old) and scan these for you guys:
They might give you some unique ideas, especially the formation planes, they were war weary Liberators that got painted like the 60's hippie vans so the group planes could pick them out of the crowd and form up on them.
Grossman56Team Gross!Comment
-
The "Dragon" is about ready to leave the roost...
Comment
-
That plane looks fabulous in person.Comment
-
-
Hi ArbFrank, the ESC wire harnesses' bullet connectors are sized differently such that it's impossible to mix them in the wrong order. Just plug black to black and red to red according to their respective diameters. I hope this helps!Originally posted by arbfrank View PostLive Q&A every Tuesday and Friday at 9pm EST on my Twitch Livestream
Live chat with me and other RC Nuts on my Discord
Camp my Instagram @Alpha.MakesComment
-
TI the pics look wonderful I'm sure it is much more spectacular in person.Comment
-
Awesome work, TI! That had to be some task to get the dragon on there so straight.
I got the graphics for "Male Call" from Callie yesterday. And UPS has moved my delivery date up to Tuesday. Yay!Comment
-
The Dragon looks great but I think Callie flipped the graphic on you. See attached photo of Collings foundation Dragon and his tail livery.Comment
-
Look up Yellow Rose (B-25) pictures... The graphics have changed with every repaint.Originally posted by gbancrof View Post
This is typical of when the planes go through restoration, repair and repaints.
And it was typical during the war for the paint to change as they repaired the aircraft.
FF gliders and rubber power since 1966, CL 1970-1990, RC since 1975.
current planes from 1/2 oz to 22 lbsComment
-
Flipped? I guess I'm not seeing the difference except your showing the opposite side of the plane.Comment
-
-
Hi TI: How were you able to remove the tail turret to work on it? I just got my plane today, and that turret is really glued in there! Any suggestions? I tugged on it but was afraid I might damage the rear fuselage or the turret itself.Originally posted by TiredIronGRB View Post
Thanks for any suggestions!Comment
-
You can use a long Ofla style break-off blade knife and cut at the seam.Originally posted by davegee View PostComment
-
I did not get a shipping notice, so imagine my surprise when my silver showed up yesterday about 2pm. I am off until 2 Jan, so hope to do a little with it between now and then. I did open it and look at major components, and this is one fine looking model. Have some plans for this one as my dad was a gunner on one in WWII.
I have the Dragon and His Tail graphics as well, but the color is a bit off in places IMO. I have the Franklin Mint 1/48 Armour model and IMO they look better on it. I also expect this one is as close to scale as the Freewing--lol. So I took some pictures and sent them to Callie, asking her to print me up another set, expect they will get here in a week or two. Doubt I will be ready to apply them by then, but one never knows.
Just as a chuckle, the 1/48 FM model weighs 8lbs 13oz, more than this one will weigh RTF, I think, even after a couple of additions...Pete MComment
-
Hi TI: thanks for the tip on removing the rear turret that is glued in. I was able to remove it ok.Originally posted by TiredIronGRB View Post
Could you shed any light on how you mechanically hooked up a servo in the nose to make the nose turret move? I'm not sure how to link a servo up to the arm to get it to move properly. Thanks for any tips on that. Your plane looks fabulous by the way! I will probably just have the nose and top turrets move with servos.
Merry Christmas!Comment
-
Comment


Comment