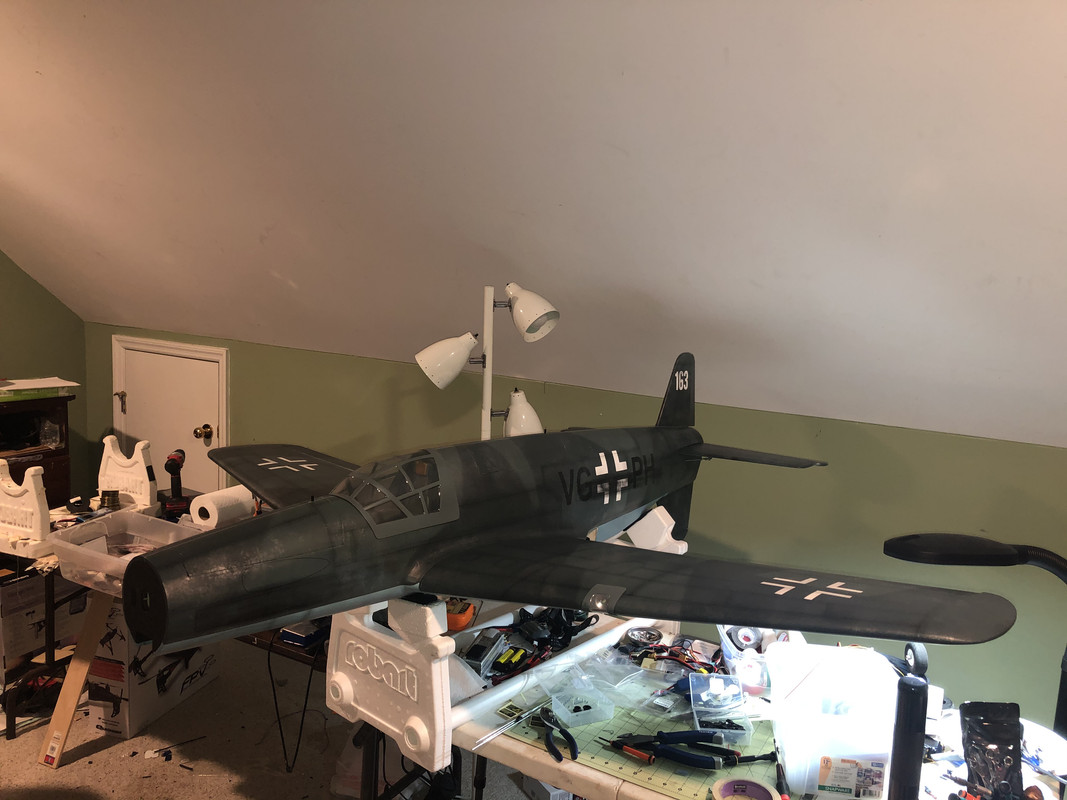
Announcement
Collapse
No announcement yet.
Official Black Horse 1724mm Dornier DO335 Pfeil ("Arrow") Thread
Collapse
X
-
Is that the He-219 Uhu in one of the photos? The last time I visited Udvar-Hazy, the Uhu was in pieces and under construction/assembly.Originally posted by Twowingtj View Post---
Warbirder
- Likes 1
Comment
-
ok so I don't know if I would trust the stock spinners, the front is an elliptical and the back is a std. I have one of the spinners from the place I posted for a 2 blade prop, have not flown it yet. if I have time i'll see which one fits.Platt: fw190d9 Dynaflite:PT-19 IMP:Macchi202 ESM:fw190 ESM:Tank, Hien Jackson:DH-2 BH:macchi200 Extr:fw190 Holman:me109F H9spit2 FL:F4u,spit 9 FW:me262 GP:us60, Stuka, cub, F4u PZ:me109, albi EF Hurri, T-28 FMS: 2x fw190, me109 Lone Star:Skat Kat RSCombat:2xfw190d9
Comment
-
For all of you who are living vicariously through my Pfeil exploits, here's my nightly update.
All servos/pushrods/control horns have been installed loosely, awaiting the first power-on of the control system. Main retracts have been installed using XWave RM400-90 retract units. I'm still waiting on my retracts for the nose gear and pull-pull system installation. Also, waiting on 5055-390kv motors (FlightLine Spitty). There have been absolutely no bad surprises during the build so far. The H Stabs went on nice and straight and the wings also slid right into place for a good, snug fit. While I wait another day or two for the front retract trunion and the motors to arrive, I'll start programming the 335 into my JumperTX. I'll be using two FrSky X8Rs to have 16 channels available, although I won't need that many. I'll also start installing the vacuum-formed plastic trim pieces.
The only thing that I've seen so far that I wish had been done differently is that the dorsal and ventral rudders are mechanically Y-d together and the left and right elevators are also mechanically Y'd together. I'd have preferred that all four have had their own servo, so that I can subtrim them with the radio. There aren't accommodations for two extra standard servos, but I may look into adding a another PW tray within the Servo Bay, to add two additional servos. I mounted my pushrod connectors a bit differently than the instructions, but we all do pushrods and connectors our own way. Six, one half dozen, or the other....
Oh, one other thing that I did a little differently... The instructions said to epoxy the plastic wheel wells in place. I, instead, chose to use five #2 sheet metal screws to mount each wheel well in the wing. That way, I can easily take them out, if I need to get inside the wing for wires or something..

---
Warbirder
Comment
-
I’ll be using the XWave RM400-90 retract for the Nose Gear, same as for the Mains. I only had two RM-400s on hand and had to order the one for the NG, plus the two more to replace the two that I’d stolen from He-111 Upgrade Bin.Originally posted by handyman220 View PostLooks good! Patiently waiting for mine, it will be here tomorrow, please let us know how the FL Spitty motors work out. I like the price and availability.
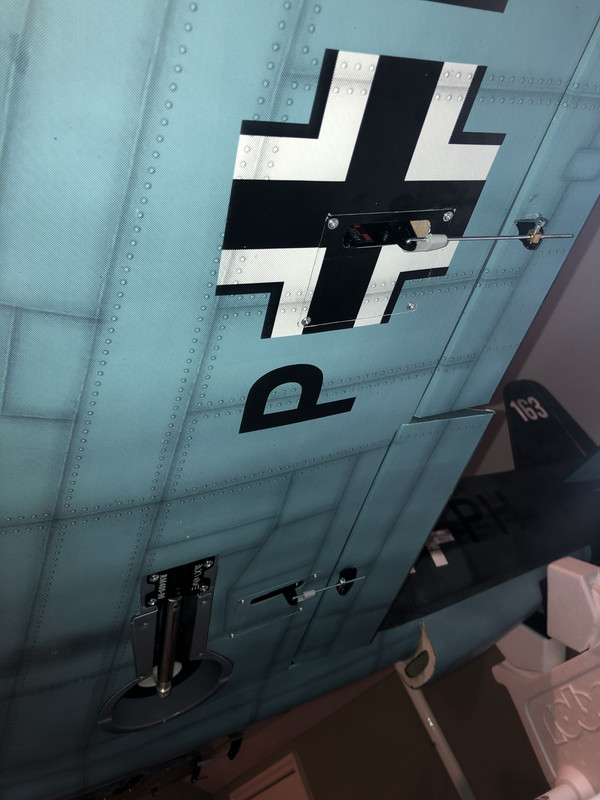
Out of curiosity what retract are you using for the nose gear?---
Warbirder
Comment
-
It can be pretty aggravating to find a plane in a museum that you're dying to document -- only to find it's squeezed into a tight place and cordoned off. At the USAF Museum in Dayton, for example, I could only photograph the front of their rare P-61-- the rest of pushed back into a corner, and the tail, booms and radar station were not visible. The Bristol Beaufighter was likewise jammed into a space. Next time I go, I plan to inquire about a museum volunteer to, perhaps, escort me around certain planes for documentation purposes. Has anybody ever done this?The aft spinner is more conical. Here are a few pics of the full scale at the Hazy-Udvar museum from last fall.
The Naval Aviation Museum (Pensacola) is different, in that nearly all of the planes are fully accessible. You can walk up to, crawl under, whatever. I enjoyed getting a lot of details shots of their two-seat ME-262.
I was looking at some photos of a Do-335 under construction -- turns out they did the fuselage much like the ME-262, in that all panel lines were puttied and sanded smooth! So really, the only lines should be removable panels. Nah, I'm not going to repaint the plane!
Comment
-
Did my first power-on today. No smoke, no fire, no shorted servos. Well, I did smoke the landing light LED. I guess that it wasn’t rated for 8.4v. The LED ran for about 10 seconds, then died. Oh well, we’ll just constrain ourselves to fly during the day. In hindsight, I should’ve mounted the landing light cover with #2 screws, instead of epoxy. If I have to open up the wing again, I may replace the landing LED.
Installed the plastic trim pieces. All of the trim pieces fit nicely and were easy very to CA in place. I trimmed the aft exhaust stack quite a bit and it looks a lot better than the untrimmed piece would’ve looked.
Doing some mechanical aligning/trimming, while I wait for the motors to arrive. I’m still thinking about ways to mount 2 more servos, for the elevator and rudder.---
Warbirder
Comment
-
Oh wellOriginally posted by Oxotnik View PostWell, I did smoke the landing light LED. I guess that it wasn’t rated for 8.4v. The LED ran for about 10 seconds, then died. .
Guess the booze patrol is gonna have to monitor your build consumption
You can pretty much bet that all "standard" RC LED's are maxed out @ 5V
Warbird Charlie
HSD Skyraider FlightLine OV-10 FMS 1400: P-40B, P-51, F4U, F6F, T-28, P-40E, Pitts, 1700 F4U & F7F, FOX glider Freewing A-6, T-33, P-51 Dynam ME-262, Waco TF Giant P-47; ESM F7F-3 LX PBJ-1 EFL CZ T-28, C-150, 1500 P-51 & FW-190
Comment
-
It was an LED from a Freewing Jet, don’t remember which. I was planning to run the LED with an LED switch controller (tied into the gear channel, so that it’d switch ON when the gear deployed). Didn’t have a spare LED controller on hand, and in my haste to get everything hooked up and tested, I wasn’t thinking and just plugged the LED directly into the RX power bus. I’d probably have been okay, if I’d have put a resister in the circuit. Without the resister, I bet that I over-amped the poor little LED.Originally posted by OV10 View Post
Oh well
Guess the booze patrol is gonna have to monitor your build consumption
You can pretty much bet that all "standard" RC LED's are maxed out @ 5V
---
Warbirder
Comment
-
Looking good, without a doubt the exhaust looks better trimmed down. That's a must do for me also, stock is out of proportion.I'm hoping the Spitty motors work as I already placed the order at Motion.Originally posted by Oxotnik View PostDid my first power-on today. No smoke, no fire, no shorted servos. Well, I did smoke the landing light LED. I guess that it wasn’t rated for 8.4v. The LED ran for about 10 seconds, then died. Oh well, we’ll just constrain ourselves to fly during the day. In hindsight, I should’ve mounted the landing light cover with #2 screws, instead of epoxy. If I have to open up the wing again, I may replace the landing LED.
Installed the plastic trim pieces. All of the trim pieces fit nicely and were easy very to CA in place. I trimmed the aft exhaust stack quite a bit and it looks a lot better than the untrimmed piece would’ve looked.
Doing some mechanical aligning/trimming, while I wait for the motors to arrive. I’m still thinking about ways to mount 2 more servos, for the elevator and rudder.
Comment
-
The rimmed down exhaust looks much better. Looks like weathering the vacu-formed add on bits will need a bit of weathering to blend in.
I was surprised at the difference in presentation character the plane has when in the sun vs. in the shade. In the shade, it looks almost over weathered. In the sun, it really nice.
Comment
-
Agreed. The gray plastic pieces need to be blended in, for sure.Originally posted by Twowingtj View PostThe rimmed down exhaust looks much better. Looks like weathering the vacu-formed add on bits will need a bit of weathering to blend in.
I was surprised at the difference in presentation character the plane has when in the sun vs. in the shade. In the shade, it looks almost over weathered. In the sun, it really nice.
The aft exhaust stack, I moved upward so that it'd fit between the balkenkreuz. The exhaust weathering is a bit lower though. I may have to get my airbrush after it, too.
---
Warbirder
Comment
-
You and me, both. We're committed. My only concern will be getting the MAS prop to work with the hex on back end of the prop adapter. It should be easy to engineer a solution, though, even if it means filing/grinding down the corners of the hex., or, maybe, using a Forstner bit to open up the end of the prop through-hole enough for the prop to seat around the hex. I guess that a hard plastic shim is another option. There are multiple ways to skin this cat. :-)Originally posted by handyman220 View Post
Looking good, without a doubt the exhaust looks better trimmed down. That's a must do for me also, stock is out of proportion.I'm hoping the Spitty motors work as I already placed the order at Motion.
---
Warbirder
Comment
-
The Spitty's prop shaft adapter has no hex to worry about. That was a bonus reason I selected the motor set up when I told ya about using it with the MAS prop on the AMS A-26.Originally posted by Oxotnik View Post
You and me, both. We're committed. My only concern will be getting the MAS prop to work with the hex on back end of the prop adapter. It should be easy to engineer a solution, though, even if it means filing/grinding down the corners of the hex., or, maybe, using a Forstner bit to open up the end of the prop through-hole enough for the prop to seat around the hex. I guess that a hard plastic shim is another option. There are multiple ways to skin this cat. :-)
Warbird Charlie
HSD Skyraider FlightLine OV-10 FMS 1400: P-40B, P-51, F4U, F6F, T-28, P-40E, Pitts, 1700 F4U & F7F, FOX glider Freewing A-6, T-33, P-51 Dynam ME-262, Waco TF Giant P-47; ESM F7F-3 LX PBJ-1 EFL CZ T-28, C-150, 1500 P-51 & FW-190
Comment
-
Excellent. Thanks!! I love it when a problem becomes a non problem. I guess that I should’ve actually pulled the spinner off my FlightLine Spitty and taken a look before I bought the motors for my 335. Hopefully the Spitty motors will arrive this evening or tomorrow. I’m anxious to get the motors mounted and run the motors/props with a wattmeter. I’m expecting to really like the power of the Spitty 5055-390 and MAS 16x10x3 prop. My preference would’ve been to have a bit more kv, but the lower kv should pull less current, and thus give me a little more flight time, at the expense of a little power and speed.Originally posted by OV10 View Post
The Spitty's prop shaft adapter has no hex to worry about. That was a bonus reason I selected the motor set up when I told ya about using it with the MAS prop on the AMS A-26.
---
Warbirder
Comment
-
A couple other blending-in tips...
The G-10 control horns are ugly. I hit mine with a wide tipped black Sharpie, and the black control horns almost disappear from sight.
The inside of the of the FG cowls are very light colored. I painted the inside with acrylic flat black, severely diluted. Diluted black quickly dulls the inside of the cowl, without adding much mass at all. The interior paint doesn’t have to be consistent or pretty, just dark, and will black out the inside of the cowls when they’re installed on the plane.---
Warbirder
Comment


Comment