


Probably just me but the way it was flying almost looked like it was nose heavy. I know that with ours the battery way back has produced very good flying planes.
-
-
Thanks for your feedback Alpha. I don't have a servo tester, but I did plug both the rudder and ailerons into the elevator and it didn't do anything except lock the front wheel twisted to the left making it look like the LG won't deploy.
I started with a fresh model, so there aren't any mixes or anything, but I may start with a fresh model slot anyhow.
The jet is stunning and the build was quick and easy, so I am scratching my head as to what could be causing my issues.
GBComment
-
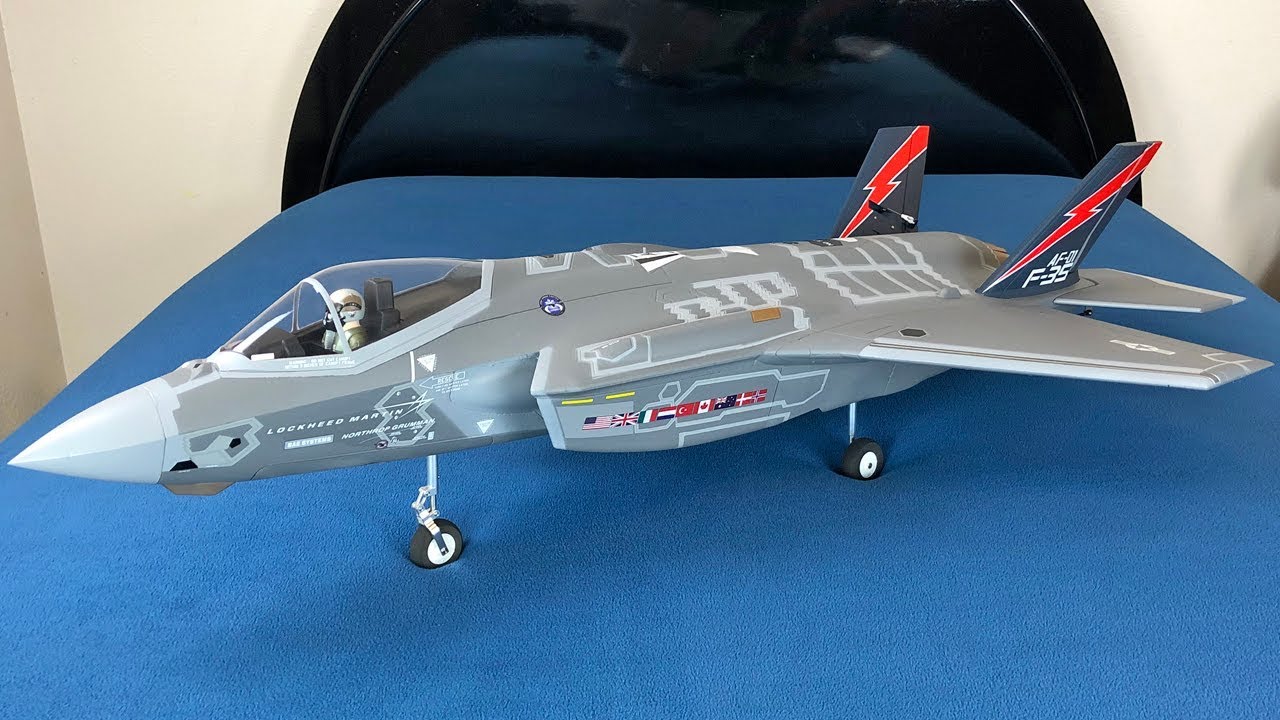
Well, we get our first really nice day, and I decided to maiden the F-35. By the time I get to the field in the afternoon, it's blowing with a stiff crosswind. Oh well, I am here lets get this done :-) I set up the CG a few MM in front of the plastic wing part and set the rest of the controls. I didn't add in the proper 4mm of up elevator but it stayed stuck to the grass runway during the roll during stiff crosswinds. I put in a short 2 min flight as this was the first charge on a new 4000 60c Gensace pack. I will tone down the ailerons more and re-set the elevator with the proper amount of trim. The 2nd flight tomorrow morning will be amazing I am sure :-) The F-35 is amazing off our grass runway. I am sure there will be a mini squadron at my club soon :-) Now I have to get off my butt and finish my F-4 now that I have a ton of weapons printed off.
2 more Jets to maiden in the next few days/weeks :-)
Comment
-
Congrats on the successful maiden! :Cool:My YouTube RC videos:
https://www.youtube.com/@toddbredaComment
-
put in 5 perfect flights today on the F-35. It sounds so sweet flying by at low level! All of the club guys were impressed! I have it just about trimmed out perfectly. Other than being hard to see head on at times, it's an absolute keeper! Thanks to urrl, I think i will add some lights for dusk flying!
Going reconfigure the wiring to allow for flaperons and try them out high. I have an 8ch so might as well use some of the extra channels :-)Comment
-
This is my unboxing!Comment
-
I fly off of astro turf and my edf's suck up a lot of rubber pellets. With this wide open cheater hole I am afraid it will trash my fan. If I cover it with a screen will the inhibited airflow affect the performance?Comment
-
She seems dialed in fairly well so far.Comment
-
My CG is 5mm ahead of the plastic square (Thumb tac on the right)
Comment
-
That's where I am putting the CG on mine. I have a few more flights of tweaking my controls, but this spot is good for now. I may try moving it back a bit more to see if I can slow it down more on landings. Now I am just holding it off in the flare to bleed off some speed before landing on our grass field. I am hoping to put in a few more flights tomorrow. It's too windy today for flying :-(Comment
-
Oh well, couldn't take it and ordered one, hope by next week maybe the CG issues will be clear as for sure where it flies the best.....:Confused:LOL.Comment
-
I agree with urrl, I have my CG in the exact same spot and it works out great. I prefer a tad nose heavy, and this spot is perfect for my Admiral 4000 Pro lipo’s. Just need to tweak my trims, but she is a solid flyer. Thanks MRC/Freewing, another Hit!!Comment
-
Just maidened mine - holy cow the flight times are long! I'm getting 5:30 on both my 5200 Lectron and 4000 Admiral packs.
This jet is awesome.Comment
-
Received my F-35 yesterday and started to design some 3DP parts. Here is a nose gear brace, two fairings for the wing spar tube in front of the fan to reduce drag plus an ESC cover to get rid of the plywood part. Upon fitting the nose gear brace I discovered that one of the grub screws protruded from the strut. The reason is that there is no flat spot on the connector pin. I grinded that spot and the grub screw fitted as expected. Note, that I did not make holes for access to the two aft screws of the retract unit.
Comment
-
Can't wait to get mine, I bet MRC is smiling on this one, it looks to be sold out already, you know that a jet is a hit when they sell out this soon, either that or production was limited to only a few to find out, still would like to see a big 90mm....:Cool:Comment
-
Nice work James !Comment


Comment