You must Sign-in or Register to post messages in the Hobby Squawk community
Registration is FREE and only takes a few moments

Register now

Announcement

Collapse
No announcement yet.

Official Nexa OV-10 Bronco 1800mm ARF Discussion Thread

Collapse
X
Collapse
First Prev Next Last
 
  • Filter
  • Time
  • Show
Clear All
new posts

  • Twowingtj
    replied
    If you've got the clearance, you could run 12x6 to 12x8 3-blade props. On my Power 32s, I run 13x6.5 2 blade props, on 4S with no stress on the motor at all. So the down one on diameter and up one on pitch should put you in good shape for power with the two I mentioned.

    Leave a comment:


  • Rosytime
    replied
    Somehow the pics didn't up load. Here they are. Click image for larger version

Name:	front gear 2.JPG
Views:	1038
Size:	54.3 KB
ID:	210227Click image for larger version

Name:	front gear 1.JPG
Views:	1151
Size:	56.6 KB
ID:	210228

    Leave a comment:


  • Rosytime
    replied
    Click image for larger version

Name:	front gear 1.JPG
Views:	0
Size:	0
ID:	210224Click image for larger version

Name:	front gear 2.JPG
Views:	0
Size:	0
ID:	210223 
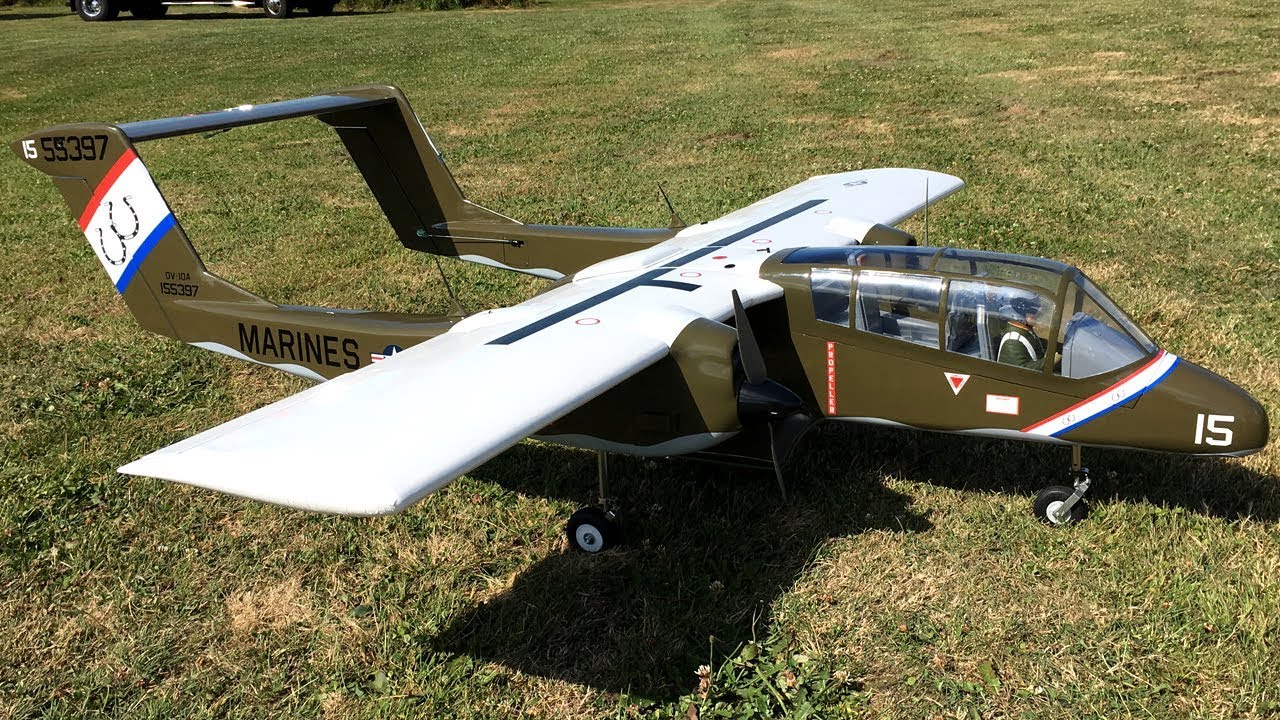
Well I have two flights on mine now. On the maiden flight the first take-off attempt was aborted since it seemed that not enough elevator was available. I switched to high rates and it took off fine. A bunch of up trim was needed but once trimmed it flew great. I landed after 4 minutes and the front steering went whacky. Inspection showed that the cable broke. Bigger cable used for the next flight but it dug into the tubing and again went sideways. If you look at how the instructions tell you to run the pull-pull system, you will see the problem. My solution was to move the u-shaped metal rod towards the front of the tube exit and wrap it around back towards the steering arm. This should solve that problem. The wire will eventually cut into the plastic tube with the original routing. I also found that my power set-up is okay but not to my liking. I had to fly at 3/4 throttle to feel comfortable. I'm using E-Flite power 32s on 4s with a MAS 10-7 3 blade prop. I could go to a 5s set-up but will try an 11-7 3 blade next to see if that helps. E-Cal show that set-up will give about 1400 watts compared to the 994 watts the current set-up shows. Going to try a 2 bladed 12-8 for now.

    Leave a comment:


  • GBLynden
    replied
    Originally posted by sam51401 View Post
    VMO2 i think had several different schemes covering the 76' Bicentennial but i do have the T.O manual that gives the wing top as white and bottom as gray. This also has all the stenciling wiht locations, sizes and all. The neat thing about this scheme is that its all listed as gloss which means not much if any work is needed to dull the shine. I have the same Callie graphics to add to mine and also using cut vinyl to accent some panels and such. Yours is top notch TLAR and enjoy your videos thanks to GBLynden for filming. Keep them coming as inspiration please.
    Sam
    Thanks guys and you're welcome Robert! I have one more flight with this bird on tap for the near future and I believe JohnVHRC captured these flights on video too

    Leave a comment:


  • Dirty Dee
    replied
    Originally posted by Nottoday View Post
    And now I am ready. Click image for larger version

Name:	001 (6).jpg
Views:	781
Size:	92.3 KB
ID:	209439

    cheers
    Markus
    Cant wait to see it all together!

    Leave a comment:


  • sam51401
    replied
    VMO2 i think had several different schemes covering the 76' Bicentennial but i do have the T.O manual that gives the wing top as white and bottom as gray. This also has all the stenciling wiht locations, sizes and all. The neat thing about this scheme is that its all listed as gloss which means not much if any work is needed to dull the shine. I have the same Callie graphics to add to mine and also using cut vinyl to accent some panels and such. Yours is top notch TLAR and enjoy your videos thanks to GBLynden for filming. Keep them coming as inspiration please.
    Sam

    Leave a comment:


  • TLAR
    replied
    Caddguy6, the wing is white on top and bottom. IRL this makes it easy for the attack aircrafts to spot the Bronco working down low among the trees. Thanks GBLynden again for recording my flight despite the challenging light conditions.

    Leave a comment:


  • caddguy6
    replied
    Originally posted by GBLynden View Post
    This is Robert's third flight!
    Yes Robert certainly has the flight routine down pat. Smooth. I love the color scheme and markings for this particular airframe but am curious as to the color of the top of the wing. Is it white or a light grey? Any clarification would be appreciated.

    Leave a comment:


  • MikeT
    replied
    Looking like he's got a handle on it very smooth.

    Mike

    Leave a comment:


  • GBLynden
    replied
    This is Robert's third flight!

    Leave a comment:


  • Kangi1954
    replied
    Originally posted by MikeT View Post
    The music wire would be the portion that extends out of the strut that slides into the retract. I haven't looked at it yet to be sure that's the way to go.


    Mike
    Removing material above the slot at the end of the music wire would work too. But I felt that removing that material would weaken the strut if using the set screw in slot method. I think maybe it boils down to personal preference. 6 of one half a dozen of the other.

    Leave a comment:


  • MikeT
    replied
    The music wire would be the portion that extends out of the strut that slides into the retract. I haven't looked at it yet to be sure that's the way to go.


    Mike

    Leave a comment:


  • Kangi1954
    replied
    Originally posted by MikeT View Post

    Why not just trim the music wire portion so it won't bottom out ? The instructions say to use the supplied spring set up. I see no reason why that would not work but I'm not at that part of my build yet.

    Mike
    I’m not sure what the music wire portion is. I’m using the spring also, but that seamed a little flimsy to me so I asked Motion about it. They said to seat the set screw in the groove of the strut. That seemed a little stronger/solid than the spring alone so that’s what I did.

    Leave a comment:


  • MikeT
    replied
    Originally posted by Kangi1954 View Post
    As supplied, the nose gear strut would not insert into the trunnion block of the XWave retract far enough for the slot in the strut to align with the upper set screw in the trunnion block. Just a little bit of drilling lengthened the strut hole just enough to align the slot and set screw. A a little Lock-Tite thread locker and the nose gear is ready for installation. The set screw seems to hold the strut quite securely and the strut rotates smoothly.

    Why not just trim the music wire portion so it won't bottom out ? The instructions say to use the supplied spring set up. I see no reason why that would not work but I'm not at that part of my build yet.

    Mike

    Leave a comment:


  • Kangi1954
    replied
    Has anyone one found a suitable scale looking landing light to go in the nose (scale location) of the Bronco? If so, what are you using and where did you get it?

    Leave a comment:


  • Nottoday
    replied
    Hi, thank you for the praise. The lamps set (3W) with electronics I bought at this shop all together have only 100, - € cost. Maiden was a year ago flying fantastic. Best Regards Markus
    LED Sets für Flugzeuge - www.LEDPROFISHOP.de
    Pichler OV-10 Bronco Maiden - YouTube
    Pichler OV-10 Bronco - YouTube

    Leave a comment:


  • Kangi1954
    replied
    As supplied, the nose gear strut would not insert into the trunnion block of the XWave retract far enough for the slot in the strut to align with the upper set screw in the trunnion block. Just a little bit of drilling lengthened the strut hole just enough to align the slot and set screw. A a little Lock-Tite thread locker and the nose gear is ready for installation. The set screw seems to hold the strut quite securely and the strut rotates smoothly.

    Leave a comment:


  • Kangi1954
    replied
    Originally posted by Nottoday View Post
    And now I am ready. Click image for larger version

Name:	001 (6).jpg
Views:	781
Size:	92.3 KB
ID:	209439

    cheers
    Markus
    Beautiful! Best of luck on your maiden!

    Leave a comment:


  • wrangler1
    replied
    Originally posted by Nottoday View Post
    And now I am ready. Click image for larger version

Name:	001 (6).jpg
Views:	781
Size:	92.3 KB
ID:	209439

    cheers
    Markus
    Very nice !!!. By the way i see that you put lights on it, where did you find those and type ?. i have a few day looking for some light kits that looks fine with the airplane scale.

    Thanks.

    Leave a comment:


  • MikeT
    replied
    Nice.
    Mike

    Leave a comment:

Working...
X