-
I pulled the trigger and purchased the Bronco today. Supposed to be delivered tomorrow. What batteries are being used besides the Admirals? I bought two but would like backups. And has any one used the Admiral 600sp receiver? I didn't include that in my order but can of course get one. -
Xviper and MrD,
Thanks for your reply's and helpful information. I got her all sorted out and will probably maiden tomorrow.Leave a comment:
-
Assembling mine today. I'm really impressed by the finish and parts fit on this.
MikeLeave a comment:
-
ALQ-144 is what was standard on my Hawks back during my 1st deployment. I was enlisted then and everytime we landed and shut down I was up on top cleaning it, keeping those mirrors shiny. It's not exactly a jammer.... that's all I can say about that.Leave a comment:
-
Ok, you got me curious and i did find pics of several with disco ball on A's. 454, 459 and 473 have them mounted.in several photos in DS.
Leave a comment:
-
I looked it up, here's what the real thing looks like. Pretty cool!Originally posted by vduniec View Post
Leave a comment:
-
Sunday evening I picked up a jar of paint at Home Depot, color matched - I needed to touch up a couple of spots after my "tree adventure". But this isn't OD. Its a medium forest green.Originally posted by Narly View Post
I think its extremely close to the OEM color.
Base: Behr PP103 (flat)
Color Codes: CL:88 DL:36 KXL:12 LL:187
In this picture, this paint was used to touch up the bottom edge of the cockpit below the plastic. I'm happy with it.
Leave a comment:
-
OK, "build" complete w/ a few hanger rash spots. Tried to match OD with extensive collection of Model Masters, Floquil, Testers, Tamiya & Revell bit nothing very close. So, has anyone found the OD matching paint??
..... and what a beaut her is!! 😄Leave a comment:
-
It's similar to throttle calibration. Throttle stick to max, plug in plane (with one throttle input at a time), wait for initialization beeps, then at the end of the next set of beeps, lower stick. Repeat for the other throttle input. If you need a visualization of this, go to YouTube and search for "ESC brake set". Or download most any ESC instruction manual.Originally posted by Ric View Post
Leave a comment:
-
Looking for some help reprogramming ESC's. Mine are set to "Brake On". Need to reprogram to "Brake Off".Leave a comment:
-
Originally posted by sam51401 View Post
I don’t have the wing pylons made yet. Hoping to design and print them at some point. If you’re going to do a Desert Storm bird, you may want to add this. It is the ALQ-144 IRCM “Disco light” jammer. It goes on the bulge on the top at the back of the fuselage.
Here’s the link on Thingiverse: https://www.thingiverse.com/search?q...&sort=relevant
Leave a comment:
-
Flown 6 times using the recommended servo arm holes. Flies perfectly well (scale like handling) using mid rates for all three axes. If you are looking for aggressive non scale flight you could definitely diverge from the manual, but then why fly a warbird?Originally posted by CFIT rob View PostLeave a comment:
-
Wowser! That's a serious collection of electrons! It'll be just as interesting how she performs weight/speed, as will flight duration... 😁Originally posted by 68Strat View PostLeave a comment:
-
To achieve the throws recommended in the manual i had to move the linkage in a hole on the servo arms (i did that rather than reduce travel in radio.) Has everyone been going with recommended throws? Everyone needed to reduce travels?
Leave a comment:
-
Man this plane is cool! Just mocked up a 4s4p Li-ion pack consisting of 21700 cells. Seems like it'll fit and balance perfectly, and give me 16.8Ah on tap. Off to do some spot welding.Attached FilesLeave a comment:
-
-
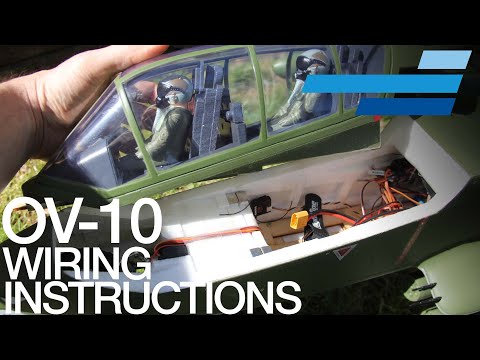
Hey guys, I made a 5 page diagram for you all to download (PDF in attachments) on how to wire your OV-10A Bronco and a video that goes over it in detail.
Leave a comment:


You must Sign-in or Register to post messages in the Hobby Squawk community
Registration is FREE and only takes a few moments


Leave a comment: