


Originally posted by Elbee
View Post
-
Thank you very much!Originally posted by marty 72 View Post
I did use the blue painter's tape for this model. I've used frog tape and other types, but I keep coming back to the good ol' blue. Now, that's not to say it won't peel up paint or bleed. All tapes I've used over the years do that to one degree or another. There's hobby trim tape out there (like 12mm wide or something) that is probably the best non-bleed or peel, but I tend to run out and use the blue painter's tape. One technique I use is I always put the sticky side on my pants or shirt a couple times before applying. This helps with less paint pull. The good news, I don't recall any original stock paint pulling up. It was the white and black invasion stripes I painted that was problematic. A bit on the yellow I used for the nose but nothing major. The silver I used for the base did pretty good not peeling too, but even when it would peel a little, there was still enough silver on the coat that I didn't need to touch it up.
Speaking of, I almost always expect to do detail touch ups, especially after using multiple different paints like this one (silver, yellow, olive drab, white and black). To me, it's just part of the process. Luckily, painting new liveries on RC model aircraft is probably the one rare time I have patience, lol.
I use paper towels to mask off the large areas you don't want overspray. Always works great. Some use newspaper, but I've always used paper towels with great success.
Thanks again for the compliment!
Leave a comment:
-
AROS,
You did an amazing job with the paint. I zoomed in, the edges all looks nice and clean. Question: Do you use blue painters' tape for the edges or something else? No issues with pull up the original paint? How many coats of the silver did you need to cover the green and black original paint?
Leave a comment:
-
Beautiful job with the repaint, Aros! When I finish my present Hairless Joe project, I'm clearing the tables to pick up one of these new P-51 models!!Originally posted by Aros View Post
Glad your flights are going well. Seems to be a pretty standard remark from others that this is a great new flying airplane!
Cheers
DavegeeLeave a comment:
-
finally got one to load I don’t know what the issue was
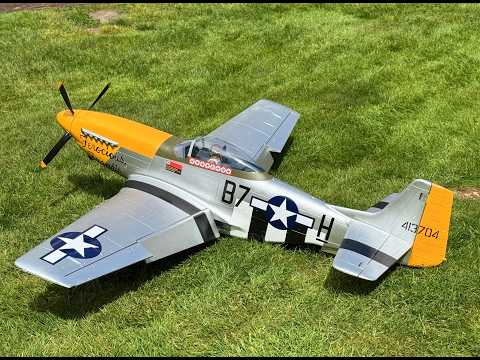
I added invasion stripes to the top of the wing and yellow to the tail. I was having some issues with it silhouetting at a distance in a high wing over. This helped tremendously and although I know it’s not correct to scale for Frenesi, I like it!Leave a comment:
-
Took her out for her second sortie. This time I tried the grass field adjacent to the airport runway. Flew fantastic. Now that she's trimmed, just no bad habits to speak of. Flies great, lands great, looks great...What's not to love?
After the flight, Callie's decals were waiting for me in my mailbox so I made no short order of slappin' them on. I think she turned out great! I'm very pleased overall. Now that the trimming and jitters are out of the way, now I can really let loose with her moving forward. Apologize for the low quality video. My fiancé was filming on her phone which doesn't have the best video quality.
 Attached Files
Leave a comment:
-
-
Hmm, nothing different on my end from earlier posts, when I went to post before it always gave me the option for size but it no longer doesLeave a comment:
-
Anyone else having an issue posting pictures?
it doesn’t give me the option to resize the picture anymore and it’s telling me it’s over max
Leave a comment:
-
I bought a Spectrum NX 8+ which has 20 channels, great little radio and more channels than I'll ever use!Originally posted by jetfool View Post
In the manual, page 54, top left is the atennae reference.
Grossman56
(Dangerous Dan)Leave a comment:
-
Thanks bud! Although, I must confess, the highly reflective nature of the paint does seem to lend itself to more gatoring susceptibility. I've only had her out in the direct Sun a few times, and never for all that long, and only maybe mid 50 degrees for the most part. Admittedly, it's nothing major, but those cells are becoming a tiny bit more pronounced than I would like. Nothing much I can do about it, just kind of live with it, knowing it's the nature of the EPO beast. You don't even notice unless you are inches away.Originally posted by GliderGuy View Post
Something for some to consider if wanting to go with a highly reflective aluminum/silver finish.Leave a comment:
-
OK... Don't go crazy on me as I know this is very debatable across all us crazy modelers. Just some fun history on the paint...
You wouldn't be totally wrong if you used OD Green or British Dark or Medium Green. In '43 the 357th FG received their 1st batches of early Bs with OD Green overall/Gray undersides straight from the NA factory. The nose bands and wing stripes were white during this time as there hadn't been any directive and much was carried over from the 4th FG. In February of '44, the Army ended that manufacturing color requirement and the planes were released in natural metal. Feb '44 also allowed the squadron colors on the nose and spinners. In just a couple of months, as the planes came overseas and since they would be seeing more action over Europe, the crews camo'd the planes again, mostly in the British greens, as that was typically all they could get their hands on. But, OD was also used when available. Some were painted on the upper surfaces only giving the 1/2 and 1/2 look. Bs, Cs, and Ds all had different green variations of the "1/2" look as well as the "overall" look, some even having different greens on the same plane. The D Day stripes also varied from plane to plane, as to exactly when they were applied, how they were applied, and/or how modified. Many times the stripes were simply applied by hand. Again, it was all because of fighting a war and literally using what was available. Cool thing is, this Group was really the only FG doing this stuff as they were the 1st active Mustang Group in the 8th AF. Makes for a cool representation any which way you go. The last Ds of the 357th delivered late in the war were pretty much all natural as there was really no more point for camo.
Since most all the photos are in black and white and because the shades are fairly close, good luck figuring out who was painted what. I talked at length with Bud when he was at Reno one year and while he admitted to his fading memory, he also remembered that the colors were all over the place.Leave a comment:
-
Thanks Gents! Dan, sorry to hear about your birds. It never sucks less whenever you crash or lose a model, no matter how many times it happens. Price point and time investment can make it worse for sure, but crashing just stinks.
I always follow the RX recommendation for antenna placement. So far so good. Other than the occasional gremlins that make your plane look like it's going through final stages of a seizure, usually it's from losing orientation or some Dumb Thumb moment. No matter the cause...BOO HISS!
Leave a comment:
-
The silver looks way better than the i have no choice flightline arf green , will get one later this year and respray it silver . Preddy or Whisner possibly or ridge runner Pierce McKennaLeave a comment:
-
Dan,
What radio did you end up with? I have always used Futaba but looking at the Spectrum 8e. Most of our members are using this now and I like a lot of the features. Still using my 7c Futaba after 14 yr and never a problem.
Best Regards, RexLeave a comment:
Leave a comment: