You must Sign-in or Register to post messages in the Hobby Squawk community
Registration is FREE and only takes a few moments

Register now

Announcement

Collapse
No announcement yet.

Official Nexa OV-10 Bronco 1800mm ARF Discussion Thread

Collapse
X
Collapse
First Prev Next Last
 
  • Filter
  • Time
  • Show
Clear All
new posts

  • Originally posted by fjkelley@cox.net View Post
    I now have 4 flights on my OV-10. I completely re-painted the model to replicate the OV-10 I flew out of Danang Airbase, Republic of Vietnam, that had my name on it.
    The model is powered by Propdrive, V2, 50-50, 580KV motors. Using 5500, 5S Lipos, Castle "ICE" 100 Amp. ESCs. Stock WaveRC (drop in fit) retracts. 14X8X3 Master Airscrew props. counter rotating. Callie graphics.

    https://www.youtube.com/watch?v=tbJimVbMNkY
    Very nice looking bird. Thanks for sharing your flight video and technical info. It's very cool to see a FAC Bronco jockey flying a replica of his old Bronco.

    Comment


    • Originally posted by fjkelley@cox.net View Post
      I now have 4 flights on my OV-10. I completely re-painted the model to replicate the OV-10 I flew out of Danang Airbase, Republic of Vietnam, that had my name on it.
      The model is powered by Propdrive, V2, 50-50, 580KV motors. Using 5500, 5S Lipos, Castle "ICE" 100 Amp. ESCs. Stock WaveRC (drop in fit) retracts. 14X8X3 Master Airscrew props. counter rotating. Callie graphics.

      https://www.youtube.com/watch?v=tbJimVbMNkY
      Nice flight and welcome on board.

      Comment


      • Great makeover and better yet the flying was even better.

        Mike
        \"When Inverted Down Is Up And Up Is Expensive\"

        Comment


        • And now I am ready. Click image for larger version

Name:	001 (6).jpg
Views:	706
Size:	92.3 KB
ID:	209439

          cheers
          Markus

          Comment


          • Nice.
            Mike
            \"When Inverted Down Is Up And Up Is Expensive\"

            Comment


            • Originally posted by Nottoday View Post
              And now I am ready. Click image for larger version

Name:	001 (6).jpg
Views:	706
Size:	92.3 KB
ID:	209439

              cheers
              Markus
              Very nice !!!. By the way i see that you put lights on it, where did you find those and type ?. i have a few day looking for some light kits that looks fine with the airplane scale.

              Thanks.

              Comment


              • Originally posted by Nottoday View Post
                And now I am ready. Click image for larger version

Name:	001 (6).jpg
Views:	706
Size:	92.3 KB
ID:	209439

                cheers
                Markus
                Beautiful! Best of luck on your maiden!

                Comment


                • As supplied, the nose gear strut would not insert into the trunnion block of the XWave retract far enough for the slot in the strut to align with the upper set screw in the trunnion block. Just a little bit of drilling lengthened the strut hole just enough to align the slot and set screw. A a little Lock-Tite thread locker and the nose gear is ready for installation. The set screw seems to hold the strut quite securely and the strut rotates smoothly.

                  Comment


                  • Hi, thank you for the praise. The lamps set (3W) with electronics I bought at this shop all together have only 100, - € cost. Maiden was a year ago flying fantastic. Best Regards Markus
                    LED Sets für Flugzeuge - www.LEDPROFISHOP.de
                    Pichler OV-10 Bronco Maiden - YouTube
                    Pichler OV-10 Bronco - YouTube

                    Comment


                    • Has anyone one found a suitable scale looking landing light to go in the nose (scale location) of the Bronco? If so, what are you using and where did you get it?

                      Comment


                      • Originally posted by Kangi1954 View Post
                        As supplied, the nose gear strut would not insert into the trunnion block of the XWave retract far enough for the slot in the strut to align with the upper set screw in the trunnion block. Just a little bit of drilling lengthened the strut hole just enough to align the slot and set screw. A a little Lock-Tite thread locker and the nose gear is ready for installation. The set screw seems to hold the strut quite securely and the strut rotates smoothly.

                        Why not just trim the music wire portion so it won't bottom out ? The instructions say to use the supplied spring set up. I see no reason why that would not work but I'm not at that part of my build yet.

                        Mike
                        \"When Inverted Down Is Up And Up Is Expensive\"

                        Comment


                        • Originally posted by MikeT View Post

                          Why not just trim the music wire portion so it won't bottom out ? The instructions say to use the supplied spring set up. I see no reason why that would not work but I'm not at that part of my build yet.

                          Mike
                          I’m not sure what the music wire portion is. I’m using the spring also, but that seamed a little flimsy to me so I asked Motion about it. They said to seat the set screw in the groove of the strut. That seemed a little stronger/solid than the spring alone so that’s what I did.

                          Comment


                          • The music wire would be the portion that extends out of the strut that slides into the retract. I haven't looked at it yet to be sure that's the way to go.


                            Mike
                            \"When Inverted Down Is Up And Up Is Expensive\"

                            Comment


                            • Originally posted by MikeT View Post
                              The music wire would be the portion that extends out of the strut that slides into the retract. I haven't looked at it yet to be sure that's the way to go.


                              Mike
                              Removing material above the slot at the end of the music wire would work too. But I felt that removing that material would weaken the strut if using the set screw in slot method. I think maybe it boils down to personal preference. 6 of one half a dozen of the other.

                              Comment


                              • This is Robert's third flight!
                                 

                                Comment


                                • Looking like he's got a handle on it very smooth.

                                  Mike
                                  \"When Inverted Down Is Up And Up Is Expensive\"

                                  Comment


                                  • Originally posted by GBLynden View Post
                                    This is Robert's third flight!
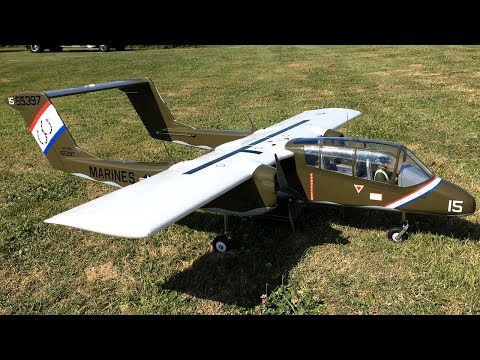
                                    Yes Robert certainly has the flight routine down pat. Smooth. I love the color scheme and markings for this particular airframe but am curious as to the color of the top of the wing. Is it white or a light grey? Any clarification would be appreciated.

                                    Comment


                                    • Caddguy6, the wing is white on top and bottom. IRL this makes it easy for the attack aircrafts to spot the Bronco working down low among the trees. Thanks GBLynden again for recording my flight despite the challenging light conditions.

                                      Comment


                                      • VMO2 i think had several different schemes covering the 76' Bicentennial but i do have the T.O manual that gives the wing top as white and bottom as gray. This also has all the stenciling wiht locations, sizes and all. The neat thing about this scheme is that its all listed as gloss which means not much if any work is needed to dull the shine. I have the same Callie graphics to add to mine and also using cut vinyl to accent some panels and such. Yours is top notch TLAR and enjoy your videos thanks to GBLynden for filming. Keep them coming as inspiration please.
                                        Sam

                                        Comment


                                        • Originally posted by Nottoday View Post
                                          And now I am ready. Click image for larger version

Name:	001 (6).jpg
Views:	706
Size:	92.3 KB
ID:	209439

                                          cheers
                                          Markus
                                          Cant wait to see it all together!

                                          Comment

                                          Working...
                                          X