


Originally posted by SanExup
View Post
-
It's the connection in the wing to fuse. I plugged mine in and the gear wouldn't go down. I looked at the connection and it's as Oxotnik stated, the pins are crap. They are totally loose and weren't lining up. I got them to align while reassembling, straight away the gear comes down. This is extremely disappointing. I probably won't remove the inner wing from the fuse much but for what we've paid, it should work without worrying about it everytime we fly.
Leave a comment:
-
Does your TXs monitor screen show movement?
Known issue??? Work around?? No it’s not... don’t worry you’ll figure it out and fix it.Leave a comment:
-
Hello everyone, I assembled mine today and for some reason the gear and flaps won't work. I am using a setup profile provided by spektrum's website, so I know things are setup correctly. all other channels on the model work correctly. Is this a known issue and is there a work-around?
thanks.Leave a comment:
-
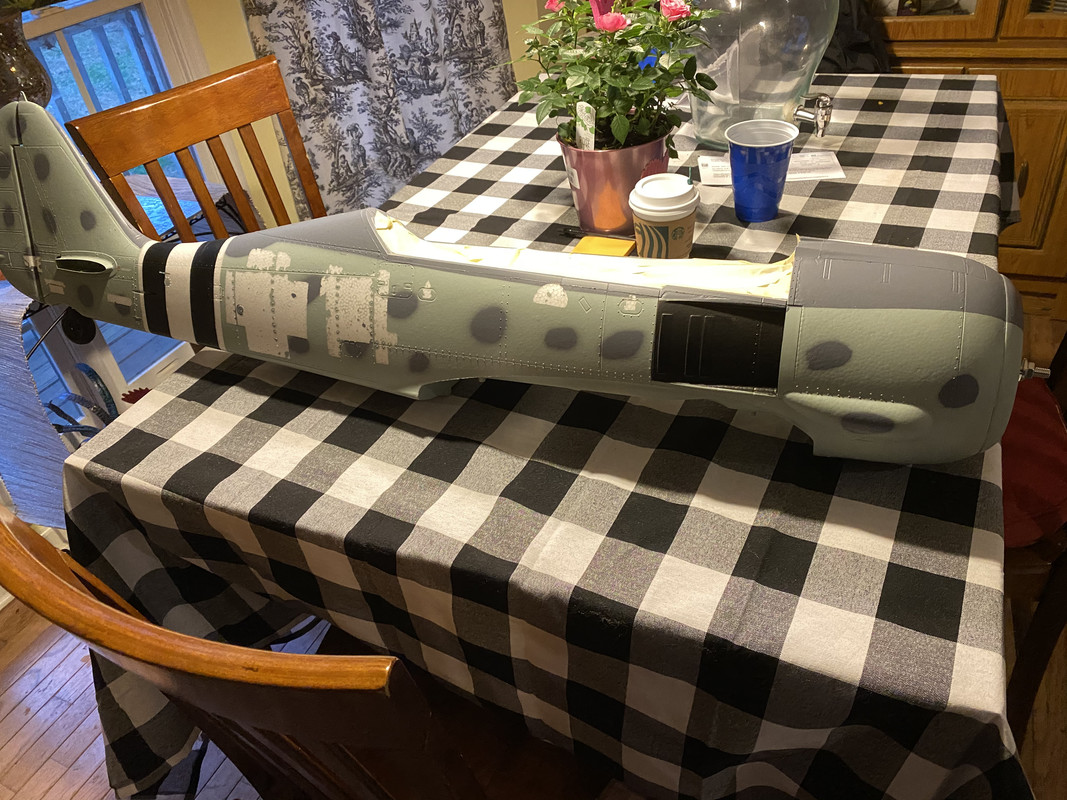
Over on RCG, I posted quite a bit yesterday on workmanship problems that I found as I was assembling my 190.
1. The elevator pushrod is small gage and long, and was unconstrained with in the fuselage. The pushrod was bowing severely in compression (Elevator Up). I had to glue a 10” long piece of Depron alongside the elevator pushrod tube, to keep the pushrod from bowing.
2. The hard-mounted servo connectors in the wing saddle and outer wing interface are total crap. Several times, a pin got shoved out of the connector. In both the wing saddle and the outboard interface, I went to a soft-mount connection. I unscrewed the multi-connector from one side of the interface and manually mated the connectors before structurally mating the wing sections. At the wing saddle, I added 6” servo extensions between the RX and the fuselage-side connector. After manually mating the ‘free’ fuselage-side connector to the hard-mounted wing-side connector, I shoved the wires back into the fuselage as I structurally mated the wing to the fuselage.

I have to admit, I was quite disappointed to have found these design/workmanship problems in an overly expensive foam model. I’ve been down on EFlite products for several years now, mostly due to their price point. Unless EFlite releases a nice FW-190D-9, or some other novel Axis warbird), this will be the last EFlite product that I buy new.
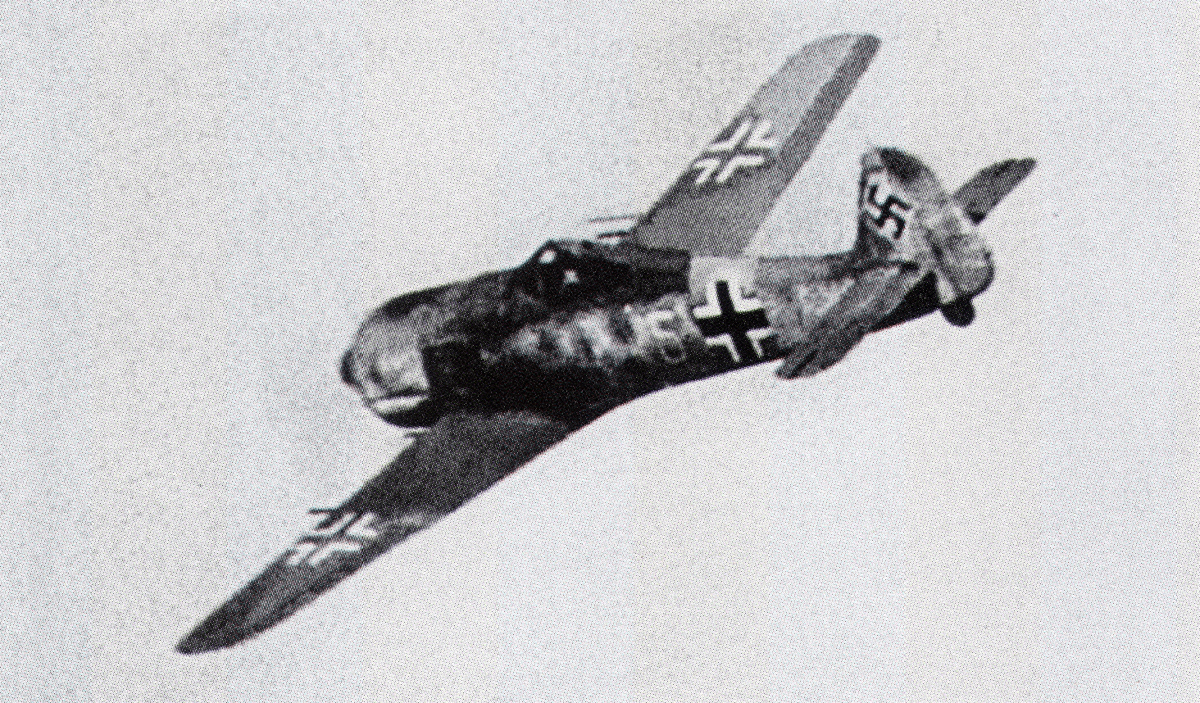
Now that my whining is over, here’s my repainted 190. I’m about 90% finished. I still need to add the White 5 and dirty her up with the exhaust and gunpowder residue. The plane that I have modeled is Walter Nowotny’s JG-54 Weiss 5, although this plane was probably never actually assigned to Nowotny. I like it because it uses non-regulation RLM 70 on the dorsal surfaces on an RLM 74/75/76 aircraft.
Here’s a primary source B/W photo of the subject aircraft.
And here’s my hack at it.
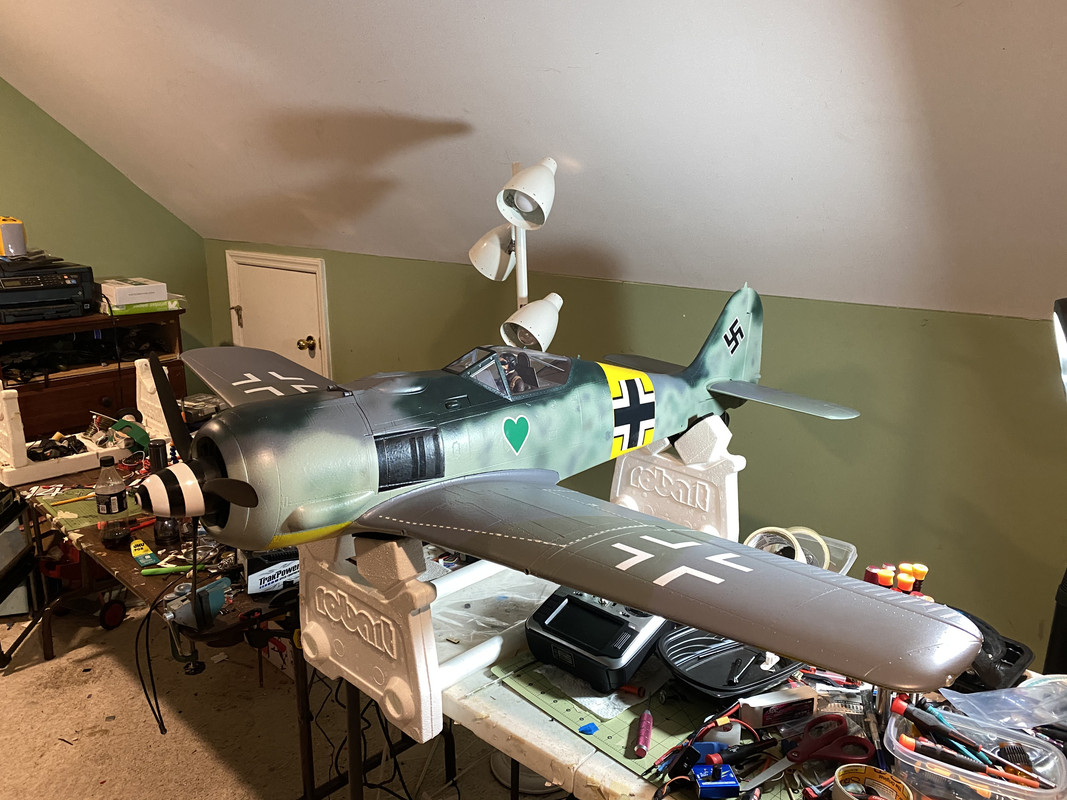
There are a few modeling escapes. One is the spinner. I’ll most likely repaint it RLM 70. I also need to add a few dark splotches to the mottling below the cockpit. And it appears that the Green Heart wasn't actually on this model. But, I'll take the scale point deduction. A Nowotny Wurger has to be a Grunherz!!! :-)Leave a comment:
-
Arycon There are few planes that I would pay as much as they are charging for this one. I'll reserve my true review of it until I've flown it. I imagine it will fly well. The utube videos we've seen so far have done a great job in showing how it performs in less than ideal adverse flying conditions but no one has done a proper flight with it, just my opinion. All of that said, if it flies as well as it looks, I can see it being an all time favorite. The quality is that good.
Which is a clouded lie coming from an rc plane enthusiast!🙂 I have a few all time favorites!Leave a comment:
-
I didn't feel the need to use filler but I did use some WB polycrylic after my priner coat so I could sand those areas lightly. It didn't take much for them to disappear. And maybe I could have just sanded the primer coat.Leave a comment:
-
The decals lifted the paint, but no pitting of the foam. For my repaint, I did no further work on the surface (no filler, no primer). I went straight to topcoat. Since I had color-matched the stock paints, It was really easy to repaint the fuselage. I mostly just airbrushed the bare foam (where the stock paint had lifted up) and the polka dots. After airbrushing the fuselage, I couldn't tell where the decals had been previously.Originally posted by Arycon View Post
ChuckLeave a comment:
-
I'm considering picking this bird up. I love warbirds but don't have any German birds. I don't care for the finish or scheme on this one. I agree they could have done so much better. I'm good with an airbrush myself and I'm curious what the body looks like after you took off the vinyl decals. in my experience with E-flite, it always leaves the foam rough and patchy, and I hate it. I've tried smoothing it out but I can always see the difference in the foam. How bad was it after you took off the decals? Is it really noticeable? It will drive me nuts if I cannot get a bird that size with a smooth finish.Originally posted by Oxotnik View PostLeave a comment:
-
You can measure the retract mounting holes. Then, replace them with a nicer quality retract. I'm sure Motion RC will have a set from other airplanes that will drop right in. They're not expensive but more reliable. If a retract fails once, for no understood reason. I'd recommend replacing both. Best of research is the way to go in this situation. You will find a set that will replace, the inop ones you have.Originally posted by Oxotnik View PostLeave a comment:
-
Thanks. I do agree that there is slop in many retracts. I've checked both of these, making sure that I haven't bent the struts, such that they're binding. On the Starmax FW-190, one of the retracts frequently refuses to come down. On the Avios MiG-17, one of the retracts often refuses to retract. It's very frustrating. I don't think that I've tried replacing the retracts themselves. Maybe I should. Well, maybe I would, if HK ever had any parts in stock. :-/Originally posted by starcop View PostLeave a comment:
-
Hello Oxotnik, Sometimes changing or modifying parts, can be very beneficial. If weaker metal or loose retract that wobble for instance. That can translate to more stress than the gear can handle. I've seen a lot of aircraft with really sloppy or weak metal parts. You can always drill and use hardened steel metal, to replace the stock steel posts. alignment is also critical. I'd suggest; from a perspective. Trying to beef up those landing gear components with stronger metal, I hope this makes sense. Happy flights buddy.Originally posted by Oxotnik View PostLeave a comment:
-
I’ve had horrible luck with the gear on my Avios MiG-17 and Starmax FW-190. The gear are totally unreliable. I’ve bought some LX gear controllers to replace the crappy stock controllers, but haven’t gotten around to working on the planes.Originally posted by Evan D View Post
I agree with you about value. Market value is determined by the lowest price that a seller is willing to accept and the highest price that a buyer is winning to pay. I’ve been really negative on new EFlite warbirds and jets because of their price points, primarily, but I really enjoy them when I find them at swap-meet prices. This Fw-190, on the other hand, really struck a chord with me (other than the awful attempt at mottling, and attempting to model an air show reproduction, instead of an aircraft that actually served in the war). The gear stance, details, and flight performance are really nice. I hate paying for SAFE-Select and SMART components, because I don’t want them, but I was willing to throw 5 bills st HH, to get this 190. I’d probably have been willing to pay more if it had been a D-9 or a D-13.Leave a comment:
-
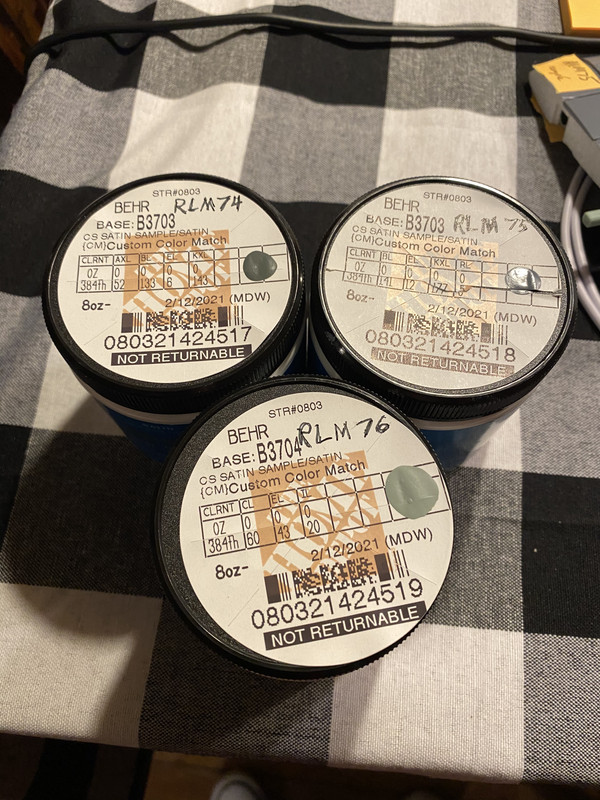
I’m using color-matched latex paint from Home Depot. The colors are EFlite’s version of RLM 76 (bottom and sides), RLM 74 and RLM 75 (upper surfaces camo). Here are the color codes (satin):Originally posted by Gilatrout View Post
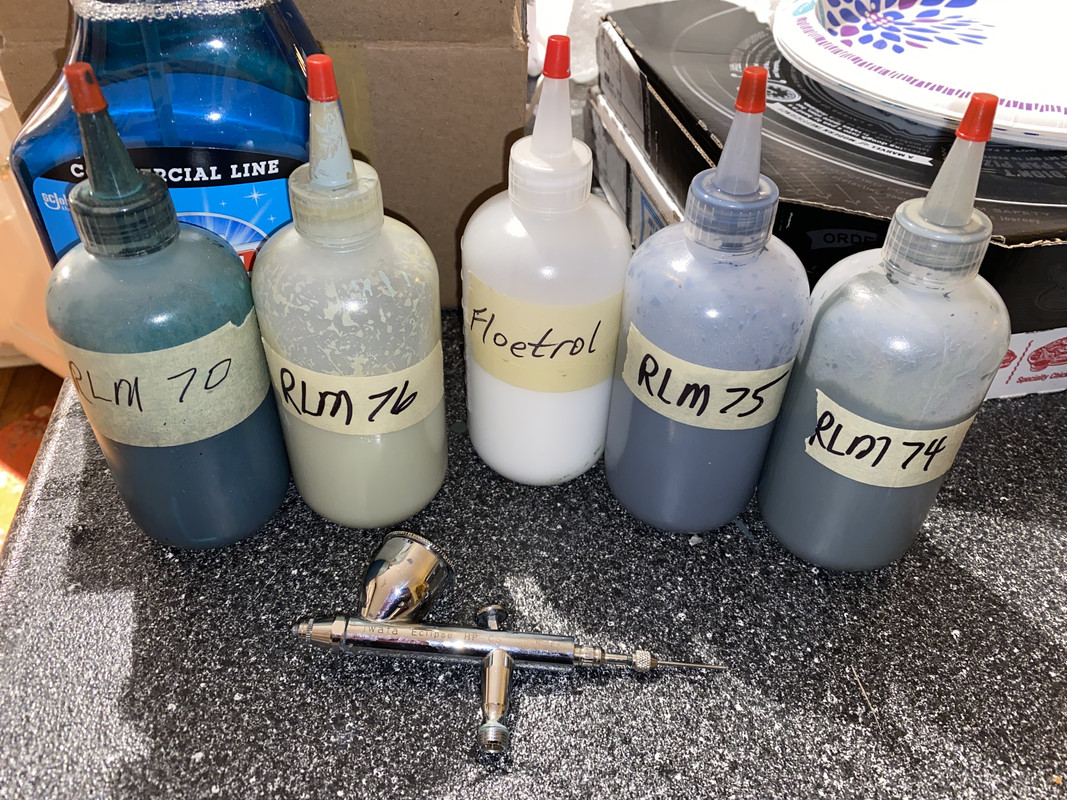
For airbrushing, I mix 4 oz of paint, 1.5 oz of Windex, and 1oz of Floetrol (storing the mixture in an 8-oz squeeze bottle with two 3/16” nuts for agitation) and it airbrushes beautifully. The color-matched RLM 76 is a near perfect match to the stock paint. Floetrol is a flow stabilizer for acrylic and latex paint. It helps the latex flow better through the airbrush and not clog up the nozzle. The downside to using Floetrol is that it significantly increases the cure time of the latex paint. Although, I like paint with fast cure times, I’m willing to accept the longer cure time (hours, instead of minutes, to be able to handle).
I probably could have gotten away with simply over-painting the polka dots, but I’m going to be changing the dorsal surfaces to an RLM 70 and 75 pattern. I am planning to leave the wings and horizontal stab alone.
The decals are vinyl and they pull up easily, but they will pull the paint off with them. I did no extra clean up, nor did I use primer. I went straight to RLM 76 topcoat.
Leave a comment:
-
Yes value is totally independent to cost. So far I haven’t replaced anything on the HK FW, but I’ve only flown one flight !! :)
interesting observation about your MiG-17. I’ve got maybe a 100 flights non mine and have replaced nothing and had no quality issues. Original servos, fan, ESC, retracts and modules...Leave a comment:
-
I bought a second hand hobbyking 190,,, was clear all servos had been replaced.. typical of hking gear did not work... flew very well... but at times 200 bucks. Is cheap by the time u replace so much stuff... found that out,,, with my mig 17Originally posted by Evan D View Post
Leave a comment:
Leave a comment: