Motion RC Gift Cards - The Perfect Gift!

You must Sign-in or Register to post messages in the Hobby Squawk community
Registration is FREE and only takes a few moments

Register now

Announcement

Collapse
No announcement yet.

Official Black Horse Spitfire 2000mm ARF Discussion Thread

Collapse
X
Collapse
First Prev Next Last
 
  • Filter
  • Time
  • Show
Clear All
new posts

  • Originally posted by Terminater007 View Post
    was on the worldhobbies.com.au website , must be the 2020 built ones.
    its probably a misprint , if you read the fine print on the actual contents it says nothing about electric retracts.

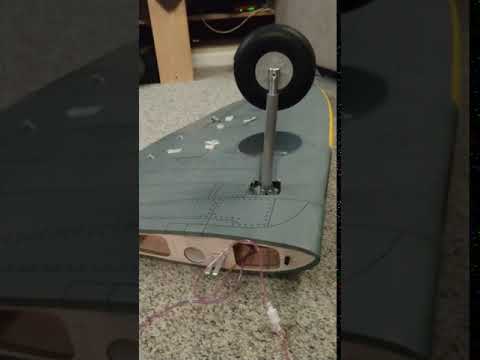
    INCLUDED AIR RETRACTABLE LANDING GEAR.
    AIR UP, AIR DOWN WITH OLEO STRUTS.
    ALL BALSA – PLY WOOD CONSTRUCTION.
    COVERED IN A HEAT-SHRINK FILM

    Even the manual is the same rev. It doesn't come with electrics. If it did. I'm sure the price would be up another $200 or so.

    Everyone is so hung up o the retracts. Gotta look beyond that . Lol

    Comment


    • Originally posted by jasmiller View Post

      As is. I have the stock retracts installed, will post pictures soon. Not too difficult but the tubing is hard to work with.
      Thanks for the feedback jasmiller , I'm also going to do the same as you. Going to use the stock gears, but with robart valves.

      Do you have the full list of valves you used ???

      I decided to just use a wheel collar on one of the tube lines to slow the air down and thus offset the gears a bit.

      Comment


      • Hi Pilots

        I got me a second spitfire version 1 BH136, this is already with elektro setup,
        Turnigy Aurodrive 6374-192Kv and a Castle ICE2 HV120 A ESC, prop is Biela 18X10 3 blade.
        Former owner flew it with 10S5000 LIPO.
        It has some wing damage underside and I will repair it with invasion strips.
        Easy way to do see pic from jun 5th 1944...Click image for larger version  Name:	spitfire mkIX invasion stripes D-DAY 5 june 1944.jpg Views:	0 Size:	91.8 KB ID:	235027
        Click image for larger version

Name:	spitfire mkIX invasion stripes carf.jpg
Views:	953
Size:	29.3 KB
ID:	235030

        Comment


        • Another sexy plane on my wish list. Spitfire has always had a special place in my heart.
          sitting in one was an experience, so the fly a huge RC one would be very cool.

          Comment


          • I’ll look up the part number. I used the red valve. You can adjust air flow on the unit itself. Works great. I have in a few othe planes.

            Originally posted by sfmadmax View Post

            Thanks for the feedback jasmiller , I'm also going to do the same as you. Going to use the stock gears, but with robart valves.

            Do you have the full list of valves you used ???

            I decided to just use a wheel collar on one of the tube lines to slow the air down and thus offset the gears a bit.

            Comment


            • Originally posted by jasmiller View Post
              I’ll look up the part number. I used the red valve. You can adjust air flow on the unit itself. Works great. I have in a few othe planes.
              I have that part... See pics...

              I opened the retract box today, i'm not happy to see that they did not include a fill valve stem or cluck. I'm probably going to pick up the robart one at the hobby store tomorrow.


              So it took my almost 1 hour to figure out how to get this hard plastic tubing onto the stems. They were a complete pain, i'm not a fan and really tempted to toss everything out.
              I love those quick disconnects though. I'm sad that they don't work with the soft tubing.


              Click image for larger version  Name:	IMG_20200205_234634923_HDR.jpg Views:	0 Size:	110.6 KB ID:	235247


              The problem is , I would love to re-use the tank with the robart 1/8 tubing. However,

              The tanks stem is slightly bigger @ 3mm. so it will fit, it will stretch, and it will have a tenancy to slip off , unless its secured down somehow. I have to get creative on this, OR just buy the robart tank that has the stem that fits the 1/8th tubing. I'm trying to save $$$ where I can and re-use parts. so i'll try to spend some time and figure it out.

              Click image for larger version  Name:	IMG_20200205_235035980_HDR.jpg Views:	0 Size:	97.8 KB ID:	235244


              These robart parts, went together in less than 5 minutes.. a little ear wax and the tubes went right on the T connectors... and I locked them down with the Line Retainer Nuts, Tomorrow i'll go out and get the brass fittings , you're not supposed to use the retaining nuts on plastic, i just wanted to see how it worked out.

              Click image for larger version  Name:	IMG_20200205_234705441_HDR.jpg Views:	0 Size:	153.3 KB ID:	235245


              Here is a pic of the difference in tubing, robart on the left and stock tubing on the right. the pic aint that great.
              Click image for larger version  Name:	IMG_20200205_234813705_HDR.jpg Views:	0 Size:	121.2 KB ID:	235246

              So, good news is the Robart, 1/8th tubing will fit over the retract cylinders, again, need to secure it somehow as the retaining nuts won't work since it's not a robart part. I may go see if the hobby store has cylinders that would drop in.... will see.... more to come!

              Comment


              • I used stock tube from retracts and then Robart tube to connectors. Works great.
                Attached Files

                Comment


                • Connected

                  Comment


                  • I ended up going out and buying the rest of the Robart Parts , but used the stock retract cyclinders. Everything works great!

                    Comment


                    • Originally posted by jasmiller View Post
                      I used stock tube from retracts and then Robart tube to connectors. Works great.
                      I really like your PSI gauge, what brand / model is that?

                      Comment


                      • Originally posted by sfmadmax View Post

                        I really like your PSI gauge, what brand / model is that?
                        I bought it from Chief Aircraft, part number DW AG1PK. Air Gauge Single w/ Nut. $19.99.

                        Comment


                        • If you have the ability to 3D-print you may like to check out this collection with several Spitfire accessories: https://www.thingiverse.com/rcmodelstl/about
                          I printed out the exhaust stacks scaled up to 113%.
                          Click image for larger version

Name:	60306625072__9FE038DB-8B50-4FC8-97A7-0856D152890F.JPG
Views:	1035
Size:	68.8 KB
ID:	235978
                          Attached Files

                          Comment


                          • Just curious, I was planning on coating the interior with a poly urethane, Just curious what others are doing to protect the wood from any possible fuel.

                            Comment


                            • Originally posted by sfmadmax View Post
                              Just curious, I was planning on coating the interior with a poly urethane, Just curious what others are doing to protect the wood from any possible fuel.
                              Hi

                              I posted my build log at beginning of threat.
                              And yes I fly with fuel and I coated interior with PU lacquer.

                              grts Hans

                              Comment


                              • Horizontal stab is now attached. I cut off some covering on the top to help secure. There was a gap at the very rear so I have a clamp for compression.

                                the push rod for the rudder is too short. I had to order additional push rods. Elevator is good.

                                Not much left now. Get fuel tank installed, break in engine, mount and fly. I’ll take some additional photos of my set up using a power box and spark box.
                                Attached Files

                                Comment


                                • Originally posted by jasmiller View Post
                                  Horizontal stab is now attached. I cut off some covering on the top to help secure. There was a gap at the very rear so I have a clamp for compression.

                                  the push rod for the rudder is too short. I had to order additional push rods. Elevator is good.

                                  Not much left now. Get fuel tank installed, break in engine, mount and fly. I’ll take some additional photos of my set up using a power box and spark box.
                                  Had same issue with rudder rod. Try turning the servo around with spline facing rear, just managed to get it to fit in length.

                                  Comment


                                  • Motor mounted.Click image for larger version

Name:	IMG_0304.jpg
Views:	860
Size:	129.4 KB
ID:	236823

                                    Comment


                                    • Originally posted by downwind3zero View Post
                                      Motor mounted.Click image for larger version

Name:	IMG_0304.jpg
Views:	860
Size:	129.4 KB
ID:	236823
                                      What's your motor/esc combo?

                                      Comment


                                      • Espritmodel Elite 35cc, Elite 125A, 12S.

                                        Comment


                                        • Processed 3D-print of stacks with pic of full scale original.Click image for larger version

Name:	IMG_0314.jpg
Views:	836
Size:	113.0 KB
ID:	237038

                                          Comment

                                          Working...
                                          X