You must Sign-in or Register to post messages in the Hobby Squawk community
Registration is FREE and only takes a few moments

Register now

Announcement

Collapse
No announcement yet.

Official 3DP Thread

Collapse
X
Collapse
First Prev Next Last
 
  • Filter
  • Time
  • Show
Clear All
new posts

  • Originally posted by Gilatrout View Post

    Here is my Lack enclosure. I embedded IKea LED puck lights in the top. There is also a smoke detector just in case.

    Also the space between the legs is exactly 19inches so standard A/V and computer rack mounted gear can be attached. I added a shelf holding an old Surface 1 computer and a pull out keyboard below to drive updates etc.
    That's a nice setup Gilatrout. I am sure that I have a spare 19" rack mount drawer (or sliding version) for a Surface. I may just put in a rasberry Pi Zero W so I can print direct from my PC. We will see.

    I am having a second attempt at printing PTEG, as my first attempt I read that it may be super stuck to the bed so use windex instead. Well all that did was peel from the bed. That was a learning exercise. I had to use acetone to bring the print bed back to normal. Things are going much better the 2nd time :-)

    Comment


    • Originally posted by slamdance64 View Post

      That's a nice setup Gilatrout. I am sure that I have a spare 19" rack mount drawer (or sliding version) for a Surface. I may just put in a rasberry Pi Zero W so I can print direct from my PC. We will see.

      I am having a second attempt at printing PTEG, as my first attempt I read that it may be super stuck to the bed so use windex instead. Well all that did was peel from the bed. That was a learning exercise. I had to use acetone to bring the print bed back to normal. Things are going much better the 2nd time :-)
      I generally prefer PETG these days. Some thermal resistance, but still fairly easy to print.

      I'll have to try the Windex thing because if the print cools it's almost impossible to remove from the bed.

      One thing I didn't mention is I have a foam mat under the printer to dampen vibrations. Just a simple black craft foam rectangle I got from Hobby Lobby. You can find it in the kids crafts section there.

      Right now I'm working on a charging case that uses both 3D printed and laser cut parts. It's coming out really nicely. I should start a thread on it. I've also recently made a scaleish pitot tube for the big Carbon Z Cessna I'm repainting. It's plumbed for the Spektrum airspeed telemetry module, but I haven't decided to include the module in the finished plane.

      Comment


      • Well, I am having no problems printing with PETG now. I think that it will be my go to as well. I will be printing my cockpit set for my A-10 from DirtyDee in PETG in between our OpenRC F1 cars.
        I will try to fit in a MiG-15 part or two as well.

        Comment


        • 8 of 12 printed and glued together

          Comment


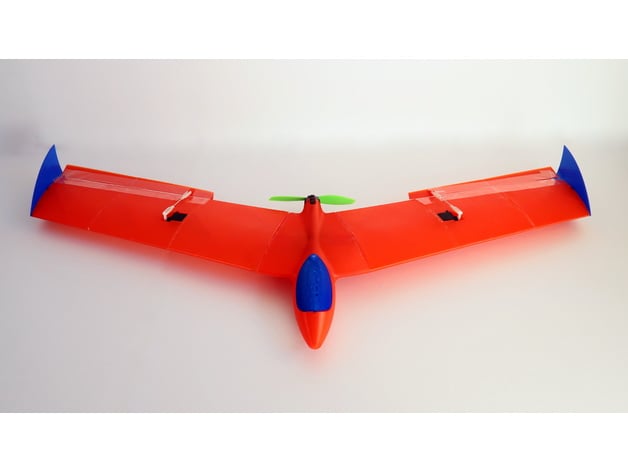
          • Printed a few silly little chuck gliders... Now trying an RC flying wing

            DISCLAIMER: I highly recommend that you have experience with flying model aircraft. This is NOT a beginner plane and will most like end in a failure if you are not familiar with flying model aircraft. Fly at your own risk. Short build and flight video: https://www.youtube.com/watch?v=p39iE-oc5M8 The CG position is marked on the bottom of the fuselage with 2 circle cut outs. Plane specifications: Wingspan - 95cm Root chord - 16.3cm Tip chord - 11.5cm Sweep angle - 15 degrees Dry weight (no battery) - 468g Flying weight - 670g The CG position is marked on the bottom of the fuselage with 2 circle cut outs. General Print settings: Material - PLA (1.75mm) Nozzle diameter - 0.4mm Wall thickness - 0.5mm Layer height - 0.2mm Print settings for the wing sections: Temperature - 215 degrees Celcius Print speed - 25-30mm/s Cooling fan - off Infill - 0% Top layers - 0 Bottom layers - 1 (for bed adhesion) Outer layers - 1 Print settings for other parts: Temperature - 200 degrees Celcuis Print speed - 60mm/s Cooling fan - on Infill - 15% Top layers - 3 Bottom layers - 3 Outer layers - 2 NOTE, the fuselage and canopy will require supports. I printed the canopy with the motor mount on the bed and supports from the bed to the rear of the wing. The canopy will require support for the overhang in the center and for the small tab. All other parts can be printed without support. Electronics: ESC (x1) - http://ubuyadrone.com/ubad-30a-angry-beast-mini-esc/ 5V Regulator (x1) - https://www.banggood.com/10Pcs-Mini-DC-Adjustable-Power-Supply-Buck-Module-Step-Down-Module-p-999753.html?p=LT0710618750201406EK Servos (x2) - http://www.banggood.com/TowerPro-MG90D-13g-Metal-Gear-Digital-Servo-for-RC-Models-p-982060.html?rmmds=searchLT0710618750201406EK Motor (x1) - http://www.banggood.com/Emax-RS2205-2300-Racing-Edition-CWCCW-Motor-For-FPV-Multicopter-p-1028793.html?rmmds=searchLT0710618750201406EK Battery (x1) - http://www.banggood.com/XF-Power-14_8V-1800MAH-4S-45C-Lipo-Battery-XT60-Plug-p-1059100.html?rmmds=searchLT0710618750201406EK Other parts: Propeller (x1) - http://www.banggood.com/2-Pairs-DALPROP-J6045-PC-Propeller-CW-CCW-For-QAV250-ZMR250-280-300-RC-Multirotors-p-1056439.html?p=LT0710618750201406EK Glue Medium CA (x1) - https://hobbyking.com/en_us/hobbyking-super-glue-ca-50g-1-7oz-medium.html Canopy Magnets (x1 set of 10pcs)- https://hobbyking.com/en_us/strong-rare-earth-button-magnets-10pcs-set.html Push Rods (x2) - https://hobbyking.com/en_us/nylon-clevis-20mm-original-color-10pcs.html Push rod clevis (x4)


            The nose has started printing.
            I might have a printed plane in about a week...

            FF gliders and rubber power since 1966, CL 1970-1990, RC since 1975.

            current planes from 1/2 oz to 22 lbs

            Comment


            • Originally posted by rifleman_btx View Post
              8 of 12 printed and glued together
              RM, Lookin' Good. Have you printed the canopy parts? I bought a neutral or clear and printed it, but will need to find a matching silver or grey to paint the fuse portion of the canopy parts. What's your plan? Best, LB
              I solemnly swear to "over-celebrate" the smallest of victories.
              ~Lucky B*st*rd~

              You'll never be good at something unless you're willing to suck at it first.
              ~Anonymous~

              AMA#116446

              Comment


              • Originally posted by Elbee View Post

                RM, Lookin' Good. Have you printed the canopy parts? I bought a neutral or clear and printed it, but will need to find a matching silver or grey to paint the fuse portion of the canopy parts. What's your plan? Best, LB
                Silver paint is a problem...

                most of the good metallics are not water based, so the common recommendation of Home Dept sample latex will not work. Color match is pretty much not going to happen.

                Metallics also amplify all defects.

                So I'd plan on a sandable automotive primer, wet sand it smooth then a good metalic spray paint.

                My 3D prints in silver PLA (looks more like aged aluminum with the grey patina that develops) have a different color appearance just by changing orientation of the print. Metallics are that sensitive.
                FF gliders and rubber power since 1966, CL 1970-1990, RC since 1975.

                current planes from 1/2 oz to 22 lbs

                Comment


                • Originally posted by fhhuber View Post

                  Silver paint is a problem...

                  most of the good metallics are not water based, so the common recommendation of Home Dept sample latex will not work. Color match is pretty much not going to happen.

                  Metallics also amplify all defects.

                  So I'd plan on a sandable automotive primer, wet sand it smooth then a good metallic spray paint.

                  My 3D prints in silver PLA (looks more like aged aluminum with the grey patina that develops) have a different color appearance just by changing orientation of the print. Metallics are that sensitive.
                  FHH, That is precisely why I was asking. I do like your idea about priming and THEN painting the clear parts and I also like the finish of the silver PLA. Thank you. Best, LB
                  I solemnly swear to "over-celebrate" the smallest of victories.
                  ~Lucky B*st*rd~

                  You'll never be good at something unless you're willing to suck at it first.
                  ~Anonymous~

                  AMA#116446

                  Comment


                  • Silver paint also has a really hard time covering other colors. Worst coverage of any paint color. I'm repainting a Dynam P-51 and its taking several coats to cover white places the foam shows through the old silver. Each coat on the old silver makes it more solid... so the defect keeps showing as thinner paint than the surrounding area.
                    FF gliders and rubber power since 1966, CL 1970-1990, RC since 1975.

                    current planes from 1/2 oz to 22 lbs

                    Comment


                    • FHH, that is why I use black primer if I am painting an airframe for the first time. I like the way silver or any metallic paint looks on black though if one is color matching or repairing, I see your point that could be a problem. Best, LB:Cool:
                      I solemnly swear to "over-celebrate" the smallest of victories.
                      ~Lucky B*st*rd~

                      You'll never be good at something unless you're willing to suck at it first.
                      ~Anonymous~

                      AMA#116446

                      Comment


                      • Black primer is a must on metallic finished airframes, or else you get so much variance, it drives you to drink Marker's Mark..... Oh wait... That is why there are imperfections!!! :P:P:Cool::Cool::Cool::Cool::Scared:

                        Comment


                        • Got the nose done.
                          Just that part... almost 7 hours

                          Started the main fuselage


                          Click image for larger version  Name:	20190427_095105.jpg Views:	0 Size:	72.4 KB ID:	192028

                          Click image for larger version  Name:	20190427_095059.jpg Views:	0 Size:	63.8 KB ID:	192027
                          FF gliders and rubber power since 1966, CL 1970-1990, RC since 1975.

                          current planes from 1/2 oz to 22 lbs

                          Comment


                          • Originally posted by Hardway View Post
                            Black primer is a must on metallic finished airframes, or else you get so much variance, it drives you to drink Marker's Mark..... Oh wait... That is why there are imperfections!!! :P:P:Cool::Cool::Cool::Cool::Scared:
                            HRDWY, Great to read your voice LOL hope all is well in your part of the Texas. Best to you and yours, LB
                            I solemnly swear to "over-celebrate" the smallest of victories.
                            ~Lucky B*st*rd~

                            You'll never be good at something unless you're willing to suck at it first.
                            ~Anonymous~

                            AMA#116446

                            Comment


                            • I'm in the process of priming my parts.Cant wait to see how much smoother they will be on the second coat.

                              Comment


                              • Originally posted by Elbee View Post

                                RM, Lookin' Good. Have you printed the canopy parts? I bought a neutral or clear and printed it, but will need to find a matching silver or grey to paint the fuse portion of the canopy parts. What's your plan? Best, LB
                                Yes sir i did, im going to just go with black for the canopy glass... i know, easy way out. But i didnt want to change filament midstream jinxing my progressLOL

                                Comment


                                • Originally posted by Dirty Dee View Post
                                  I'm in the process of priming my parts.Cant wait to see how much smoother they will be on the second coat.
                                  Wooohoo! Looking great brother!:Cool:

                                  Comment


                                  • Very cool looking Rifleman! It's pretty big when put together. I am ready to start my MiG-15 tomorrow night. I was just waiting for some new PLA material to arrive which it did today :-)

                                    Comment


                                    • hey guys just finished watchin a motian video,, jeremy solt painted an L39... 6 months old sorry// he did an awsome job.. but am i the only one who hates the extreme shine,,, 4 me i like a flat finish.. never been to an airshow here with polished waxed warbirds.., u can get matt clears,, they do protect the the surface... im an auto painter.... one more thing any house hold masking tape has low tak,,( NO PEEL BACK) use thinner tape and add a little masking paper ,,, or newspaper its free happy painting ..one last thing if u wana save weight,, there r many thin lightweight ,, adhesion promoters available,, auto trade dupont etc.. only light coat req again happy flying

                                      Comment


                                      • Fuselage is complete, got the left drop tank printed, printing the right one overnight. Just ordered all the electronics 87% of which from motion, 10 servos, esc and 12 blade fan. Ordered retracts through hobby king, and reciever off Amazon. Going to have 3 completed projects done before i get my motors for my pby, and the print, radio program, escs and servos are all set ready to go. :Angry:

                                        Comment


                                        • It's a beast isn't it? Mine is not quite as far along as yours.

                                          Comment

                                          Working...
                                          X