You must Sign-in or Register to post messages in the Hobby Squawk community
Registration is FREE and only takes a few moments

Register now

Announcement

Collapse
No announcement yet.

Official FlightLine RC 1600mm Spitfire Mk. IX Thread

Collapse
X
Collapse
First Prev Next Last
 
  • Filter
  • Time
  • Show
Clear All
new posts

  • Do you do anything to the decals to dull them?? That was one issue I had when doing my Grumman cats with callie graphics was the gloss on them. I did something similar as you allowing the run burns to fade onto the decal themselves, then shaded panel lines over the top of the decal as best I could.
    Current Fleet: Flightline Tigercat, Flightline Bearcat, Eflite Corsair, ESM Skyraider, Pilot RC Yak-54 30%:corsair

    Comment


    • Originally posted by spec450 View Post
      Do you do anything to the decals to dull them?? That was one issue I had when doing my Grumman cats with callie graphics was the gloss on them. I did something similar as you allowing the run burns to fade onto the decal themselves, then shaded panel lines over the top of the decal as best I could.
      I spray clear flat or satin over them to dull the shine.

      Comment


      • Originally posted by Pogo View Post

        I did a full cockpit and sliding canopy on my TopFlite P-47 about 5 years ago and replaced the pilot figure with one of these Warbird Pilots last year. As Alpha said, the realism of these figures just can't be beat and though expensive are well worth it, I think.
        As the Jug is about 1/7.5 scale this guy is a tad large but should be just right for the 1/7 Spitfire.:Cool: I'll probably begin this week and will try to document the process as it goes along. I'll use this guy out of the Thunderbolt for sizing as I haven't got his British counterpart on hand yet.
        At the moment I'm waiting not so patiently for my family to wake up so the gift opening can begin and I can unbox the Spit Santa brought me!
        Happy Holidays guys!
        Tom
        So here he is shoehorned in- removing the cockpit floor down to the pushrod tubes gains about 20mm, otherwise the figure would have to be cut at the waist. I wanted to retain the legs and all the cotton stuffing has been removed from his butt to get him as low as possible- this was necessary to fit him into the P-47 as well.
        Tom

        Comment


        • Work on the sliding canopy and door is coming along- plastic wiper blade tracks were cut down for the canopy rails and the rubber wiper blades themselves were trimmed and bonded to the roughened canopy sides with Goop adhesive. The door is hinged with cut down nylon units and closes with a nice "thunk" thanks to the installed magnets. It's all looking pretty rough right now but with some detailing and paint should be OK.
          Tom

          Comment


          • Originally posted by Ryan@Motion/ryramZ View Post

            I spray clear flat or satin over them to dull the shine.
            Same here, the clear coat helps to seal the decals on as well as giving you that nice flat surface sheen.
            While I'm thinking about it, has anyone ever removed the 'hubs' that sit beside the cannon?
            I'm debating on whether I want to or not as it gives me the option to install the cannons or fly with out. When flying without, I'll put some red tape over the cannon hole.
            Team Gross!

            Comment


            • So, I inadvertently found a very scale looking retract setting. The blue box has three different gear retraction sequences, I plugged one retract into the door mechanism plug and the other into the regular retract plug. The result is that one gear goes up then the other, looks very scale-like. Anyone else doing that??

              Grossman56
              Team Gross!

              Comment


              • I did a new instrument panel today, using the old panel as a template onto a piece of sheet "glass and then drilled holes for the instruments. I used some of the ones from the stock paper panel and some others I had and added some styrene switches etc. The instrument faces were daubed with epoxy to simulate glass.
                Tom

                Comment


                • Happy New Year https://photos.app.goo.gl/HdyK3icG8QTrktC02

                  Comment


                  • :)

                    Comment


                    • Happy New Year everyone! Some progress pics of the cockpit....
                      Tom

                      Comment


                      • Hi Pogo ,these Spit's cabin crossover , show that you have a design talent...all kudos.

                        Comment


                        • Originally posted by Pogo View Post
                          Happy New Year everyone! Some progress pics of the cockpit....
                          Tom
                          Amazing work Pogo! Excited to see it complete.

                          Comment


                          • Thanks guys- appreciate it!
                            Tom

                            Comment


                            • I have finally Built My aircraft and put all the decals on it. Does anyone have any recommendation of some sort of coating I can put on it to seal the paint and decals. I put a decal in the wrong spot and ended up having to move it. It took some paint with it however RAF colors are easy to come by in the model paint world. I have a friend that prints monograms and is making me a shark's mouth to go on the front of the airplane I think that will look pretty cool. I keep seeing little post here and there about sealing paint and stickers on foam aircraft. I just need find out what works for sure and will not have any negative effects to the aircraft

                              Comment


                              • Originally posted by BrandonTW82 View Post
                                I have finally Built My aircraft and put all the decals on it. Does anyone have any recommendation of some sort of coating I can put on it to seal the paint and decals. I put a decal in the wrong spot and ended up having to move it. It took some paint with it however RAF colors are easy to come by in the model paint world. I have a friend that prints monograms and is making me a shark's mouth to go on the front of the airplane I think that will look pretty cool. I keep seeing little post here and there about sealing paint and stickers on foam aircraft. I just need find out what works for sure and will not have any negative effects to the aircraft
                                Varathane water based spar varnish.

                                Comment


                                • Originally posted by BrandonTW82 View Post
                                  I have finally Built My aircraft and put all the decals on it. Does anyone have any recommendation of some sort of coating I can put on it to seal the paint and decals. I put a decal in the wrong spot and ended up having to move it. It took some paint with it however RAF colors are easy to come by in the model paint world. I have a friend that prints monograms and is making me a shark's mouth to go on the front of the airplane I think that will look pretty cool. I keep seeing little post here and there about sealing paint and stickers on foam aircraft. I just need find out what works for sure and will not have any negative effects to the aircraft
                                  The most prominently used paint and decal sealer/protector is the water based polyurethanes like Minwax Polycrylic
                                  Warbird Charlie
                                  HSD Skyraider FlightLine OV-10 FMS 1400: P-40B, P-51, F4U, F6F, T-28, P-40E, Pitts, 1700 F4U & F7F, FOX glider Freewing A-6, T-33, P-51 Dynam ME-262, Waco TF Giant P-47; ESM F7F-3 LX PBJ-1 EFL CZ T-28, C-150, 1500 P-51 & FW-190

                                  Comment


                                  • Had to be done..........short and sweet but rings a bell for me from a long tome ago ................
                                    Grossman56
                                     
                                    Team Gross!

                                    Comment


                                    • That's some fine work there Gman just beautiful.

                                      Comment


                                      • Thanks Farm, if the old adage 'if they look good they'll fly good' is true, she'll be sweet in the air. This one's been a dream since I was a kid, now here I am. Can't wait 'til Spring, but I guess I'll have to. So many toys to play with. The Spitfire, the P-40 with 6s, the re-engined Tigercat (more to come on that)
                                        Gonna be a great year!!

                                        Grossman56
                                        Team Gross!

                                        Comment


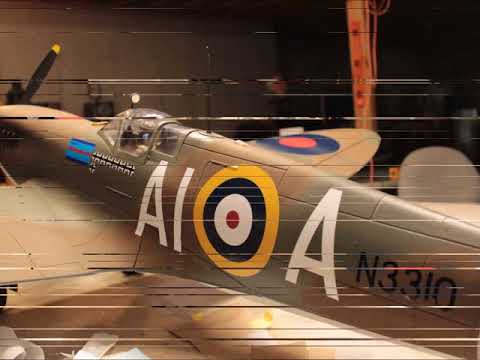
                                        • If it isn't becoming obvious to you Squawkers, it's a beautiful sunny covered-with-snow-so-you-can't-fly day here in Cody. So, I'm keeping myself occupied. Traditionally, all new planes have a photo session on the back porch, so I took here out for hers....
                                          Click image for larger version  Name:	IMG_1966.JPG Views:	1 Size:	203.7 KB ID:	112050Click image for larger version  Name:	IMG_1967.JPG Views:	1 Size:	183.1 KB ID:	112051Click image for larger version  Name:	IMG_1968.JPG Views:	1 Size:	211.1 KB ID:	112052Click image for larger version  Name:	IMG_1970.JPG Views:	1 Size:	181.5 KB ID:	112053Click image for larger version  Name:	IMG_1971.JPG Views:	1 Size:	166.8 KB ID:	112054
                                          As you can see, the bottom is still plain white as I'm missing one roundel on the starboard side. A little gunsmoke and some paint chips in the wheel wells (what you see is just white) and I have to get the carb intake screen painted black. Too bad that the intake isn't functional.
                                          BTW, I know there should be 8 gun ports, but with the funky hub from the cannon still there, it was going to look Mickey, so cut me some slack. Once the painting is done, I'll go over her with some flat clear acrylic Minwax.

                                          Grossman56
                                          Team Gross!

                                          Comment

                                          Working...
                                          X