You must Sign-in or Register to post messages in the Hobby Squawk community
Registration is FREE and only takes a few moments

Register now

Announcement

Collapse
No announcement yet.

Freewing 80mm A-10 Modifications

Collapse
X
Collapse
First Prev Next Last
 
  • Filter
  • Time
  • Show
Clear All
new posts

  • RCjetdude
    replied
    I finally completed my Euro Green A-10. The finishing touches were crxmanpat's ordnance decals.

    Click image for larger version

Name:	20170624_120953.jpg
Views:	810
Size:	79.5 KB
ID:	83104

    I am posting a list of the things I did to it on the first page and will be getting back to the canopy mod to try and finish documenting it. Clearly it is one of the most striking features of the plane.

    Leave a comment:


  • RCjetdude
    replied
    Finished them off with some Stainless Steel paint.

    Click image for larger version

Name:	20170625_221551.jpg
Views:	750
Size:	51.0 KB
ID:	83100

    Leave a comment:


  • sam51401
    replied
    Here is a link to 4 ea. 6"x 6" sheets of .062 aluminum to make several sets of nose plates.

    Leave a comment:


  • T-CAT
    replied
    Originally posted by RCjetdude View Post
    And the other side as well....

    Click image for larger version

Name:	20170625_201958.jpg
Views:	824
Size:	50.5 KB
ID:	83079

    Click image for larger version

Name:	20170625_202015.jpg
Views:	799
Size:	57.3 KB
ID:	83080
    Muchhhhhhh better!!! That's how it's done right there.

    Leave a comment:


  • TiredIronGRB
    replied
    Originally posted by RCjetdude View Post
    And the other side as well....

    Click image for larger version

Name:	20170625_201958.jpg
Views:	824
Size:	50.5 KB
ID:	83079

    Click image for larger version

Name:	20170625_202015.jpg
Views:	799
Size:	57.3 KB
ID:	83080
    Awesome sause!

    Leave a comment:


  • TiredIronGRB
    replied
    Originally posted by sam51401 View Post
    I just seen you caption that you used the "stock" plate as additional reinforcement.

    Since im not an A&P any longer, where is a good source for 5052 T6 aluminum?
    I usually get it on ebay.

    Leave a comment:


  • RCjetdude
    replied
    And the other side as well....

    Click image for larger version

Name:	20170625_201958.jpg
Views:	824
Size:	50.5 KB
ID:	83079

    Click image for larger version

Name:	20170625_202015.jpg
Views:	799
Size:	57.3 KB
ID:	83080

    Leave a comment:


  • RCjetdude
    replied
    90mm nacelles. Working on a more scale looking exhaust.

    Click image for larger version  Name:	20170625_195639.jpg Views:	1 Size:	57.9 KB ID:	83074

    Click image for larger version  Name:	20170625_195633.jpg Views:	1 Size:	48.0 KB ID:	83075

    Click image for larger version

Name:	20170625_200423.jpg
Views:	811
Size:	53.9 KB
ID:	83076

    Leave a comment:


  • sam51401
    replied
    I just seen you caption that you used the "stock" plate as additional reinforcement.

    Since im not an A&P any longer, where is a good source for 5052 T6 aluminum?

    Leave a comment:


  • sam51401
    replied
    George, Is the plate you made a replacement for the one that is installed? I can see how the additional thickness will help as i bent mine that was installed stock. When you say that the travel is 45 degrees, im not catching on to a visual limit of 45 deg. that you are talking about. Just looking for some clarification.
    Sam

    Leave a comment:


  • RCjetdude
    replied
    Originally posted by Pogo View Post
    Thanks for taking the time to do this, George! I'll be copying your nose gear mod as mine didn't work out and that strut flopping around really bothers me.
    Tom
    It works great. I had about 1/2" of forward-back movement on mine and now2 it is less than 1/4" but the nice thing about it is that the trunion is now supported from moving back by a metal plate instead of the plastic housing.

    Leave a comment:


  • Pogo
    replied
    Thanks for taking the time to do this, George! I'll be copying your nose gear mod as mine didn't work out and that strut flopping around really bothers me.
    Tom

    Leave a comment:


  • TiredIronGRB
    replied
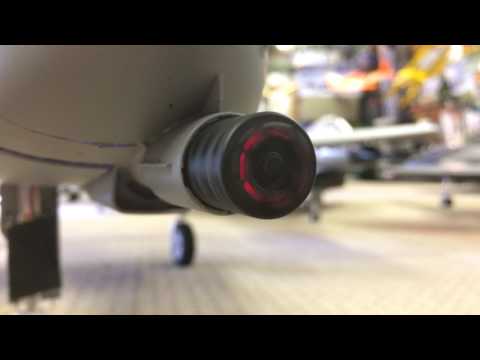
    Here's the cannon mod, used an LX retract motor, some clear red Lexan tube, a Freewing P-51 LED controller and a cardboard tube a drill bit came in to make a rotating "lit-up" cannon.

    Click image for larger version

Name:	20170609_170002353_iOS.jpg
Views:	856
Size:	134.8 KB
ID:	82933

    Click image for larger version

Name:	20170603_205758910_iOS.jpg
Views:	812
Size:	149.9 KB
ID:	82936

    Click image for larger version

Name:	20170609_193351552_iOS.jpg
Views:	814
Size:	175.5 KB
ID:	82935

    Click image for larger version

Name:	20170609_192934912_iOS.jpg
Views:	809
Size:	83.2 KB
ID:	82934

    Leave a comment:


  • TiredIronGRB
    replied
    I'm copied my other mods here as well, this little mod lets you remove and replace the cockpit with one hand. I made an angled skid out of plastic and reinforced the bottom section with a piece of foam then made a new, larger "vane" to lift it with.

    Click image for larger version

Name:	20170625_155451000_iOS.jpg
Views:	843
Size:	79.6 KB
ID:	82930

    Leave a comment:


  • TiredIronGRB
    replied
    Originally posted by RCjetdude View Post
    George, thanks for the nose gear mod. Very ingenious. You should throw some pictures of it up here.
    Sorry, I'm just getting caught up...

    This is what I did you take the slack out of the nose gear and will work on the mains once they need it. I used .062 5052 aluminum sheet and cut an additional retract plate that's 1mm shallower which limits travel to 45 degrees.

    Click image for larger version

Name:	20170625_192053825_iOS.jpg
Views:	796
Size:	115.2 KB
ID:	82927

    Use the stock plate on top of the new one for extra strength.

    Click image for larger version

Name:	20170625_193631731_iOS.jpg
Views:	847
Size:	94.8 KB
ID:	82926

    I also ran a wire tie around the end of the retract to strengthen it some, just had to drill one hole and ran it through it and the slot for the battery strap.

    Click image for larger version

Name:	20170625_155409000_iOS.jpg
Views:	830
Size:	129.9 KB
ID:	82928

    Leave a comment:


  • RCjetdude
    replied
    Well, so far I have heard no reports of anybody putting one together with 90's. I would love to know it that has been done and how it flies because I am going to go for it on my second. I am thinking of running a pair of the 1550kV 6S 12 blade fans on 5S and go with higher mAh packs. Possibly a pair of the Roaring Top 5S 70C 6600 mAh saddle packs. Anybody ever try anything similar? Thoughts? I have both 80A and 150A ESC's I could utilize but will test to determine which. My second Hawg will be here tomorrow. Somehow I have got to tame my inner modder.... :)Is there a Modder Intervention hot-line or Modders Anonymous perhaps? LOL

    Are you smellin' what I'm steppin' in?

    Click image for larger version

Name:	20170625_090259.jpg
Views:	789
Size:	53.4 KB
ID:	82870

    Leave a comment:


  • Pogo
    replied
    Originally posted by RCjetdude View Post

    Yes, but I will let George describe it. Didn't I see somewhere that you did a mod to reduce slop or was that someone else?
    Yes, but it didn't work. The little brass shim bonded to the trunion came unbonded- JB Weld let me down.:Angry:
    Tom

    Leave a comment:


  • RCjetdude
    replied
    Originally posted by Pogo View Post

    I've missed this mod- is it to reduce slop in the nose gear?
    Tom
    Yes, but I will let George describe it. Didn't I see somewhere that you did a mod to reduce slop or was that someone else?

    Leave a comment:


  • Pogo
    replied
    Originally posted by RCjetdude View Post
    George, thanks for the nose gear mod. Very ingenius. You should throw some pictures of it up here.
    I've missed this mod- is it to reduce slop in the nose gear?
    Tom

    Leave a comment:


  • Pogo
    replied
    Originally posted by T-CAT View Post
    Hahahaha, he's totally Flinstoning it up. Who needs EDF's when you have legs.
    Feets don't fail me now!:)
    Tom

    Leave a comment:

Working...
X